Welcome to a journey into our Universe with Dr Dave, amateur astronomer and astrophotographer for over 40 years. Astro-imaging, image processing, space science, solar astronomy and public outreach are some of the stops in this journey!
The Veil Nebula is a cloud of heated and ionized gas and dust in the constellation Cygnus.
It constitutes the visible portions of the Cygnus Loop, a supernova remnant, many portions of which have acquired their own individual names and catalogue identifiers. The source supernova was a star 20 times more massive than the Sun which exploded between 10,000 and 20,000 years ago.
Supernovae can expel several solar masses of material at speeds up to several percent of the speed of light. This drives an expanding shock wave into the surrounding interstellar medium, sweeping up an expanding shell of gas and dust observed as a supernova remnant. Supernovae are a major source of elements in the interstellar medium from oxygen to rubidium.
At the time of the explosion, the supernova would have appeared brighter than Venus in the sky, and visible in the daytime! The remnants have since expanded to cover an area of the sky roughly 3 degrees in diameter (about 6 times the diameter, and 36 times the area, of the full Moon).
The area of the nebula pictured here, also known as NGC 6960, is the “western” portion. At the top of the image is the filamentary segment often called the “Witch’s Broom”. The image records narrowband signal from the 3 ionized gases: hydrogen alpha (red), hydrogen beta (blue), doubly ionized oxygen (teal).
Capture info: Location: SkyPi Remote Observatory, Pie Town NM US Telescope: Orion Optics UK AG14 (F3.8) Mount: 10 Micron GM3000 Camera: SBIG STXL 16200 Data: H-alpha, H-beta, OIII: 6.5, 6, 7 hours respectively Processing: Pixinsight
The entire Cygnus Loop imaged by the orbiting space telescope Galaxy Evolution Explorer or Galex which images the universe in ultraviolet wavelengths. The Eastern and Western Veil are the main portions which can be easily seen in the visible portion of the spectrum. (Courtesy Wikipedia).
The 3 “narrow band” filters used in the image were H alpha, H beta and Oxygen III or doubly ionized oxygen. These filters only allow a 5 nanometer segment of light to pass. Hydrogen alpha emits light in the red, oxygen in the green-blue and hydrogen beta in the blue. This accounts for the colors in the image.
Where is it? The Cygnus loop is in the region circled on the lower left. The constellation Cygnus (the swan) is easily recognized and is also known as the Northern Cross. It appears directly overhead during the Summer in the Northern Hemisphere. Right now you can see it there around 3am 🙂
The Great Eclipse of 2024 is now over and it is time to return to Deep Space! We traveled back to the remote observatory in Pie Town NM to install a new camera system in Gamma Complex.
It’s a 4 hour journey into the most remote regions of the Southwest US. It has been about 6 months since I had to make any “service trips” up there.
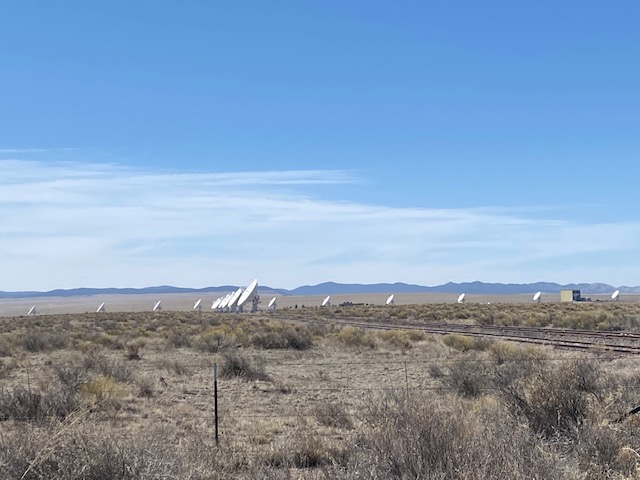
The VLA’s radio dishes stand at attention waiting for their next assignment!
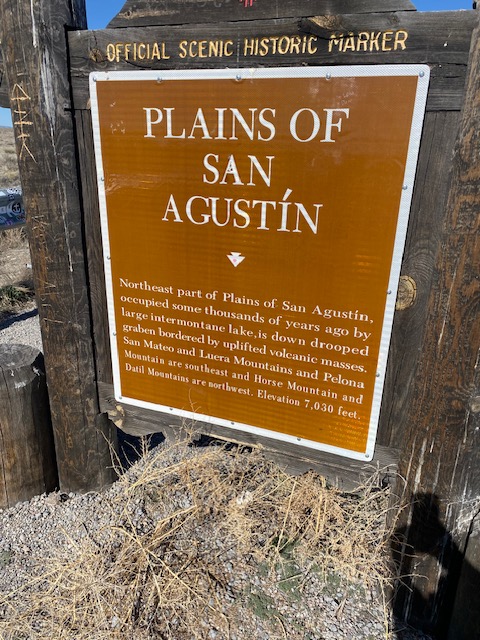
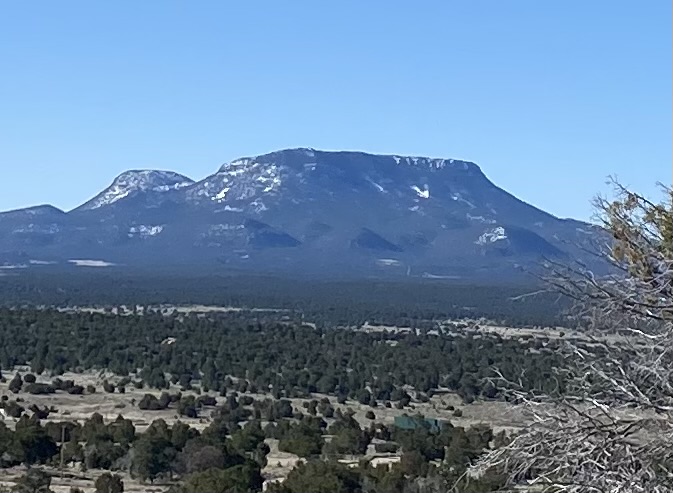
Our travels take us across the San Agustin Plains, an area covering about 55 miles in width. The basin, created by a prehistoric lake, is bounded on all sides by various mountain ranges. One of driest remote places in the continental US, what else would one do out here except study the distant universe? The plains are home to the VLA (very large array), part of the National Radio Astronomy Observatory. Twenty -eight radio dishes each 25 meters in diameter make up the Y-shaped array. Arid climate is absolutely essential as water molecules will cause significant aberrations in radio signal.
SkyPi Remote Observatory entrance with the mathematical “Pi” logo and surrounding pinyon trees.
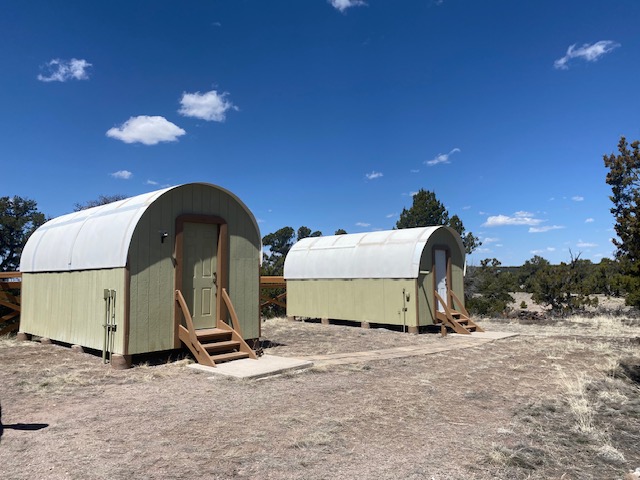
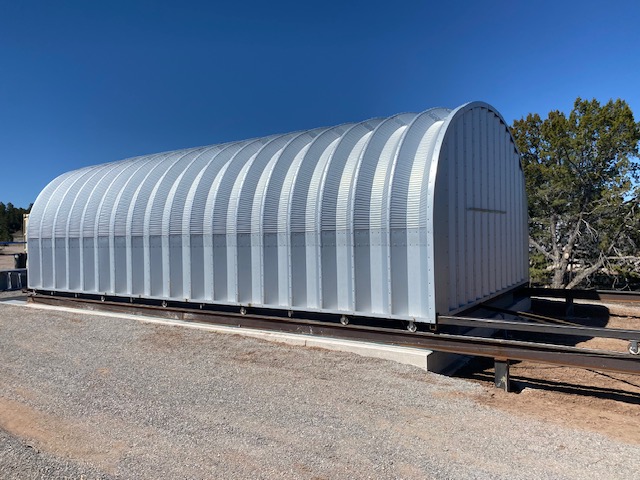
Another 60 miles west and we have arrived at our destination, SkyPi Remote Observatory, founded in 2012. The observatory complex is home currently to 5 roll-offs containing 8 telescope piers. They are named Alpha, Beta, Gamma, Delta and Omega (the owner has an aerospace background!). My equipment resides in Delta and Gamma. A 4-pier roll-off expansion is planned for the coming year.
Two of the 5 roll-offs are shown here (Alpha and Beta). These roofs roll off to the west. You can barely see the tracks to the left.
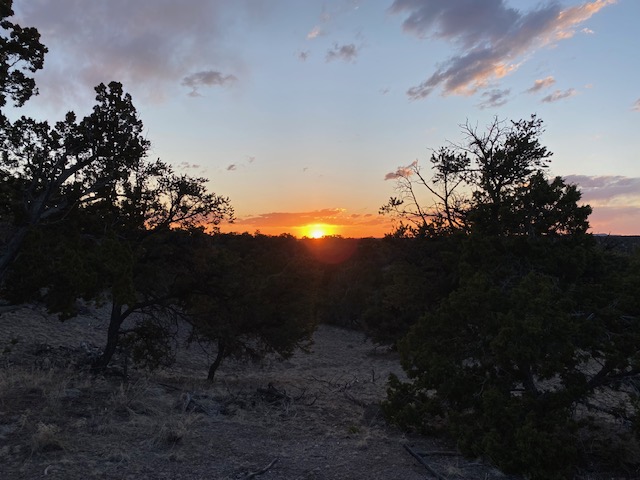
Eastern view from the observatory complex. Looks like the scene of an old western movie perhaps!
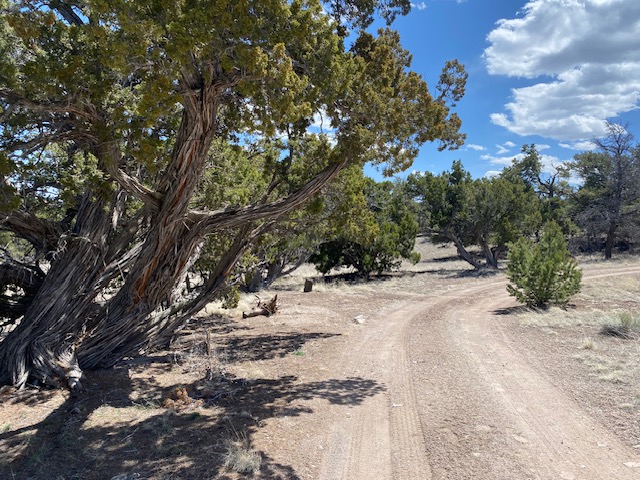
The walk or drive up to Gamma and Delta where my equipment resides. The pinyon or piñon pine tree grows in southwestern North America, especially in New Mexico, Colorado, Arizona, and Utah.
These trees have a very ethereal vibe to them, perfectly suited for an observatory site!
Outside of the observatories, it’s just you, the Pinyon trees and the Universe!
And now back to business here, the purpose of this trip is to replace our “old” CCD camera with a new CMOS version.
We’re replacing this CCD camera (about 6 pounds)
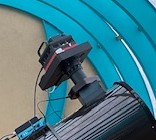
With this one (< 1 pound)!
We have discussed the whole camera technology changing over from CCD to CMOS in previous posts, but just to review, CCD (charge coupled device) and CMOS (complementary metal oxide semiconductor) image sensors are two different technologies for capturing images digitally. Both types of imagers convert light into electric charge and process it into electronic signals. CCDs and CMOS imagers were both invented in the late 1960s and 1970s. CCD became dominant initially, primarily because they gave far superior images with the fabrication technology available at the time.
However, with the promise of lower power consumption and higher integration for smaller components, CMOS designers focused efforts on imagers for mobile phones, the highest volume image sensor application in the world. This is what changed everything as the CCD market was quite narrow and limited to astroimaging and other science applications while CMOS technology could be applied to a huge global consumer market including smartphones, webcams, video surveillance etc. The CCD phase-out was thus inevitable.
An enormous amount of investment was made to develop and fine tune CMOS imagers and the fabrication processes that manufacture them. As a result of this investment, we witnessed great improvements in image quality, even as pixel sizes shrank and at this time, based on almost every performance parameter imaginable, CMOS imagers now outperform CCDs. As I commented before, this is one instance where cheaper IS actually better! Contemporary CMOS astroimaging cameras typically cost at least 50% less than their CCD predecessors.
The mount’s torque motors go through a series of movements to measure the telescope’s balance i.e “front heavy” or “back heavy” so any necessary adjustments can be made. This enables a very precise correction to within 0.1 %
Replacing a camera system involves several steps including rebalancing the optical system, especially in this case as I had to remove a 40 pound counterweight after the install! Then the mount has to “relearn” how to point to objects in the sky after the weight and balance has changed. Finally a new “profile” has to be created in the control software to include the new camera and guider specs and the new image scale as the new sensors have different dimensions and pixel sizes.
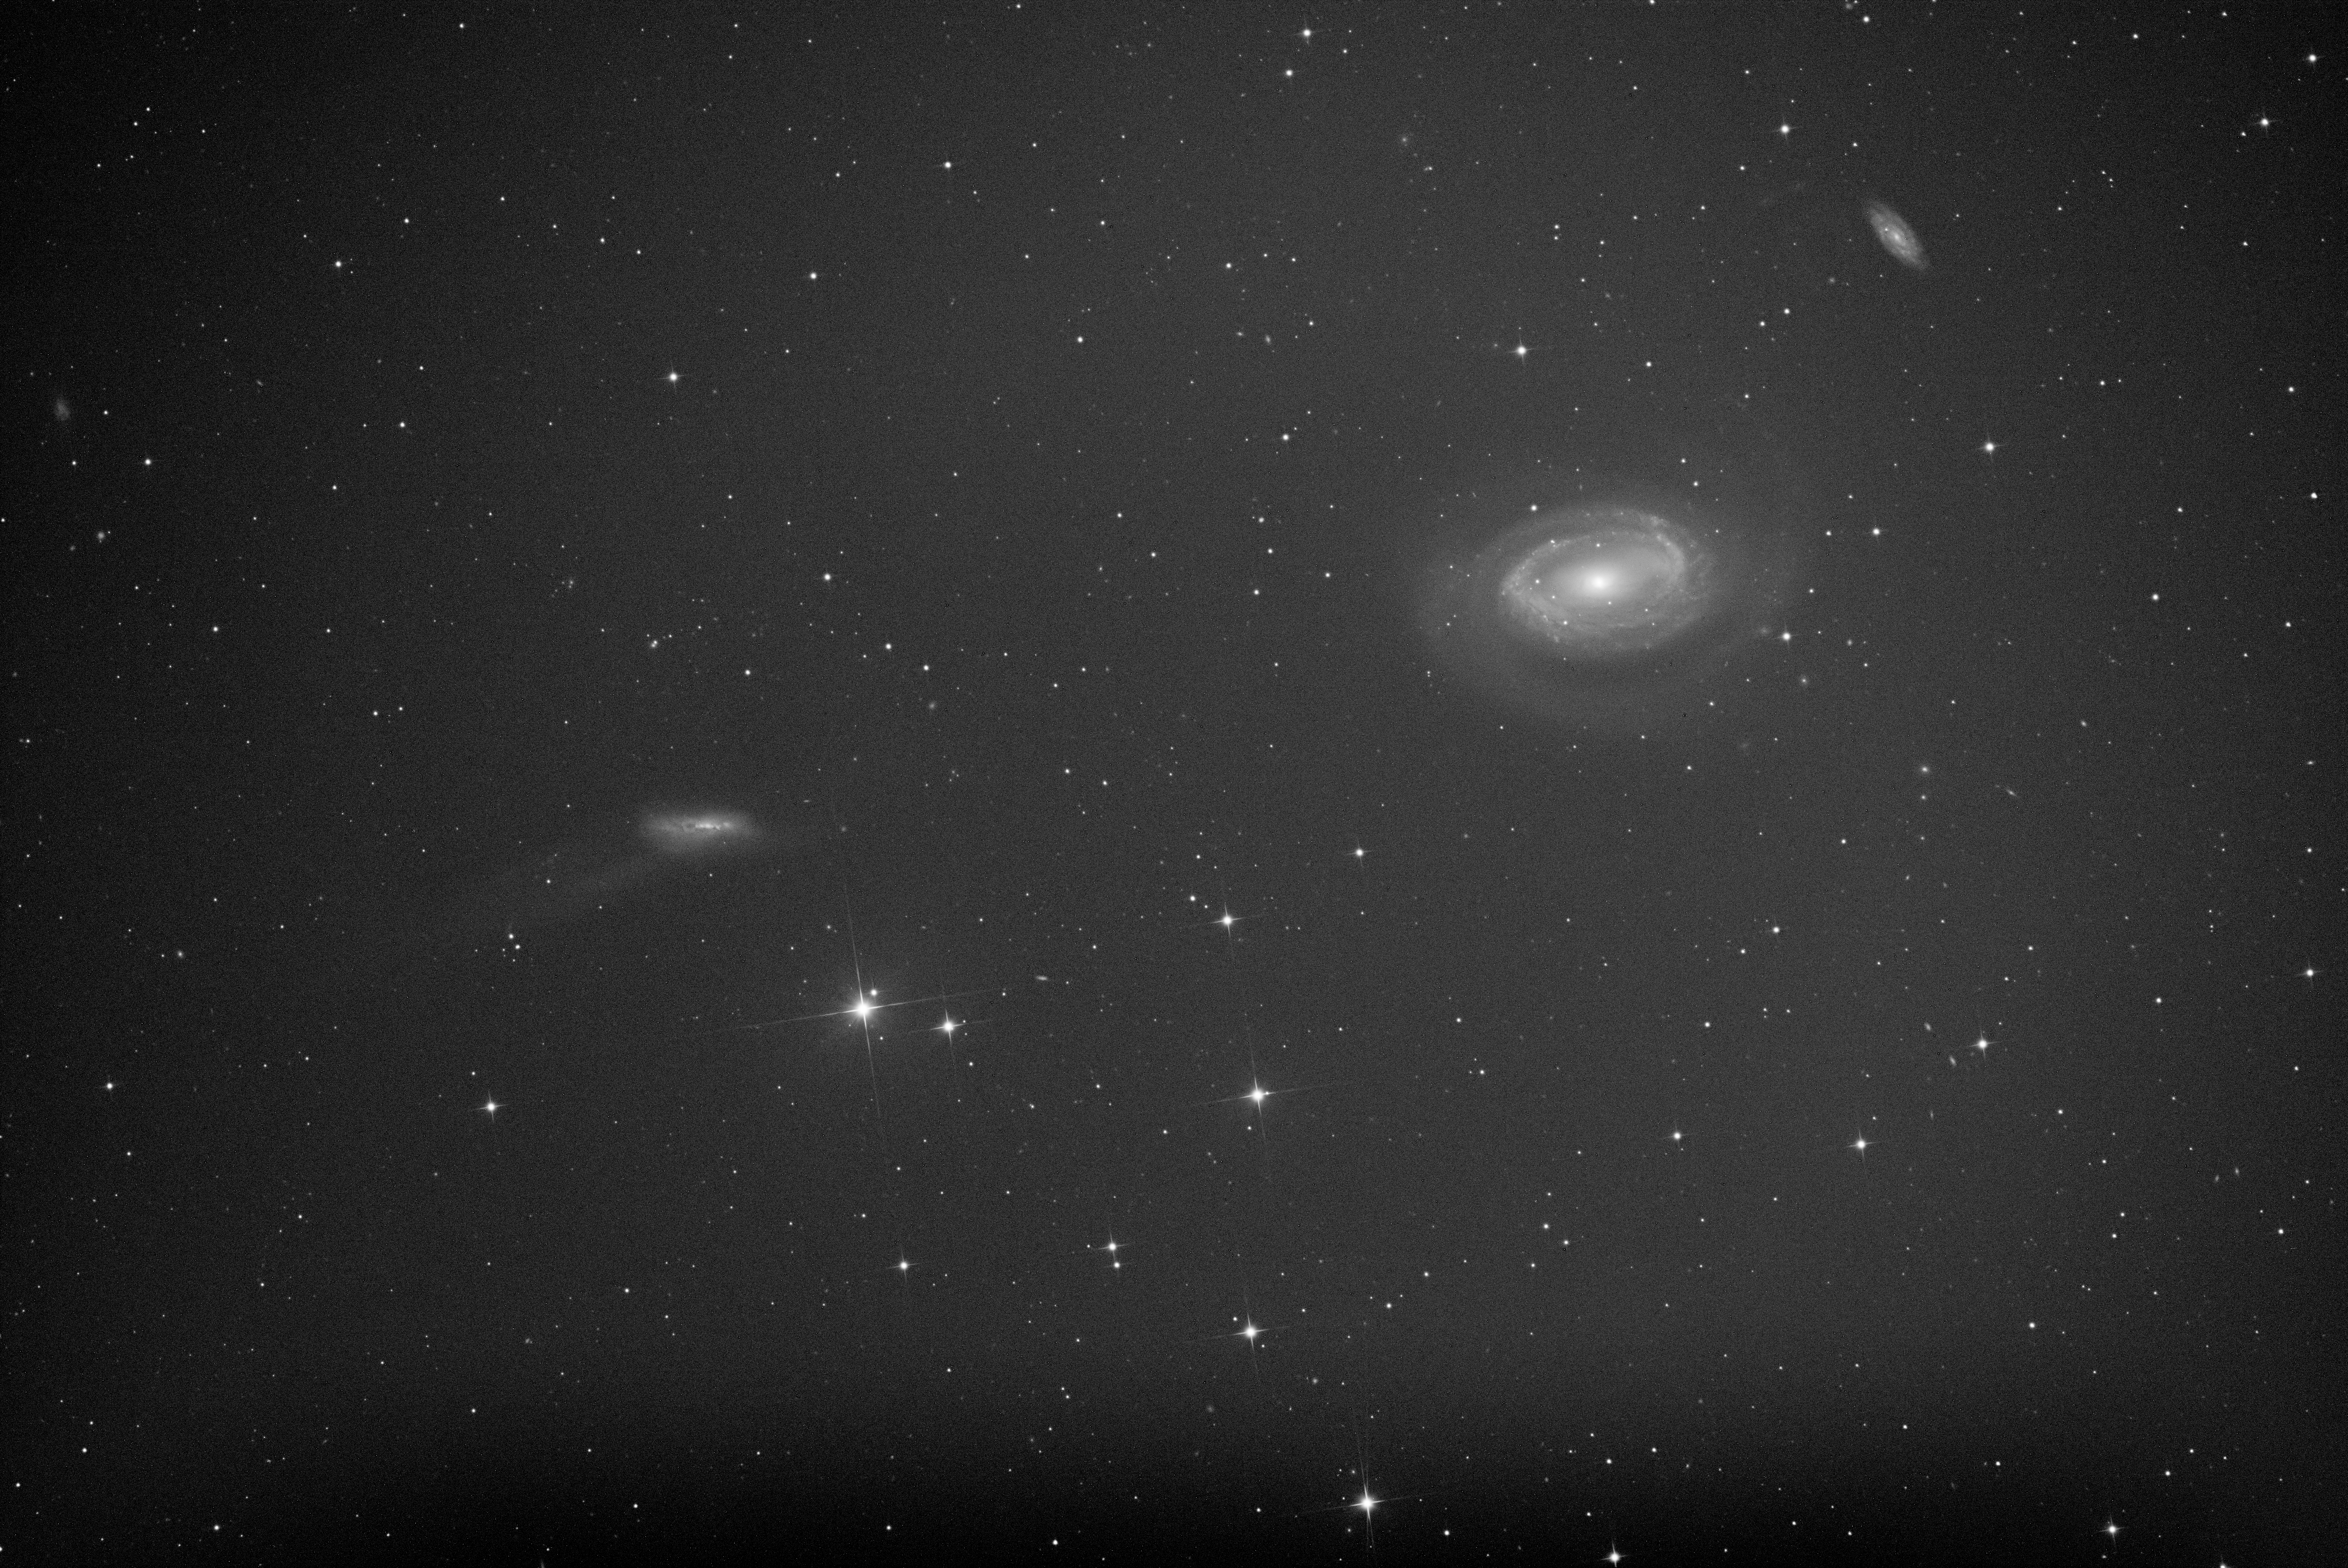
First light image with new camera system! This is a 5 minute raw uncalibrated image with a waxing gibbous moon. Annotated image. NGC 4725 is an intermediate barred spiral galaxy with a prominent ring structure, located in the northern constellation of Coma Berenices. A likely companion galaxy to the left is the irregular NGC 4747, also known as ARP 159. A tidal plume is seen emanating from the left edge. More on this group at the completion of the project!
The camera installation project took 3 days and 3 nights to complete but our “first light” image is very encouraging!
Multiple pier roll-off at the new HCRO observatory
Finally I visited a new observatory complex under construction just “over the hill” from SkyPi. “Howling Coyote Remote Observatories” is yet another telescope hosting facility with identical conditions to SkyPi but on a much bigger scale. Currently there are around 7 telescopes in 2 roll-offs but plans are in the works for around 50 or more piers!
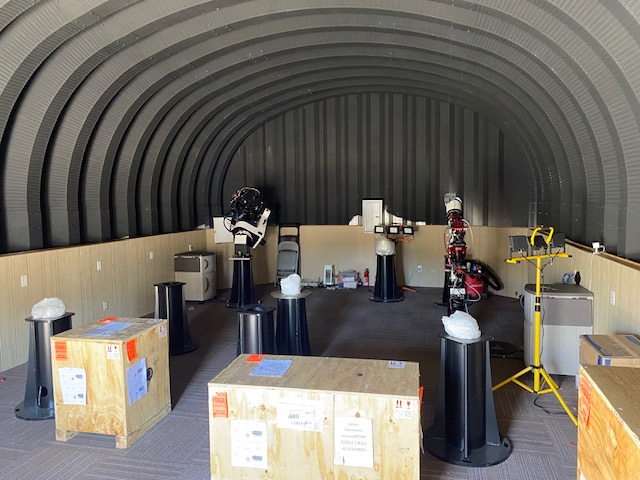
Piers arranged inside the observatory at HCRO
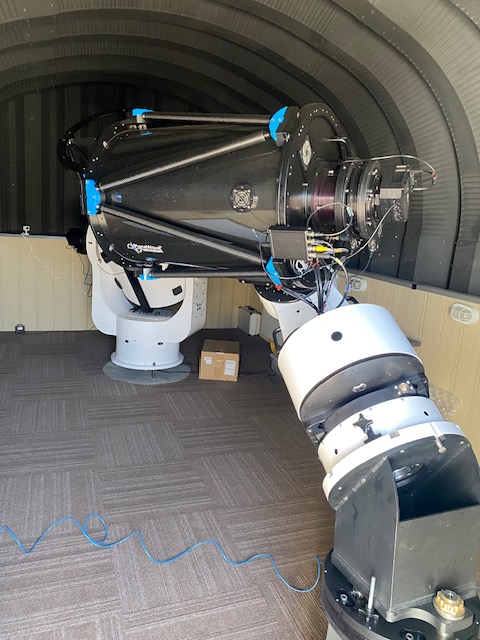
A Planewave Delta Rho telescope at HCRO
And that sums up my recent service trip to SkyPi Remote Observatory !
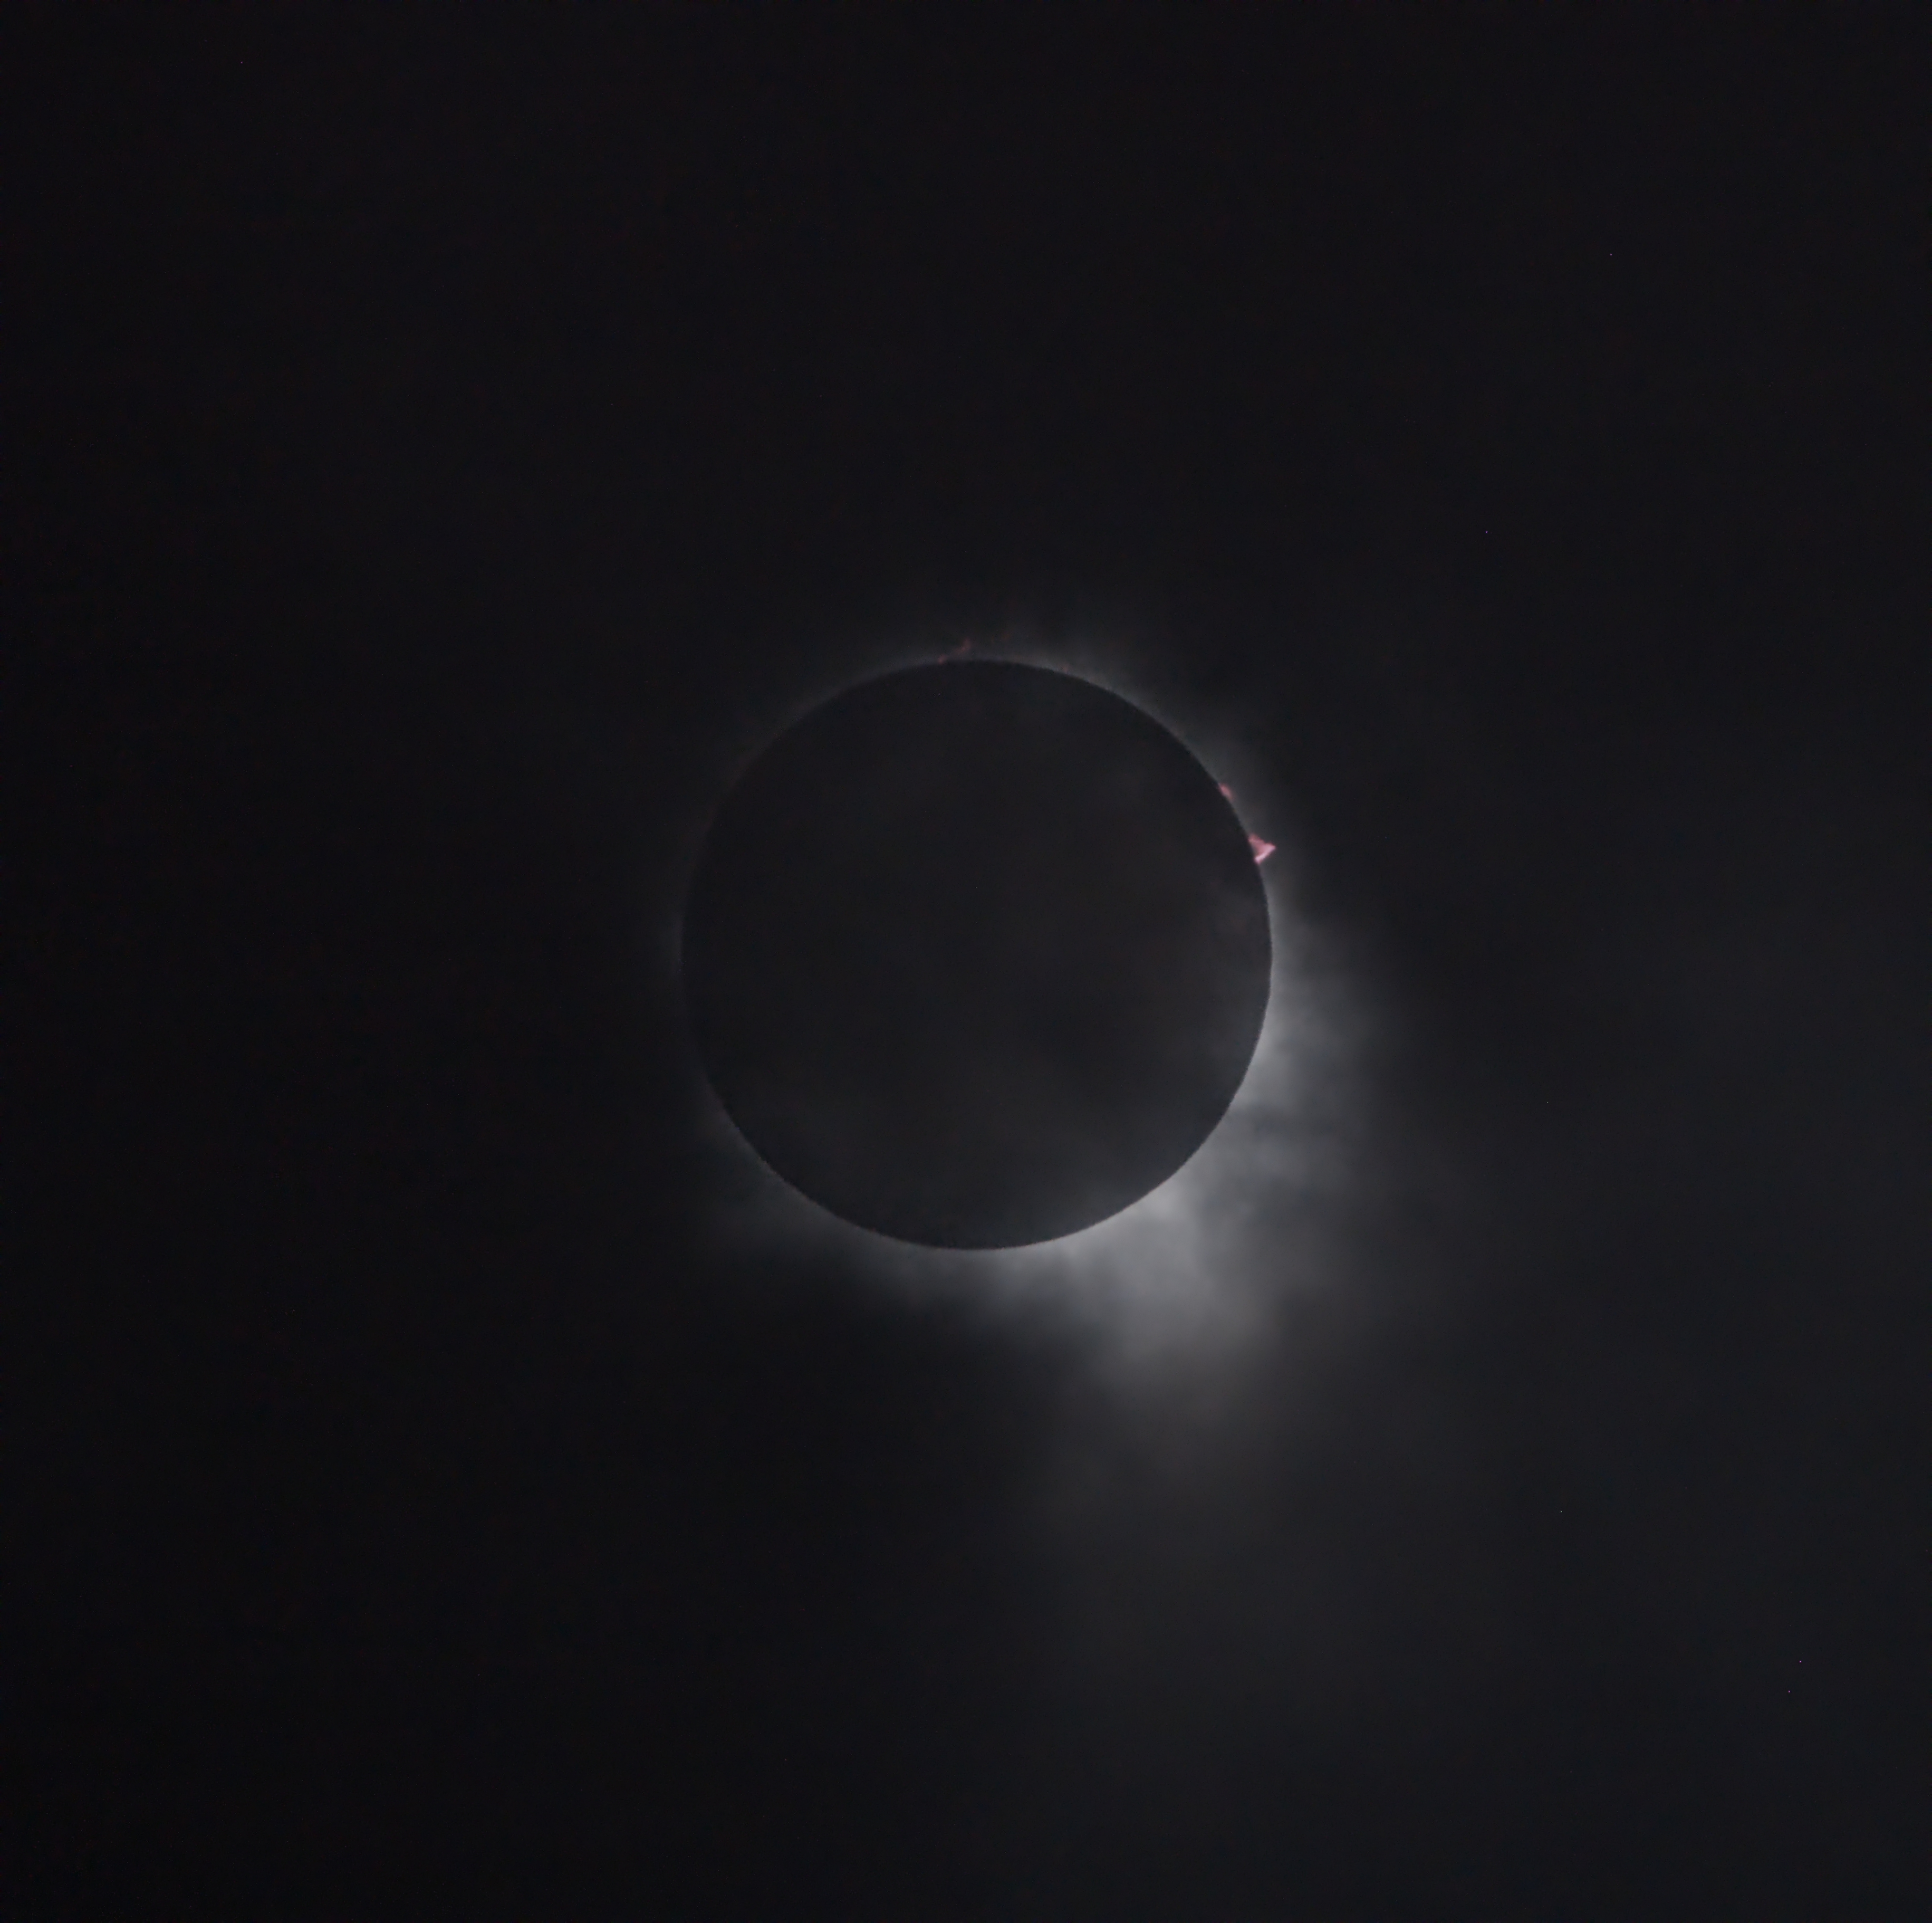
This was probably the best image from the day! Unexpected for sure but I did capture the prominences at C2.
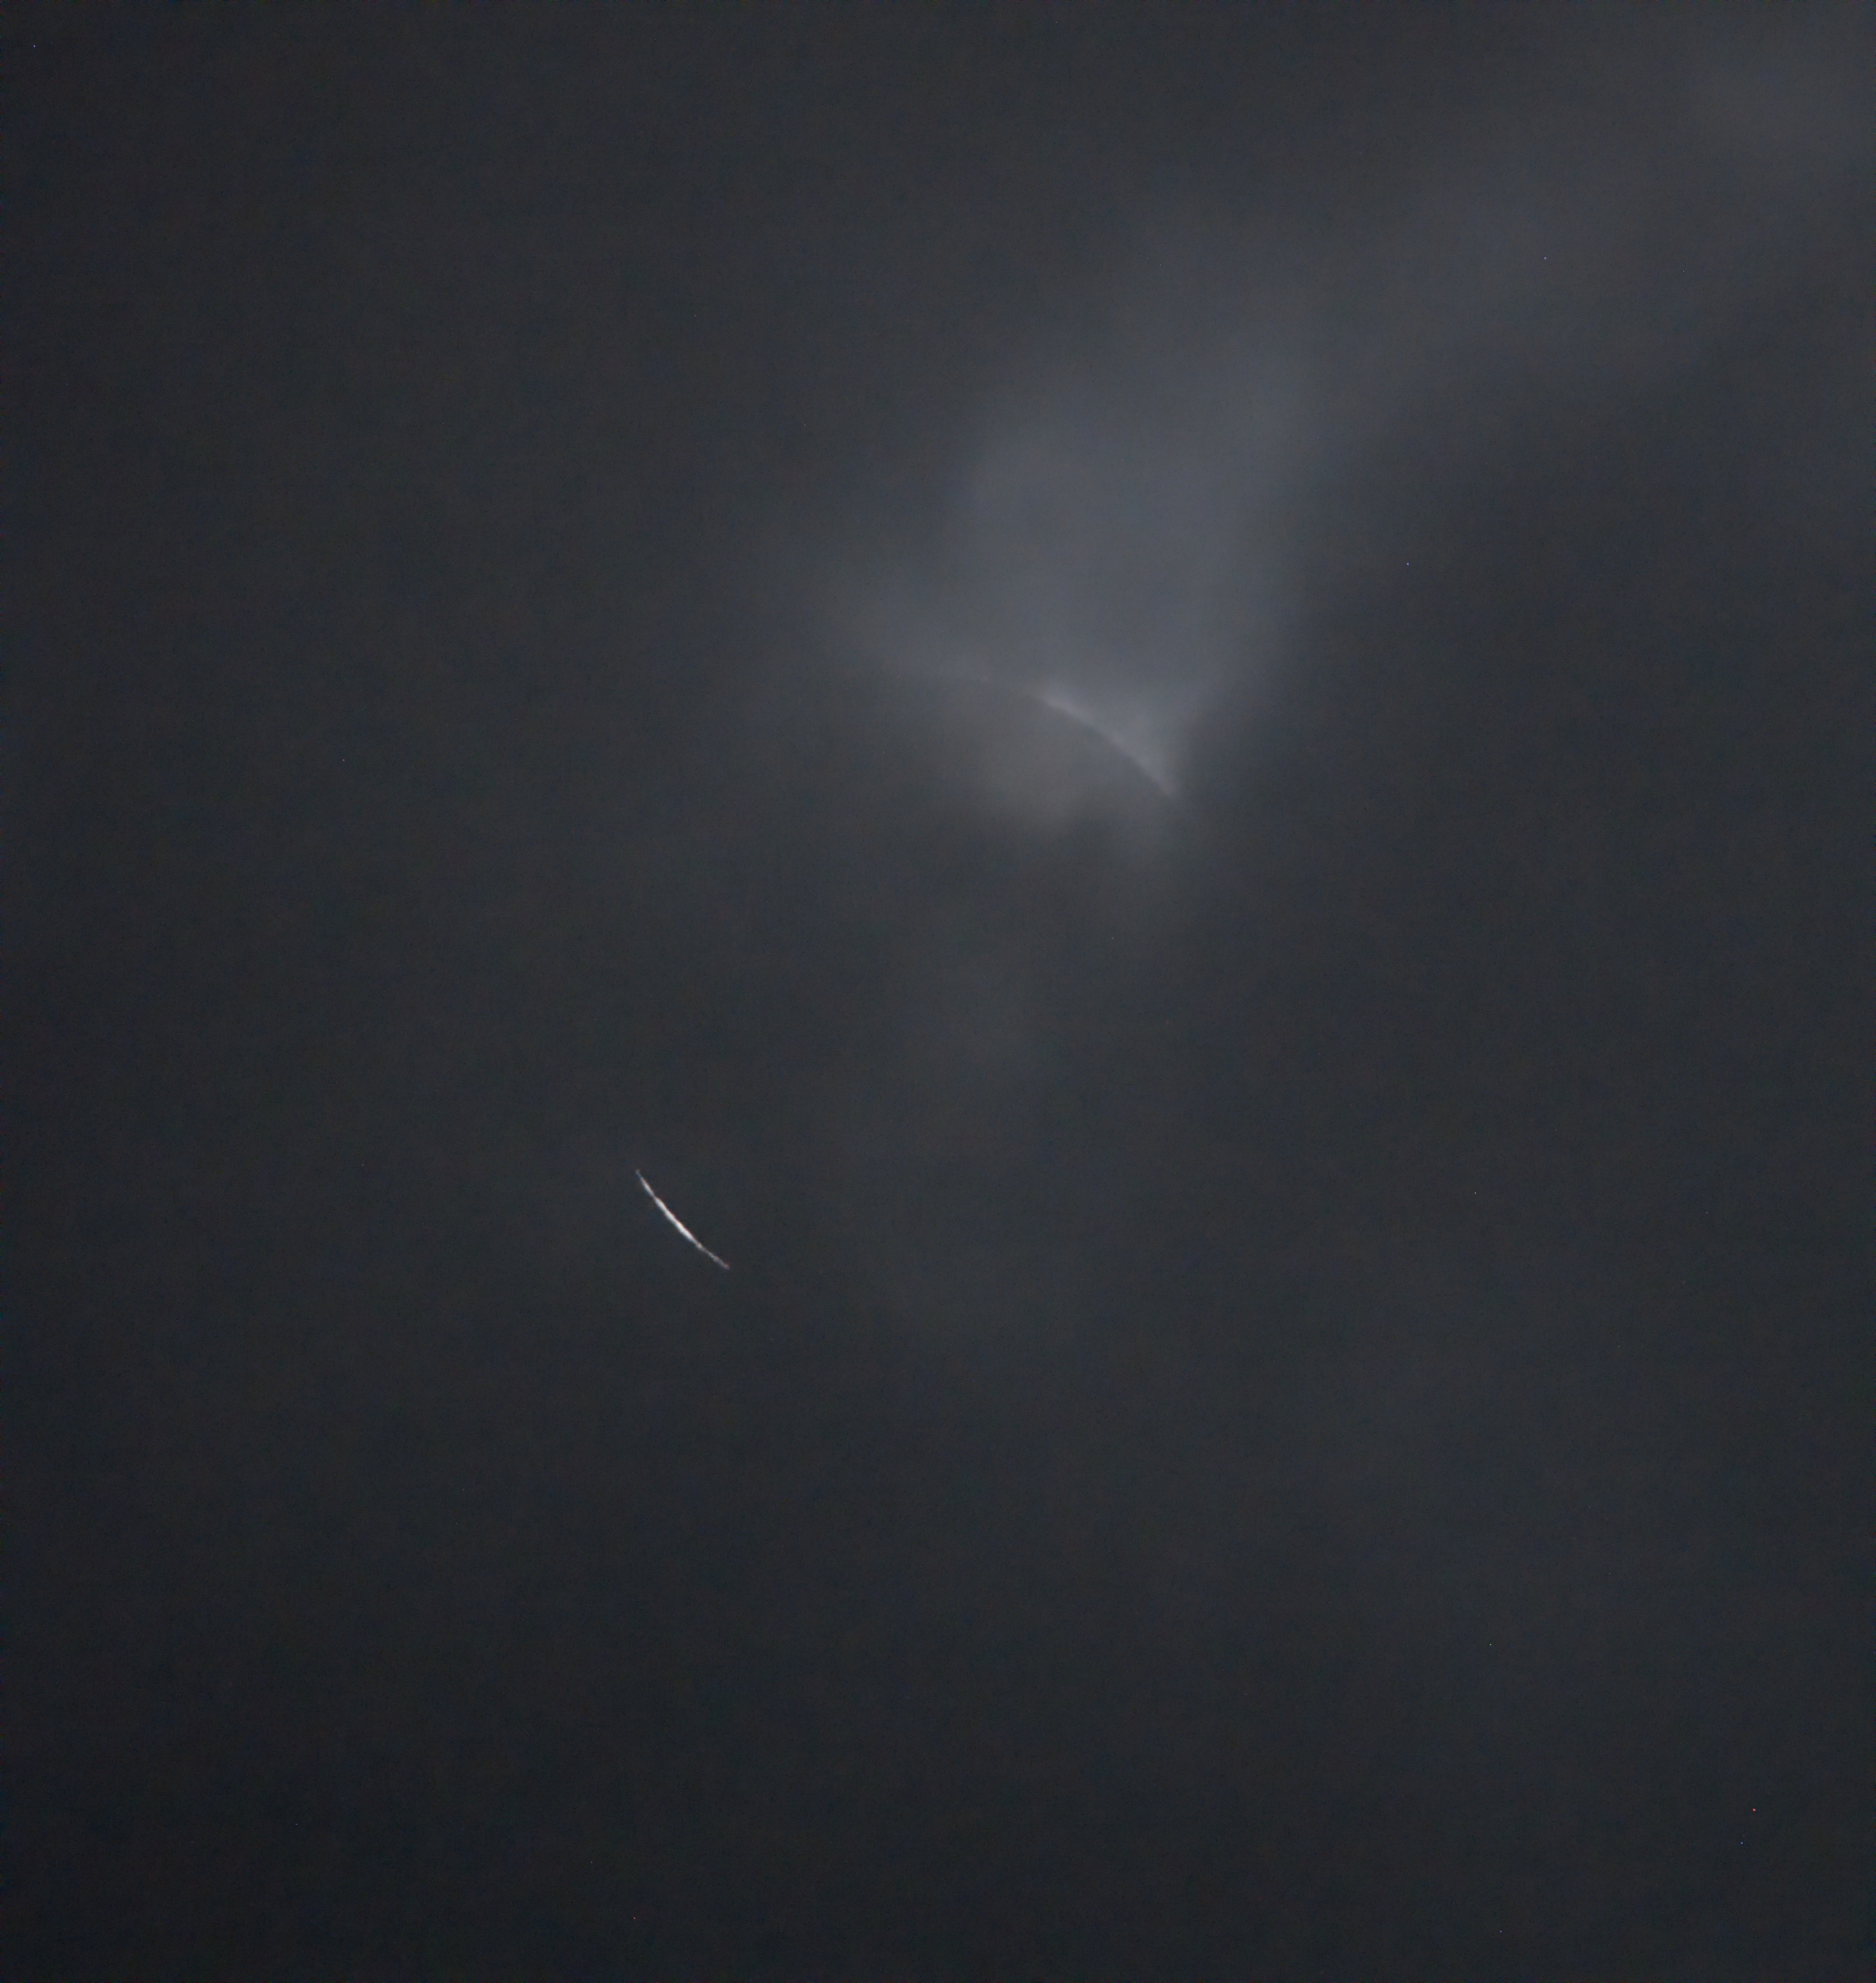
We were actually pretty fortunate with the weather as complete overcast skies were initially forecast but we were on the edge of the cloud bands. The sun was in and out of the clouds and we got glimpses of the partial phases up through about mid-totality. Actually the clouds added a little drama to the whole thing! It was of course fantastic to be there and see what we were able to see. We could not see associated phenomena such as shadow bands or the approaching Moon’s shadow. Probably the most remarkable thing was that during totality, with the clouds present, it was pitch dark! I could not see my equipment at all, so it took me me about 30 seconds to find the usb-c port on my laptop in order to change the drive mode from high speed back to single shot. I think because of that I was not able to get more images during totality. And because of the clouds there were only about 2 minutes where we could see it at all.
Here are the other images from the day:
This was the only image obtained at the start of totality, probably within the first minute.
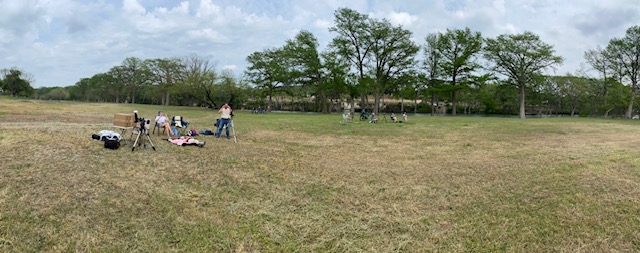
There could not have been a more perfect observing site! Maybe 10 of us were present in this field by the river. I think there were about 30 people total at the resort. Many set up right next to their cabins.
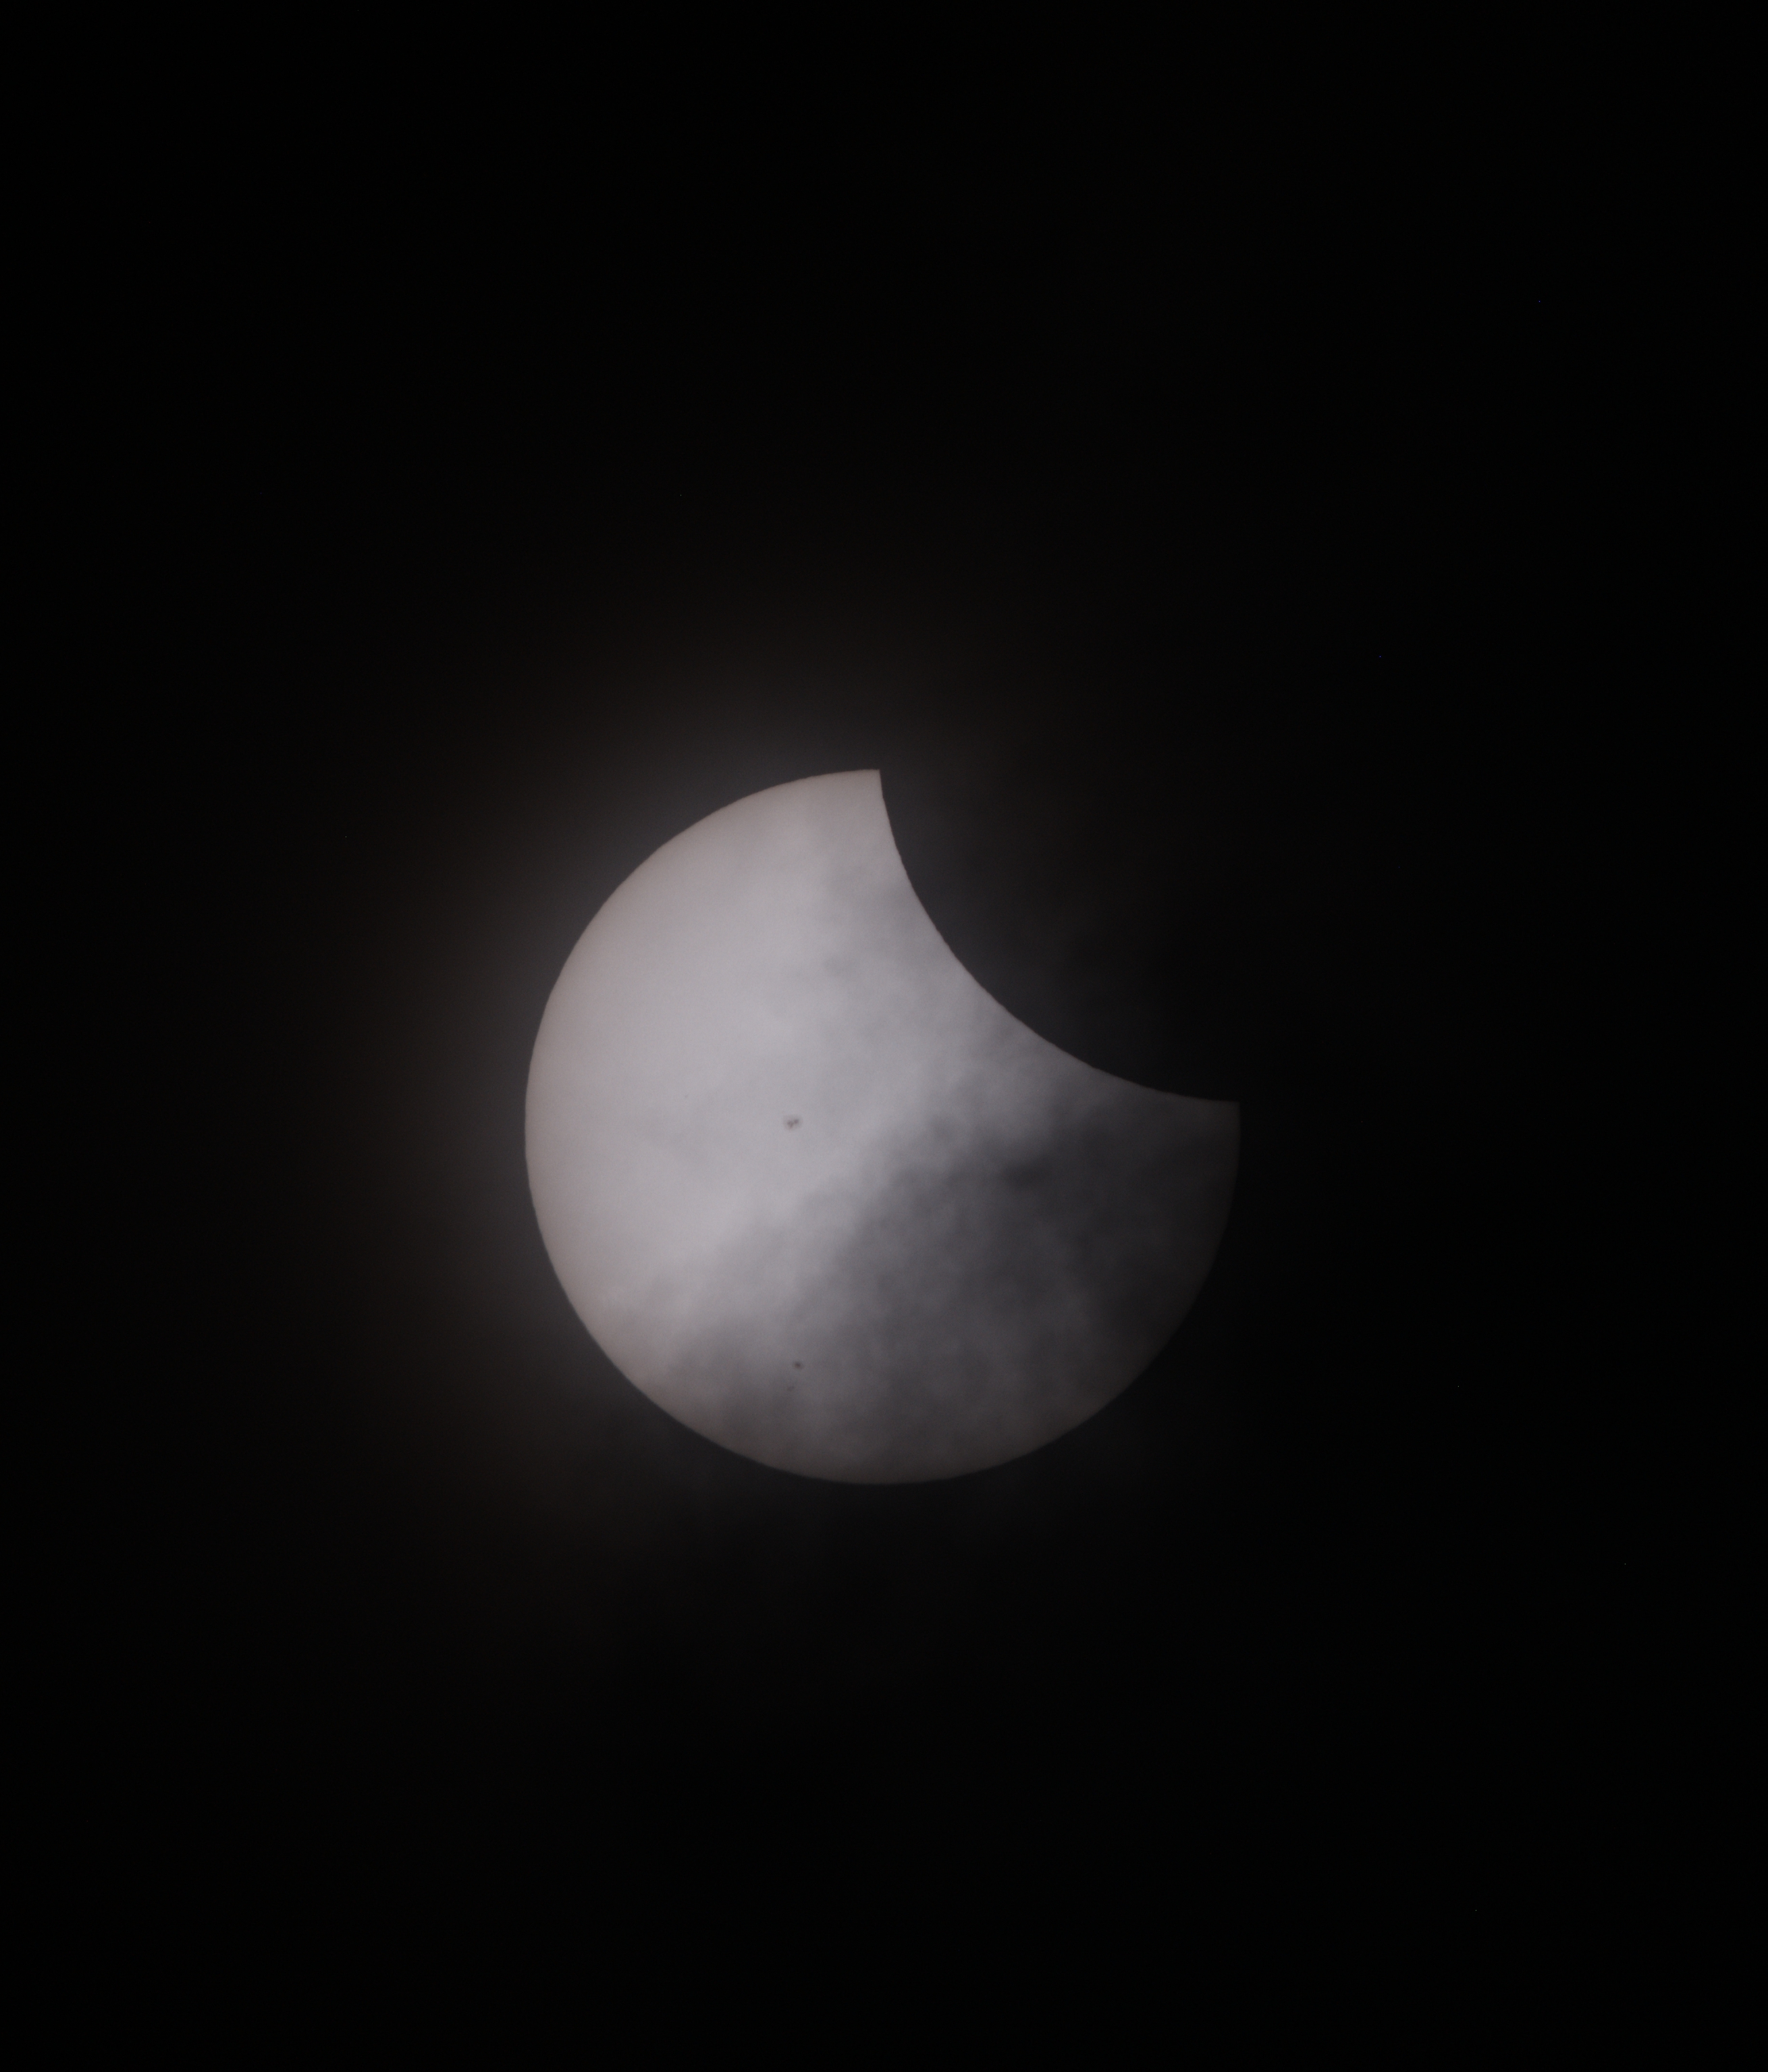
Partial eclipse, about 30 minutes or so before C2.
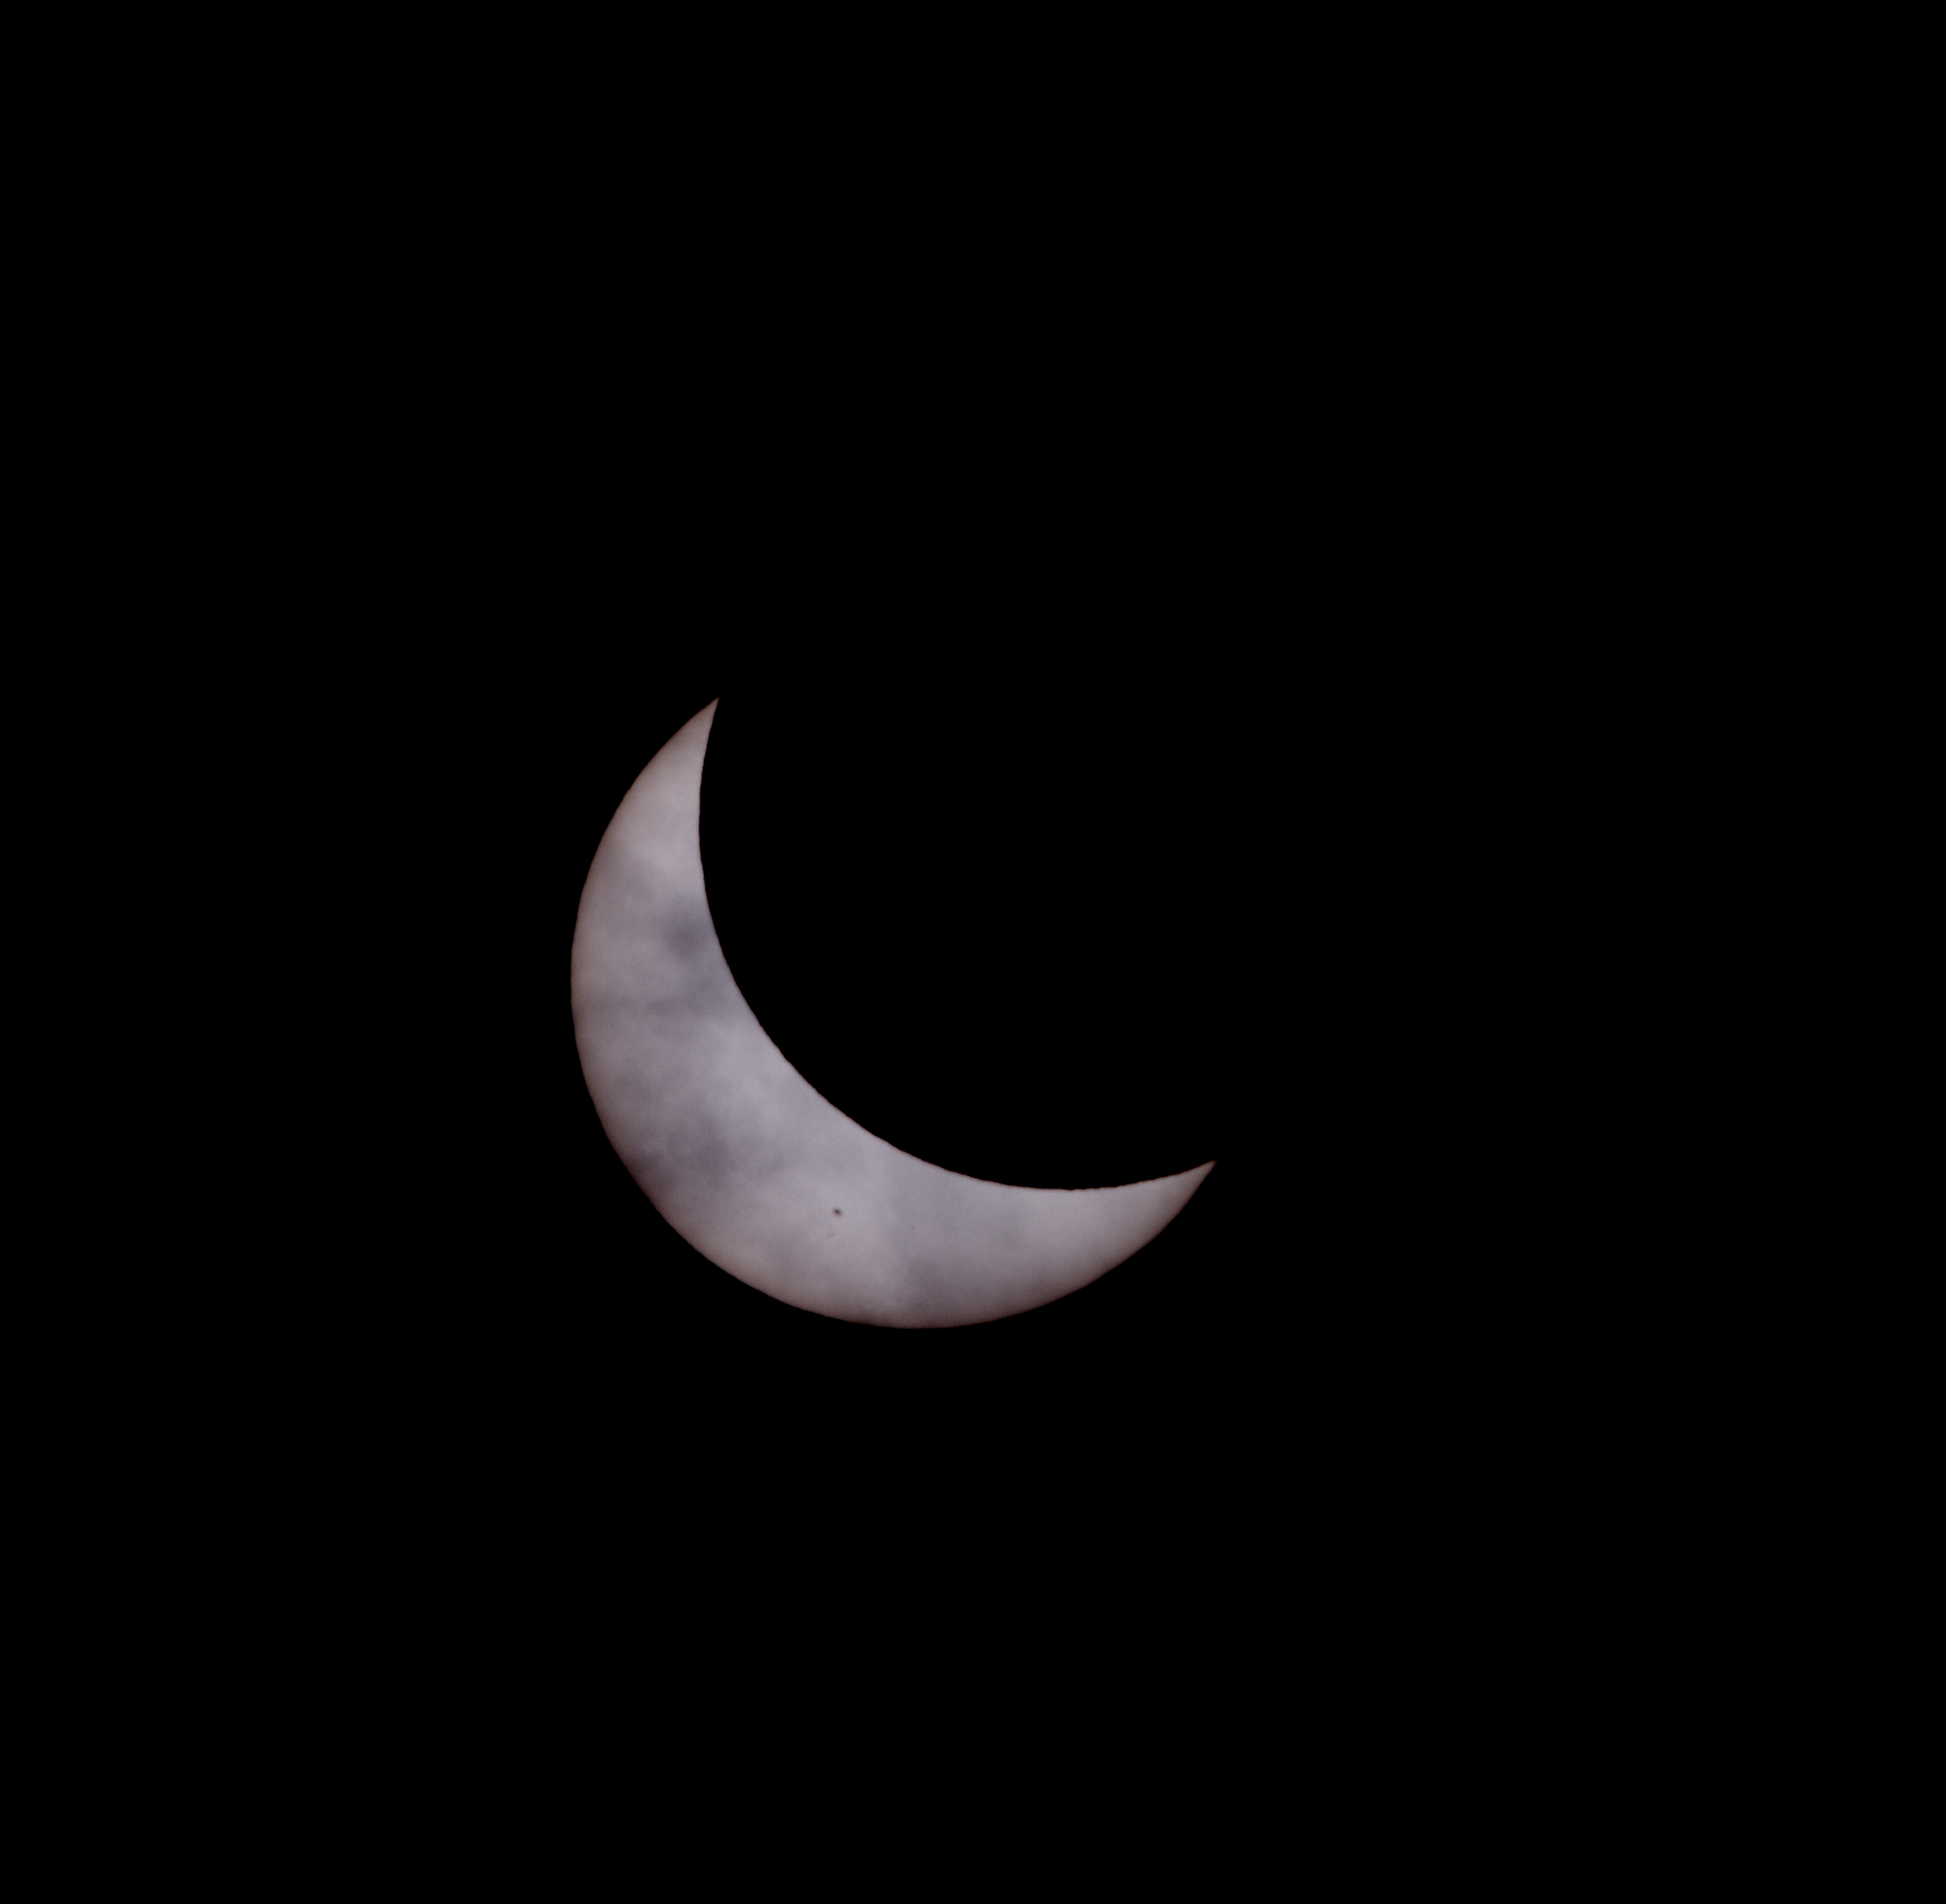
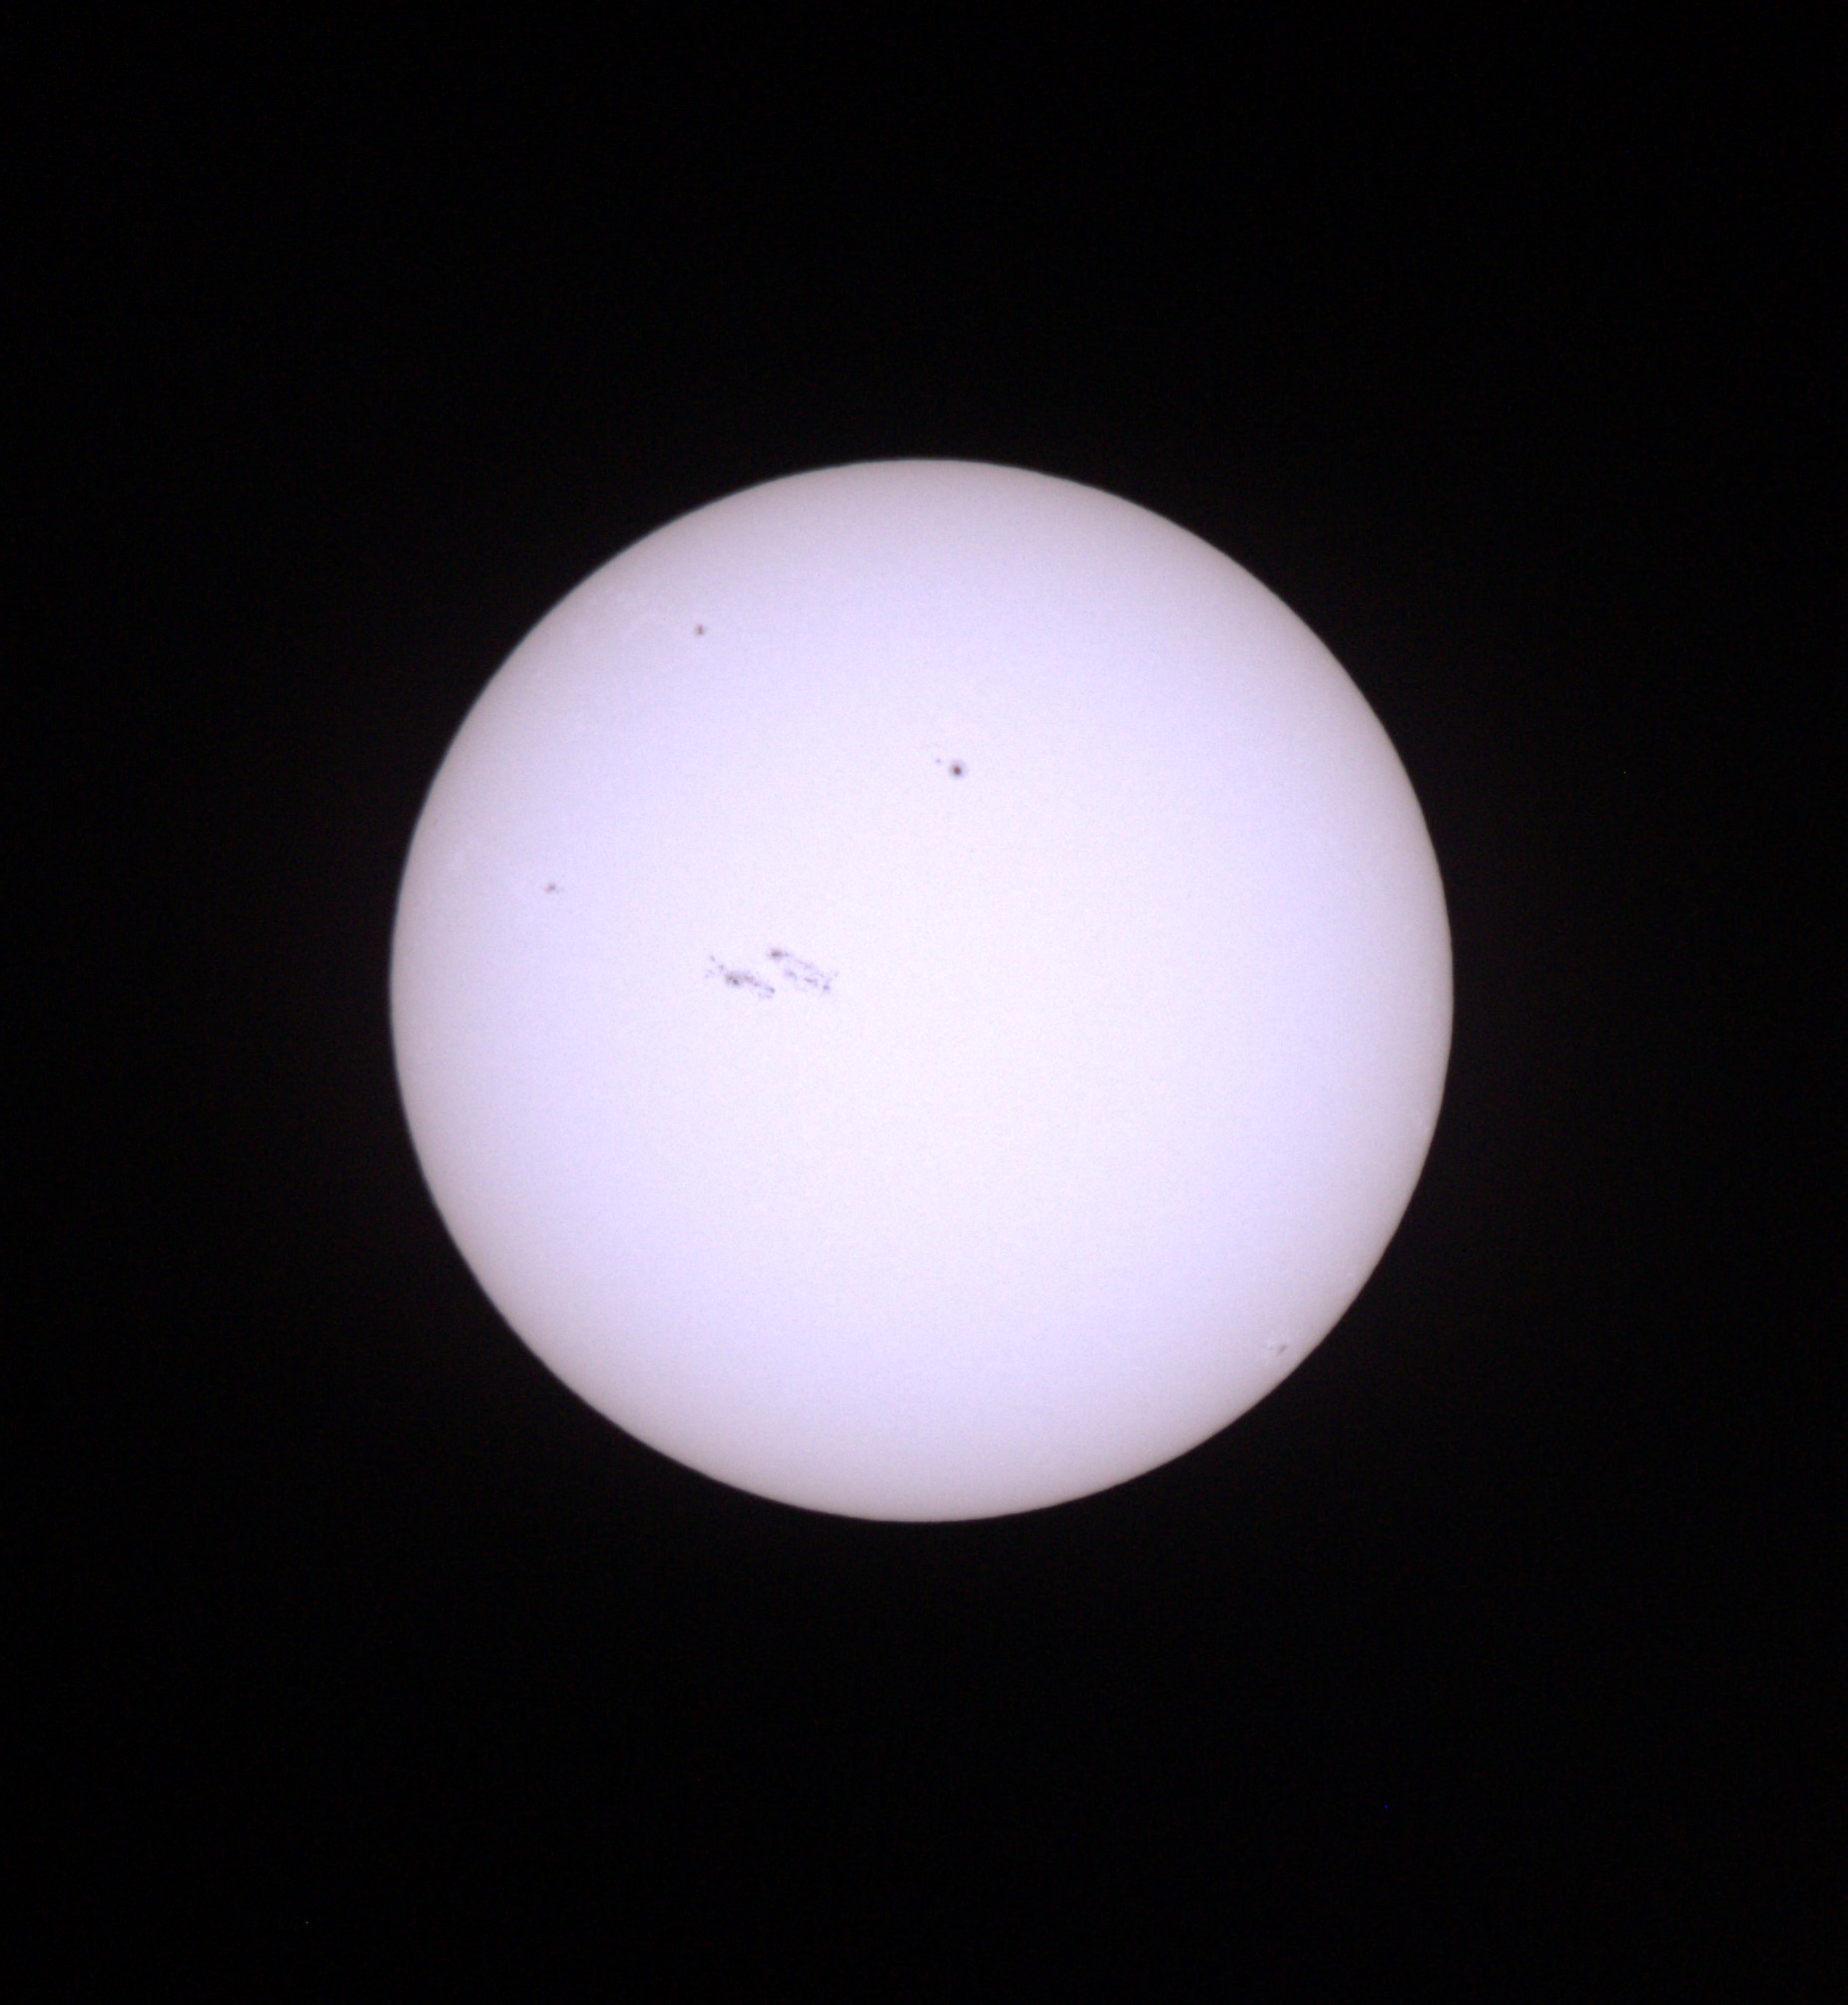
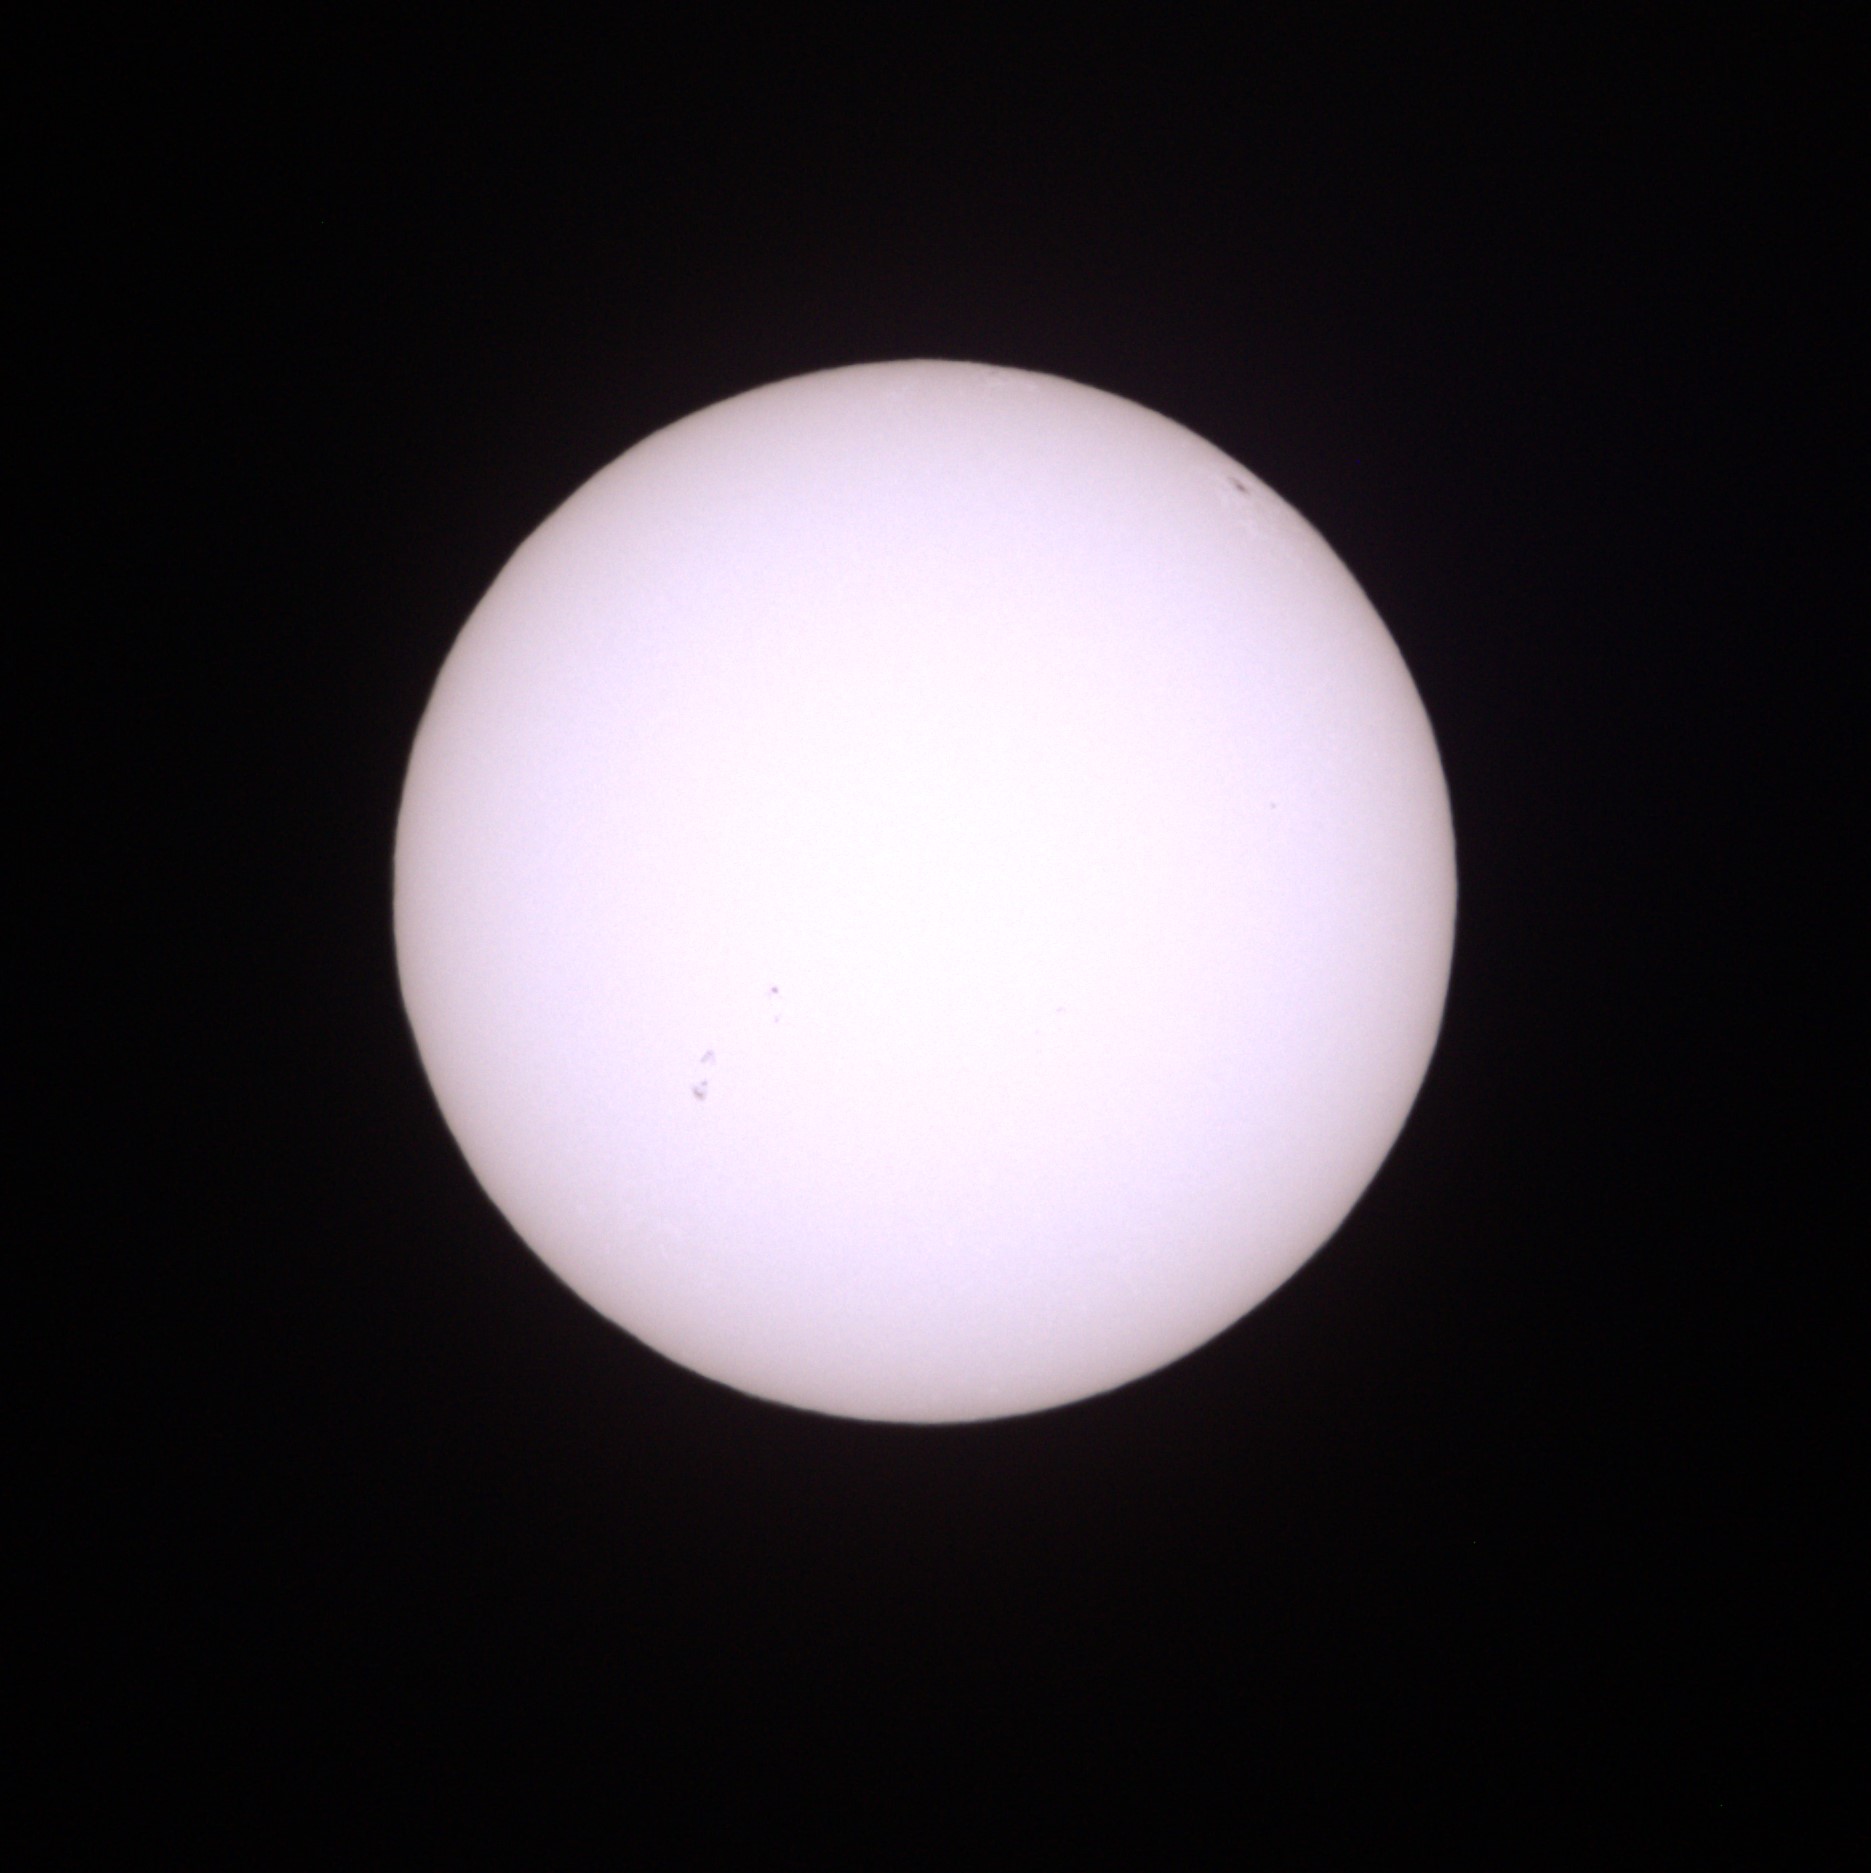
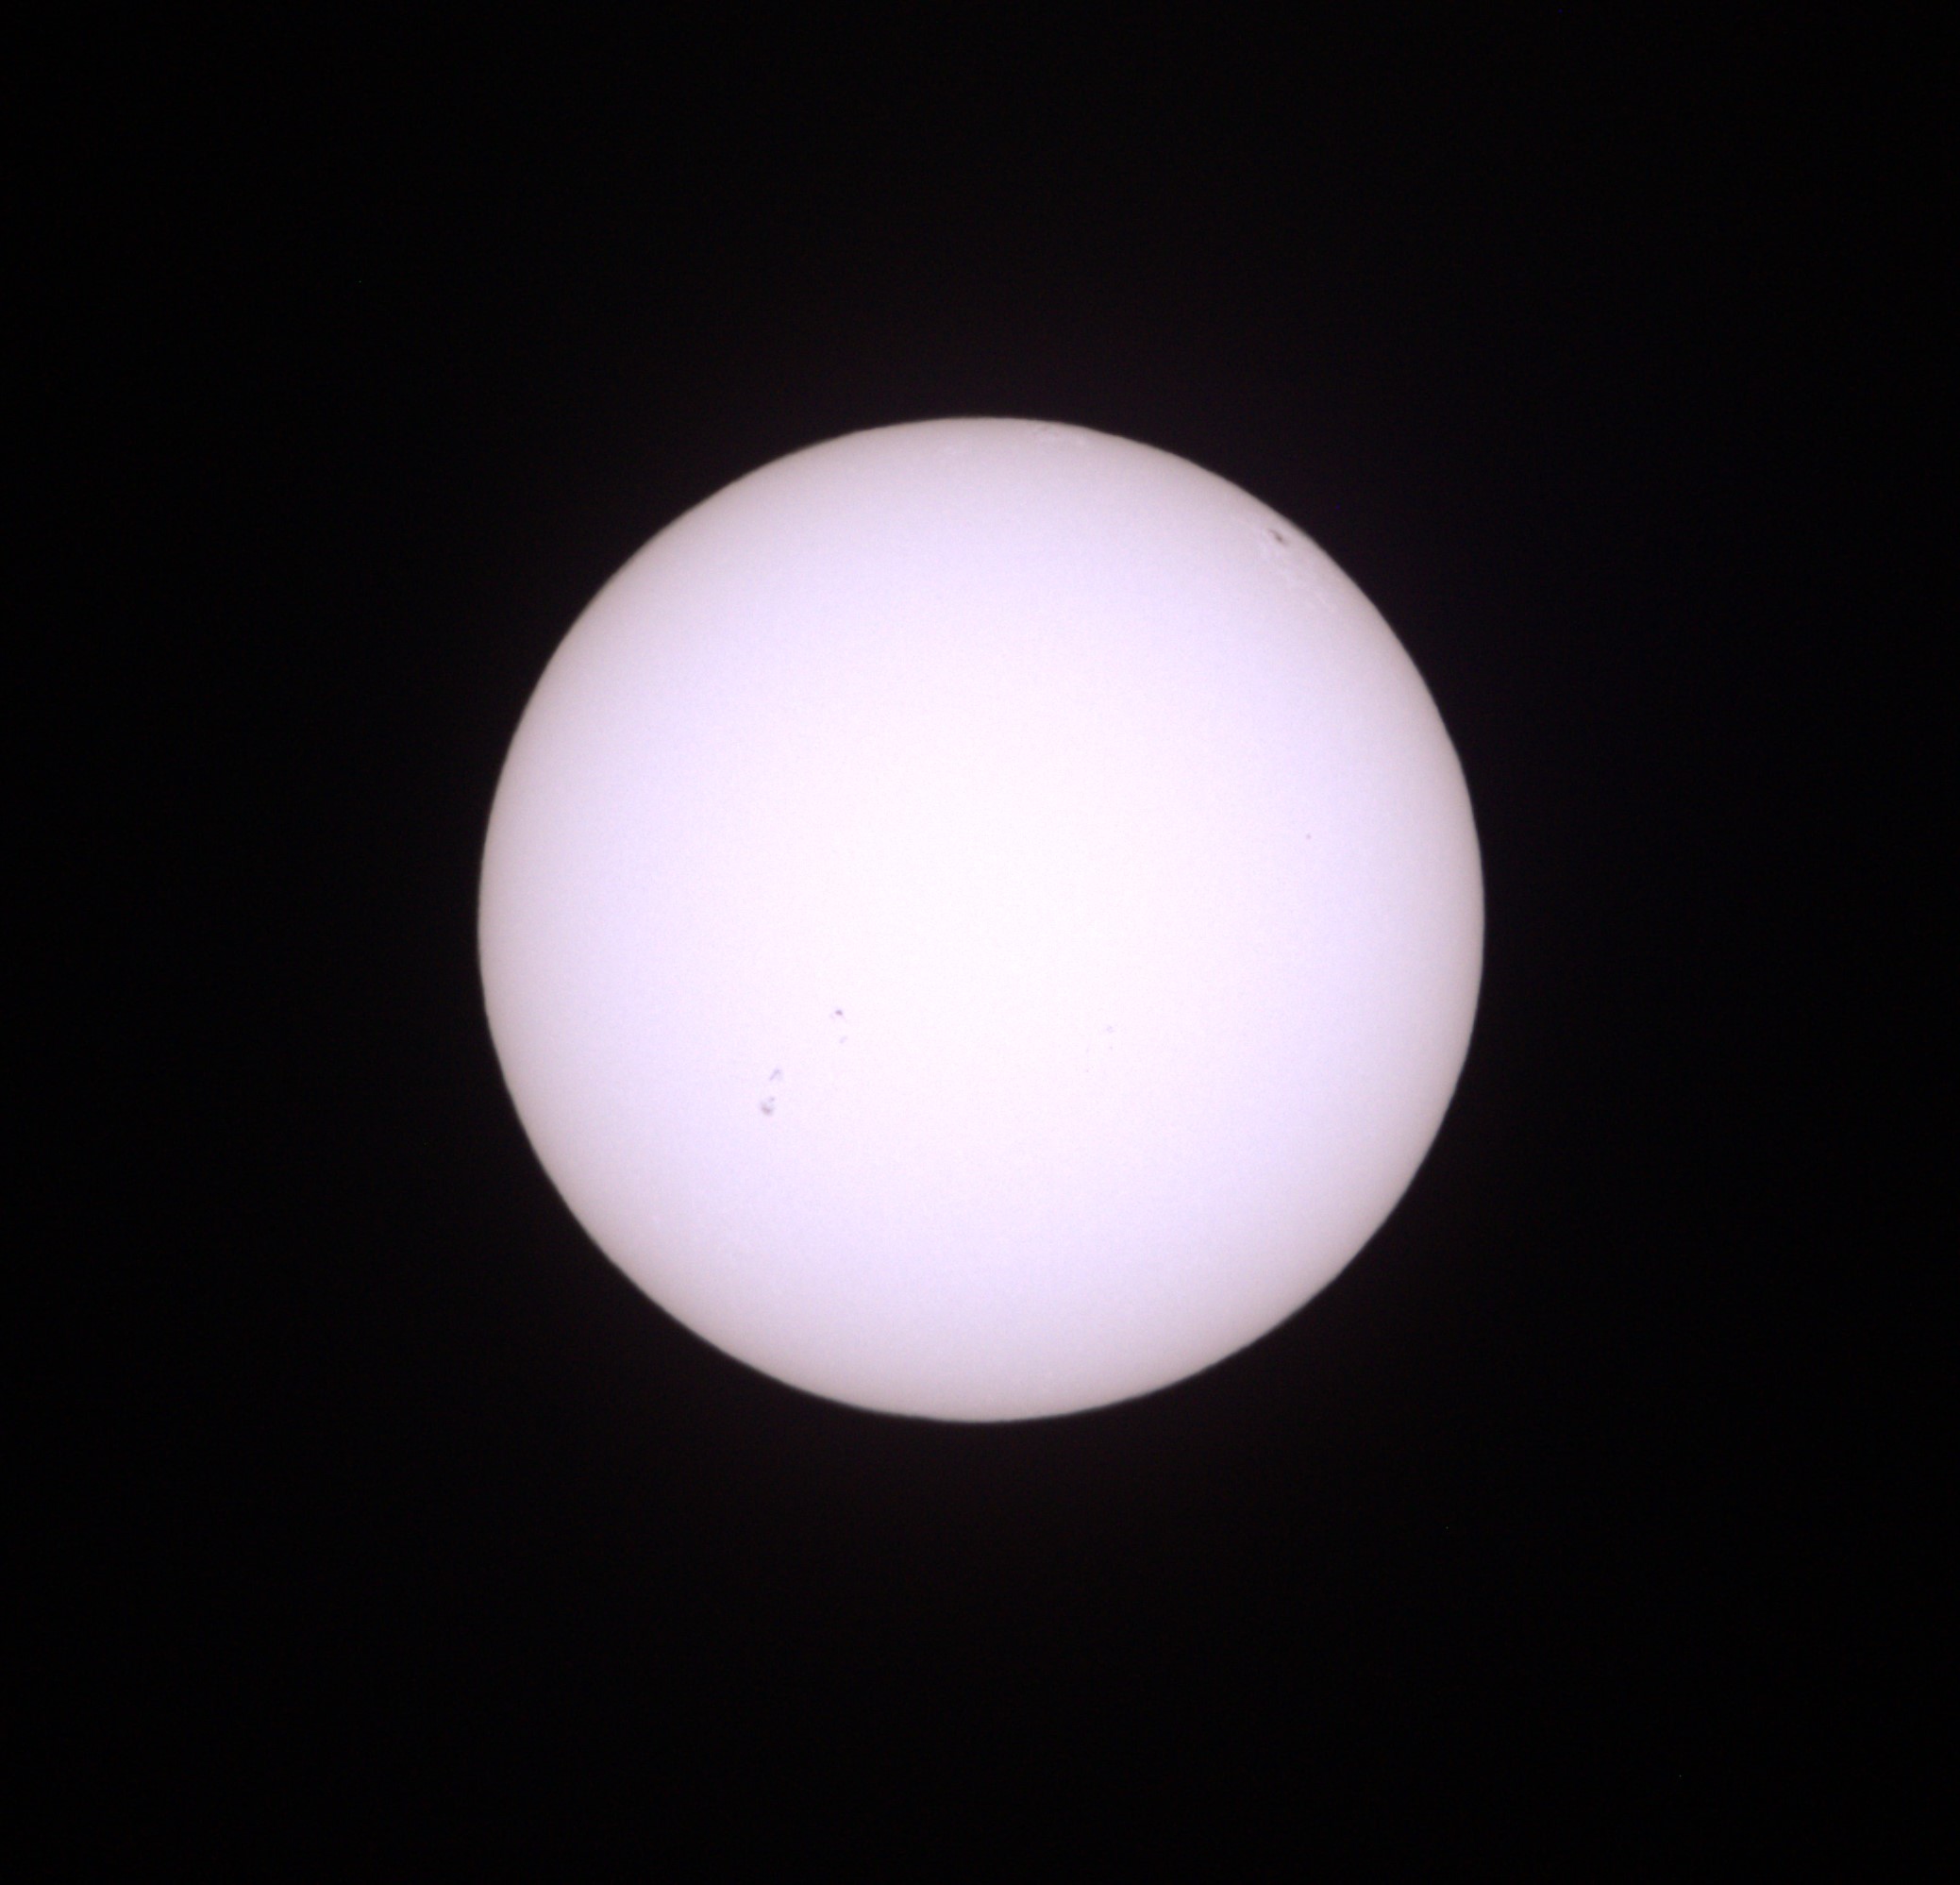
Just after the very beginning. You can see 2 sunspot groups, one close to the center and one near the bottom.
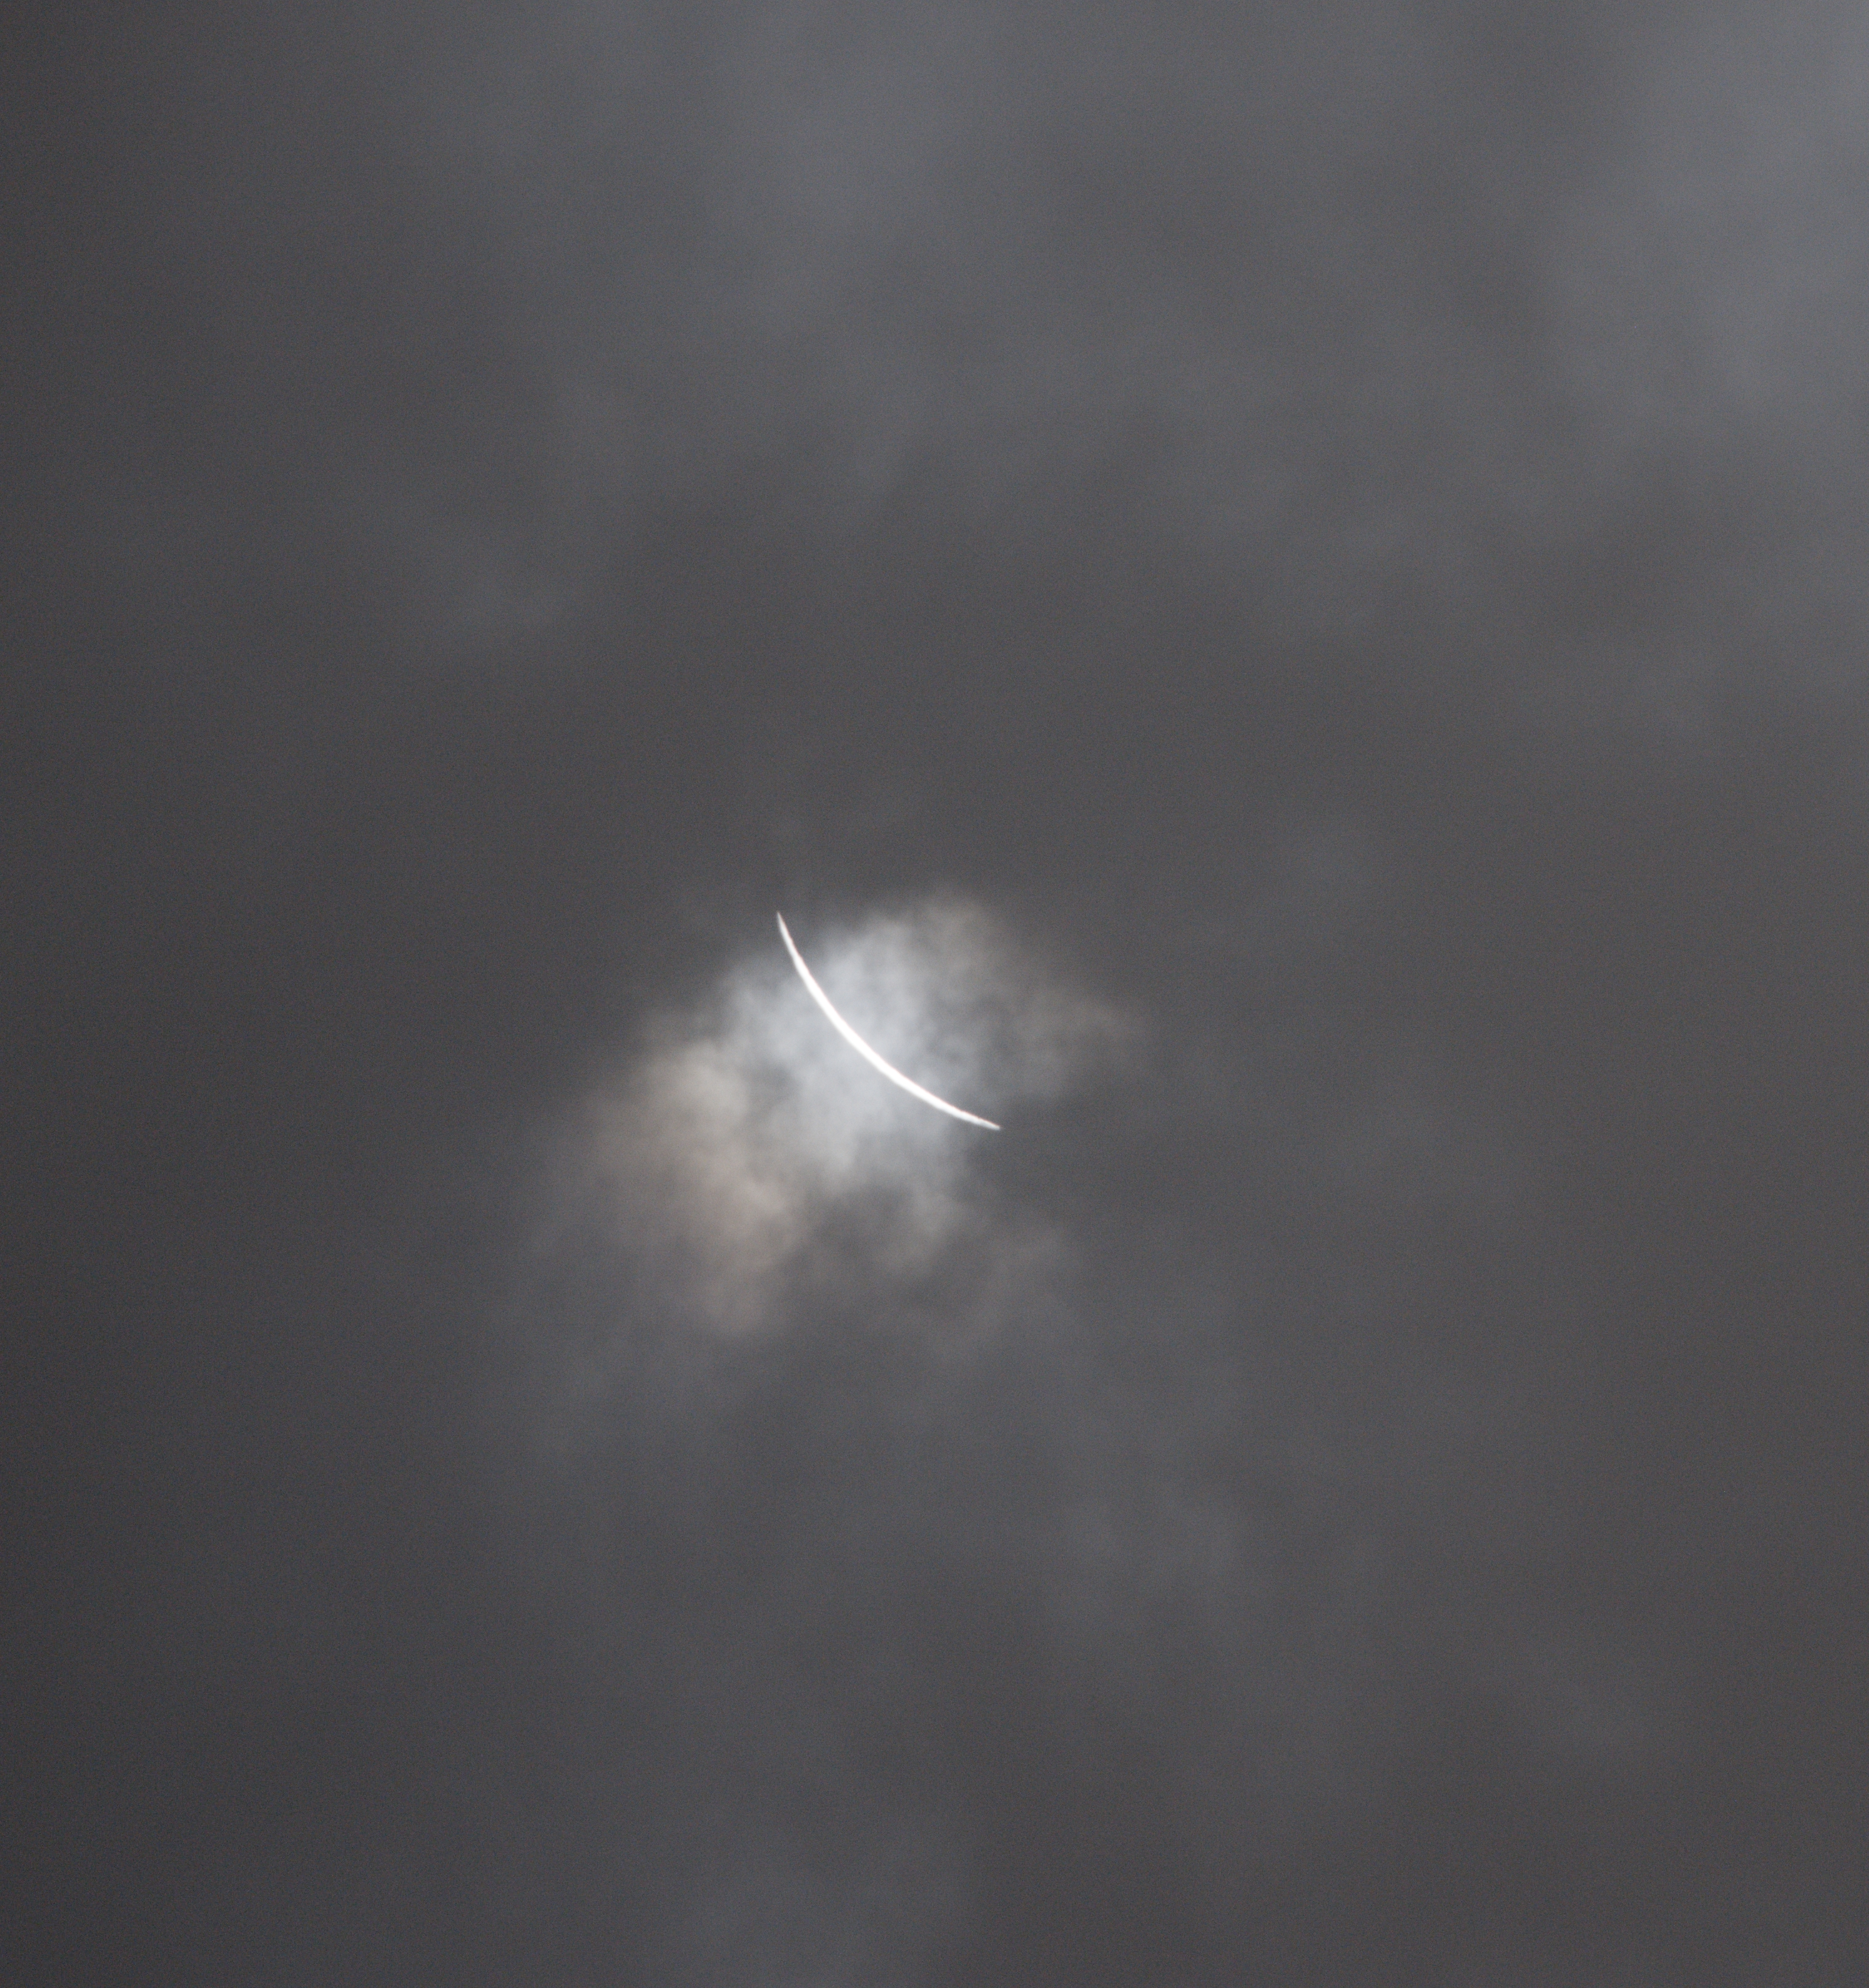
This was about 25 seconds or so before C2. I did have the high speed mode active but I had to go totally off script and basically guess on exposure time. These were all ISO 200, F6.3, 1/60 sec. Normally this part of the eclipse you need to have an exposure of 1/4000. I did see somewhere in the case of clouds that exposure was decreased to 1/30-1/60.
Baily’s beads through the clouds! Overall I had the right idea and my planning was geared toward this phase of the eclipse, so considering the adverse conditions we had some success!
Final glimpse of sunlight before totality begins! All in all, we did get to see it despite the weather and as I was saying the cloud coverage added a totally unexpected drama to the experience!
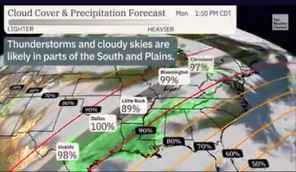
And so we are finally here at the eclipse observing site! Unfortunately it looks like the event will be completely clouded out 😦 In fact, most of the eclipse path will be adversely affected by inclement weather.
Probably the only guaranteed viewing spot is way up in the Northeast US and Canada! The worst case scenario. But the positive spin on this is that there is absolutely no way we were going to drive across country to chase it.
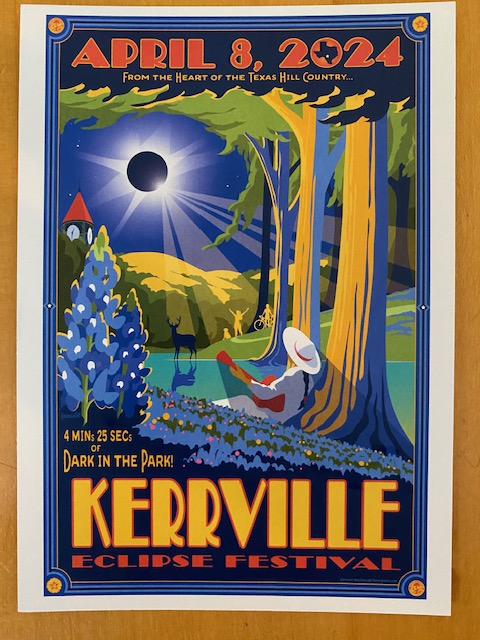
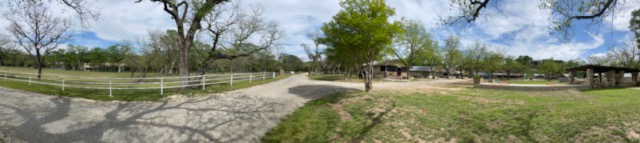
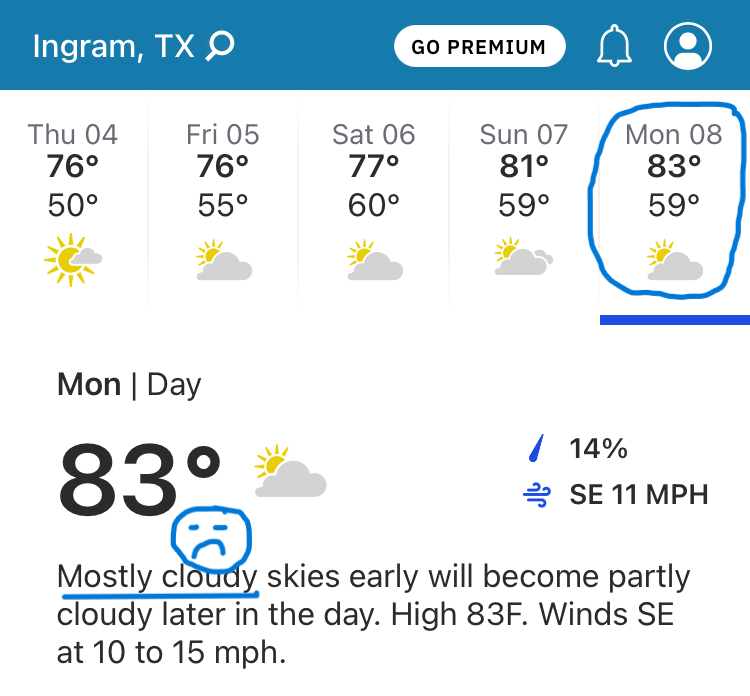
The other plus is that we did choose a nice vacation spot which is the “Hill Country” in Southeast Texas. We are in a town called Ingram which is in Kerrville County. Scenic rolling hills abound with the Guadalupe River running through it.
We are staying at a riverfront cabin. In this pano image the cabins are on the right and the river is actually about 30 yards from the fence on your left.
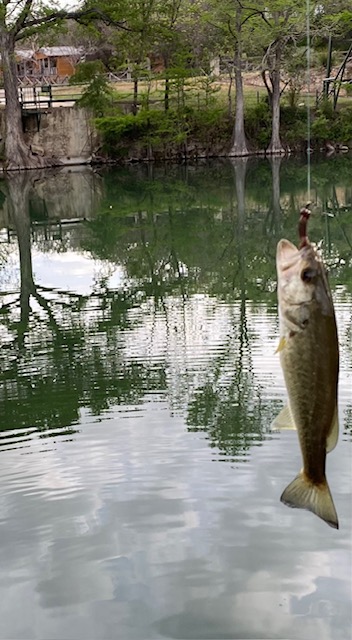
And as I mentioned in the last post there is fishing here! Trout is the most abundant, but there is also bass, which I think the fish above is, and perch.
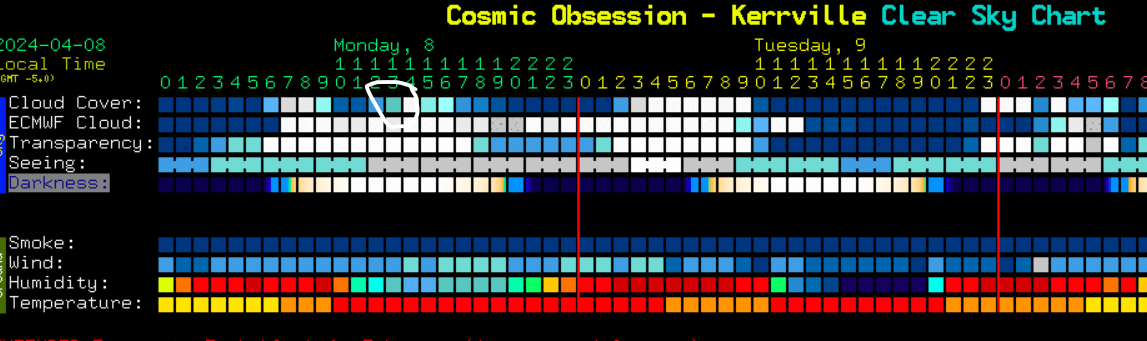
Now stranger things have happened. The Kerrville clear sky clock above shows the time just before the start of the eclipse as clear (blue squares) but then at totality the cloud coverage increases to around 60-70% (white circle). If that shifts slightly we could be in luck! But as of 5am local time it’s not looking particularly encouraging.
In the event of overcast skies we might consider watching the umbral shadow approaching. Or we can always just watch the NASA webcast!
And so we continue with eclipse preparations, now about 10 days to go! Last time we came up with the strategy we will use for the eclipse, tested switching to high speed drive mode and used the intervalometer. We retested focus at 15x and checked a sample of images from the high speed sequence to make sure they were captured and were in focus. We tweaked tracking by figuring out the correction needed between the magnetic pole from the smart phone app and true north since most likely we’re polar aligning during the day.
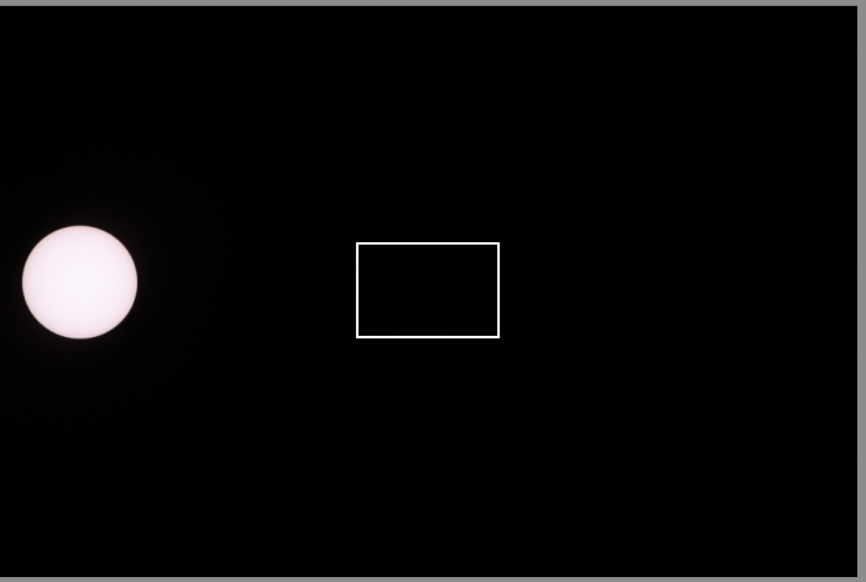
Today we ran through a timed simulation, beginning with setting up high speed drive mode using the laptop, deploying the shutter for 25 seconds, then switching to single shot mode, setting exposure to 1/2000 and going through a manual sequence of turning the exposure wheel 2 clicks down x 20 times. These are the resulting exposures which would occur during totality:
Exposures > 1 sec might capture the Moon’s surface detail.
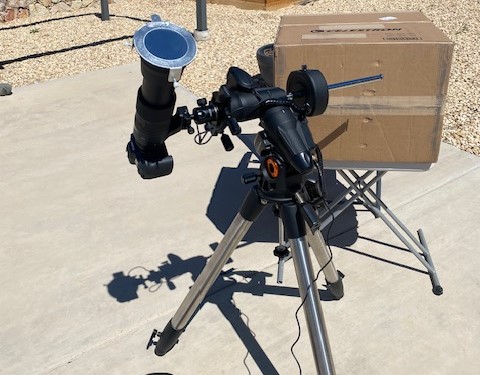
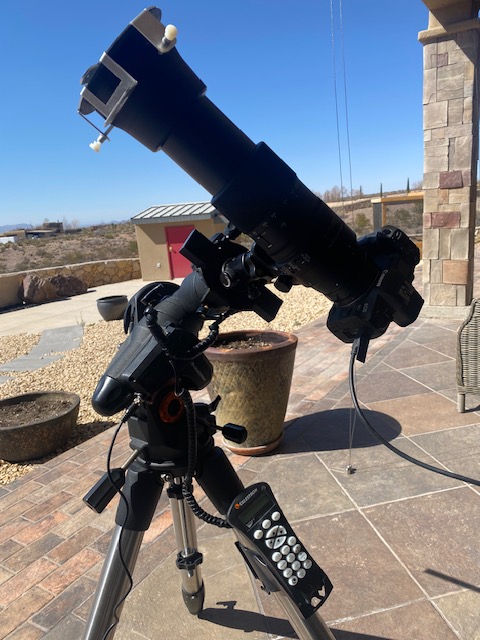
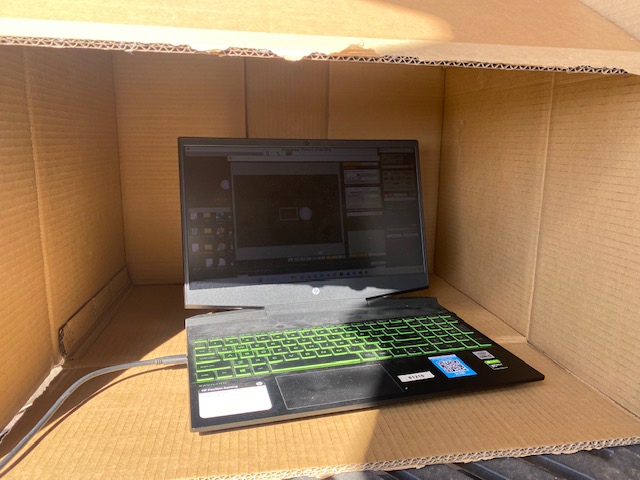
Picture of set up including Celestron AVX mount, Canon R5 with 500mm telephoto, cardboard box with laptop inside shielded from Sun (kind of- there still is a fare amount of glare in there). Lithium battery is used for power for laptop and mount
After the single shot sequence above, I had to go back to the laptop and change the drive mode back to high speed and reset exposure back 1/4000. Each time you’re done with settings in the utility, you have to be sure to close out of the ultility software and disconnect the camera-laptop usb otherwise the intervalometer will not deploy a high speed shutter burst.
I did 2 runs. The first one, again from high speed shutter at C2 to high speed mode at C3, with the single exposures in between took 4′ 25″. The second one I was able to decrease it to 4′ 8″. The duration of totality is 4′ 25″. This is basically what will save us! This is a fairly long eclipse. So I think we will be good especially with a few more practice runs. The eclipse practice run in the Solar Eclipse Timer app (see last post) uses the 2 minute eclipse from 2017. With my approach I probably would not have been able to get the exiting images at C3, but we will run through that just to hear the announcements that the app plays to you and we can still get a feel for going through the steps as long as we can.
Basically from here on out we will continue to practice, perhaps shaving off a few more seconds. When we arrive at the observing site we can load in the exact longitude and lattitude into the app so it will produce the contact times and be able to run properly.
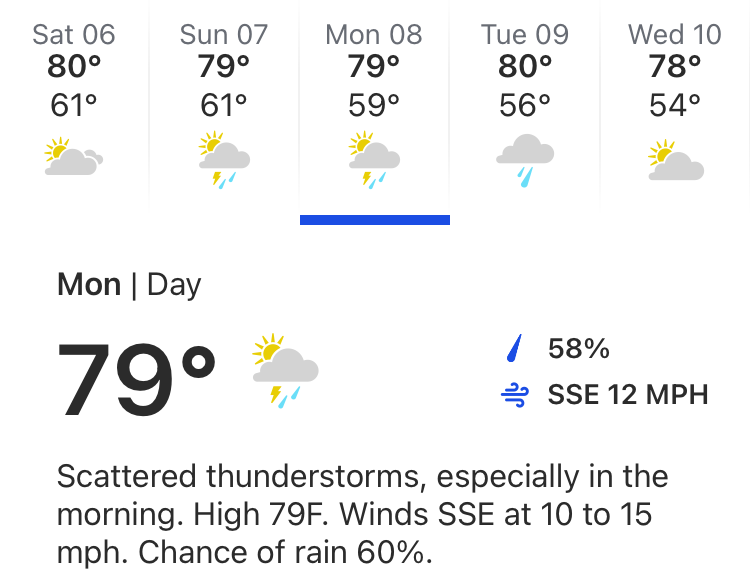
And finally the weather update….bad 😦 10 day forecasts can be 50/50 though, so we will see.
And so we continue with eclipse preparations! Last time we did confirm decent mount tracking of the Sun and ability to track past meridian. I adjusted my estimation of optimal Sun disc exposure time to about 1/1000 sec. I realized that I will have to change the camera drive mode from single shot to high speed continuous and back to single again using the utility software on the laptop because I absolutely cannot see anything on the camera’s flip out LCD screen! So this will add maybe 20-30 seconds to operating time.
I think the approach is starting to become clearer now. Hear are the anticipated steps:
Pointing and alignment to the Sun (FILTER ON!)
Center and focus using the laptop- perhaps 20 minutes or so before totality
Take a couple of partial phase shots maybe 10 and 5 minutes before totality
Change the drive mode to high speed plus and select 1/4000 sec expsoure
Disconnect camera from laptop
REMOVE FILTER when prompted (see below)
At the appropriate time (see below) just before C2 we initiate high speed “burst” mode holding down the button on the intervalometer for 25 sec
Reconnect to laptop and change drive mode back to single shot, select maybe 1/1000 exposure
Disconnect from laptop and take single shots, moving up exposure times in “2-click” stepwise fashion MANUALLY using the wheel in the front of the camera and if there is time, back again to faster exposure times until just before C3
Connect to laptop, change drive mode back to high speed, set exposure to 1/4000.
When prompted at C3 start the high speed burst sequence for another 25 sec
REPLACE FILTER
Change mode back to single and take a couple of “parting” partial phase shots
END
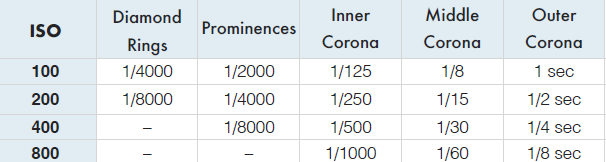
Approximate expsoure guidelines for inner and out corona. From Alan Dyer’s ebook “How to Photograph the Total Eclipse”
Alright so that’s quite a lot of stuff there. I have to remember to look up during totality while I’m taking the single shots!
So you’re probably wondering how the heck am I going to know when to do all of these things!
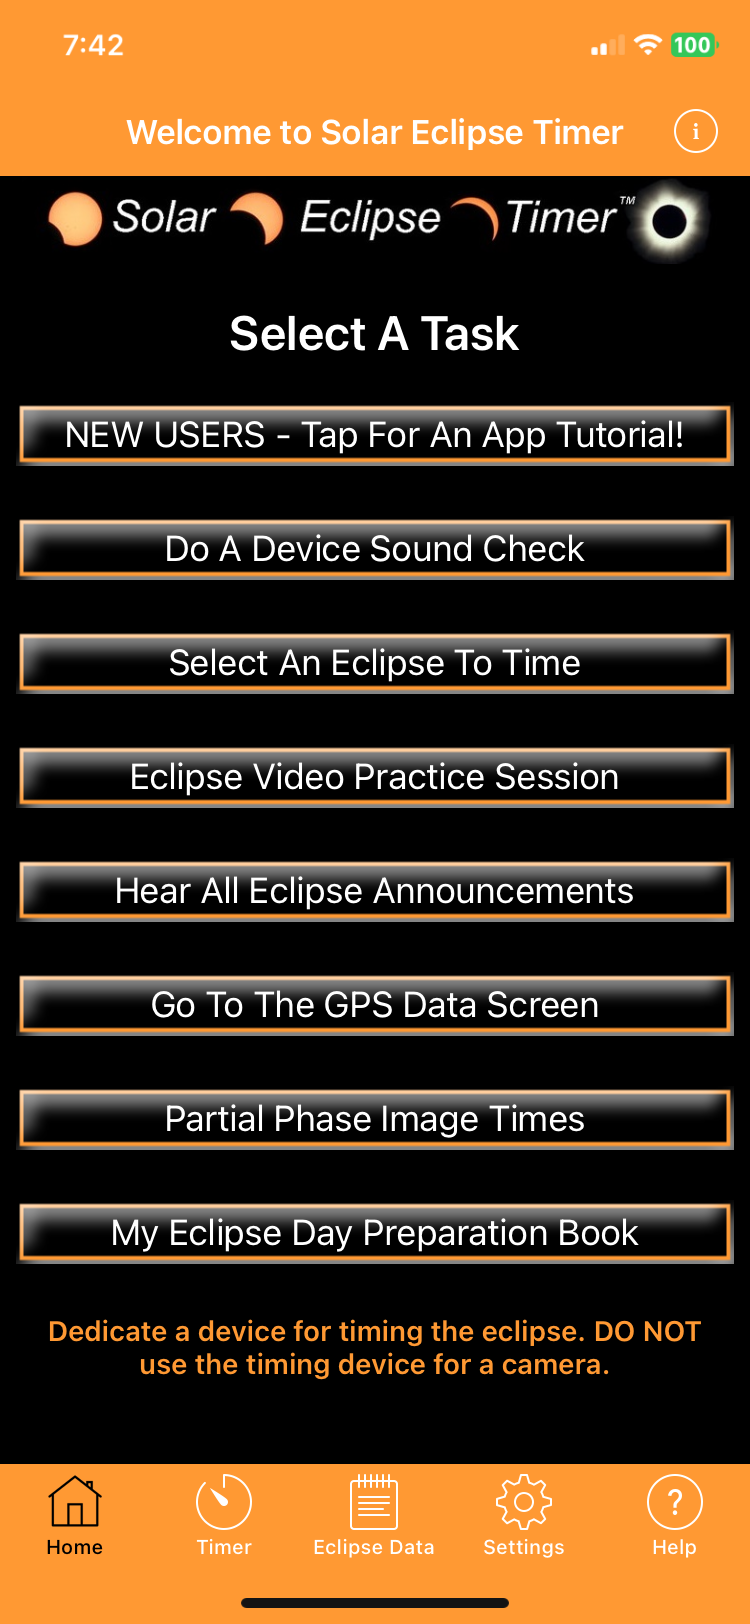
The “brains” of this whole operation is an ingenious smart phone app called “Solar Eclipse Timer” created by Dr Gordon Telepun. Please see this recent presentation that was done on The Astroimaging Channel
The Solar Eclipse Timer app will enable you to load your observing longitude and lattitude and when you do this the exact timing of all eclipse events will be automatically stored in the app! Just follow the directions as it walks you through every phase of set up and operations. The key for us will be the “Eclipse Video Practice Session” In that video there is a compressed version of the last eclipse in 2017 and there are voice announcements that prompt you as you go through your workflow. If I can do everything I need to during that practice then I should be totally good to go as that last eclipse was only 2 minutes! This one is twice that length. We will probably have to run through it multiple times.
Finally we’re getting a very preliminary long range forecast for our observing site. Not so good right now but it’s early and I know about the unsettled weather in Texas during the Spring. It is what it is, but hopefully even with a partly cloudy diagnosis we will still get to see something. This is one big advantage of a tracking mount. Once the Sun is lined up it will stay pretty much right there until the clouds pass!
My wife and I discussed this whole weather thing already. We reserved a spot for 5 days a good year and a half ago. That whole region of Texas is going to be unbelievably crowded and likely gridlocked for even a day or 2. It is highly improbable that we’re going to be able to get to a clearer area trying to travel northeast from our location. I did get to see the last eclipse in 2017 and we have others planned including a trip to Spain in the Summer of 2026 where the chances of inclement weather are practically zero.
The point being is that my back up plan for weather turning bad in our observing spot will be……fishing 🙂
And so we continue with eclipse preparations! Now it’s getting kind of close. Last time we went through initial equipment testing. We established that the mount is able to align on the Sun and can track pretty well. The solar finder is able to put the Sun in the camera field fairly predictably. We can focus and center the Sun’s image. We took a provisional Sun disc image which we thought was optimal in terms of exposure.
In this session we wanted to test the ability to track the Sun past meridian after setting that feature in the mount’s control system, since it looks like totality will end about 3 minutes before transit of the Sun and just in case the timing of that is a little off, we don’t want to be in a situation where tracking stops right in the middle of everything!
I wasn’t totally happy with focus after looking at the images from last session so we wanted to improve on that. Finally we wanted to test going from single shot drive mode to high speed continuous mode which will occur during the eclipse as we go from taking the last couple of partial phases to diamond ring/Baily’s beads just before C2 up to full totality. Then we want to examine the shots taken during the high speed continuous mode to see if they remain in focus.
I set up the equipment aound 1PM local time which was about 15 minutes before the Sun’s transit. This ensured that when the camera slewed to the Sun it was still east of the meridian (Meridian is a great circle arc from north pole to south pole. The local meridian goes through the zenith or highest point in the sky and the passing of the Sun across the meridian marks its highest elevation in the sky at that site as it goes from east to west. Since I am using an equatorial mount, when an object passes from east to west, the mount has to “flip” from pointing east to pointing west at some point after the object crosses that line. That operation called “meridian flip” interrupts everything until the mount repositions itself on the east side pointing west. This is why we need to avoid this happening during the eclipse). Here you can see that the mount is tracking past the meridian. The camera side is lower than horizontal which means that it is west of the meridian. Actually the whole session lasted until a good half hour after transit so we did confirm that tracking will continue until at least that time which should be more than enough!
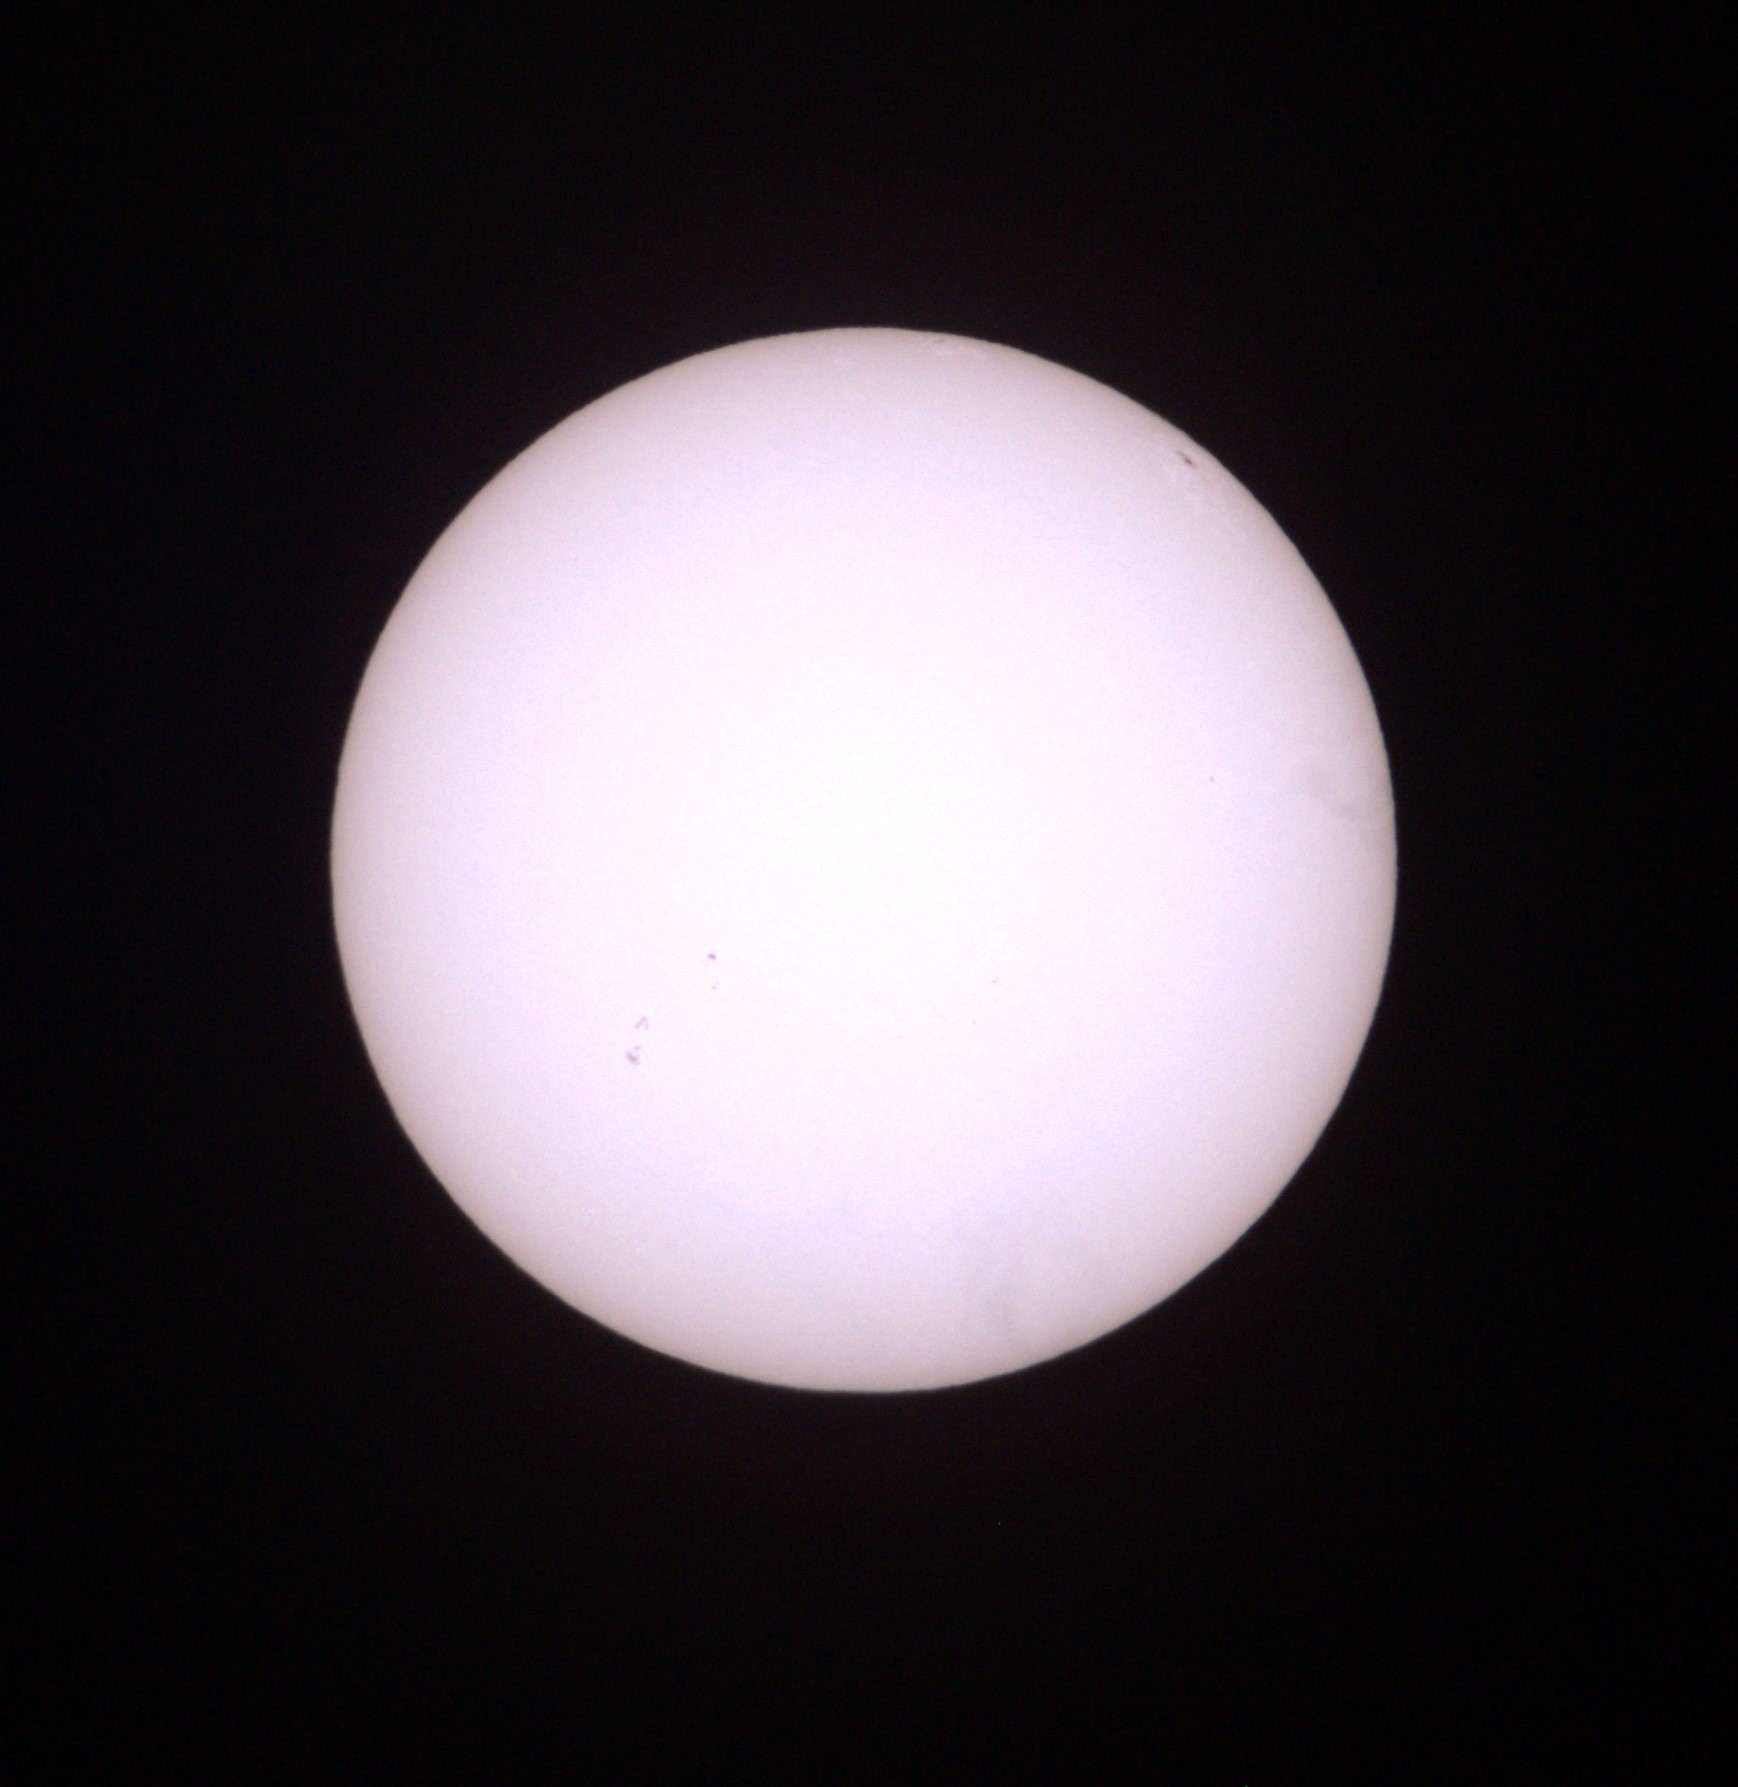
Next was improving focus and optimal disc exposure time. The reference I have been using for exposure time is for glass filters. This filter is a Baader Solar Film filter which is constructed from light weight aluminum and gives you this whitish solar disc. I think it’s a lot harder to judge than the yellowish images, but from experience and multiple tests I’m going to say that this 1/1000 sec exposure above is close to what I want. I know I said last time it was a lot faster like 1/2000 but now I’m thinking this is better.
I decided to use the 15X live shoot mode for focusing and this I believe has definitely improved focus as you can see! I think it’s as good as it probably can get for manual focusing on a telephoto lens focus ring.
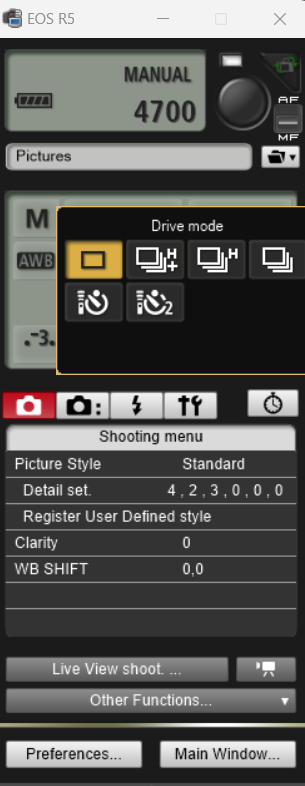
Now comes the challenging part! Initially my plan was to connect the camera to the laptop only once before C2 for focus, centering and partial phase shots, then once after. I would then change the drive mode from single shot to high speed using the camera screen, then go to possibly a previously set up bracketed exposure sequence for totality, then back to high speed and finally connect back to the laptop for a couple phases after. Well that approach is NOT going to work AT ALL! With the camera pointed nearly directly up, I was kneeling down and trying to read the drive modes on the LCD screen. Forget about it! I can’t see squat on that tiny screen in the bright sun! By the time I get that done the eclipse will be over.
So instead, I will have to set the drive mode using the Eos utility software on the laptop. This is MUCH easier but will take several seconds more possibly. The single shot mode is highlighted in yellow above and the high speed continuous mode is the one immediately to the right of that.
After setting the drive mode to high speed continuous and selecting a shutter speed of 1/4000, I disconnected the camera from the laptop and pressed the button on the intervalometer, holding it down for about 20 sec. An intervalometer is just a shutter release cable connected to the camera and enables you to take the pictures without touching the camera body. There is also a timer on it so you know exactly how long the shutter remains open. The high speed + mode allows for taking about 10 frames per second! I really think this is a plus rather than trying to do it manually with separate exposures. The challenge will be to see if I can switch back to single shot mode during totality and then back to high speed for C3! The one thing we have going for us is that this eclipse is fairly long, just over 4 minutes so I think we will be good.
Anyway, the 20 minute burst high speed mode took 241 images! I randomly sampled a handful of them to check focus and it does look like it held up very well.
For exposures at the beginning of C2, I’m using the references I have cited in earlier posts (Alan Dyer, etc) because that system is very close to the one I am using. So we have 500mm ISO 200, F 6.3 and 1/4000 sec. I actually did not understand what exactly “2 stops” of exposure time means. It’s basically doubling, so 2.5 stops would be around 1/4000 if I am fairly certain that 1/1000 is an optimal solar disc exposure.
Next time we will test the exposure sequence we will be using for totality and take a look at the eclipse timing app that will be critical for all of our tasks!
And so we continue our total eclipse preparations! Now about 3 weeks out, but for me a few days less because we are leaving actually on the 4th of April, visitng friends down in Texas for a couple days before heading to the observing site on the 6th.
That being the case, we are really going to have to have everything dialed in prior to April 4th which is at least my official deployment day!
Today we started getting into some serious equipment work. As some of you may recall, I discovered the Celestron AVX control board failed sometime since the last total eclipse in 2017. We had to go manual for the annular eclipse last October (see “ring of fire” post) and that worked fine for that event but for a total eclipse there are so many things happening you do not want to fuss with moving the RA axis of the mount every 20 seconds or so.
Camera mounted on Celestron AVX mount
Immediately after the October eclipse I shipped the mount back to Celestron and they successfully updated the control board! I tested the mount shown above and we are able to align perfectly fine on the sun after setting the time and location (you have to enable the sun as an object in the handpad because all of these mounts have built in sun pointing restrictions . Manufacturers don’t want anyone looking at the sun with no protection!)
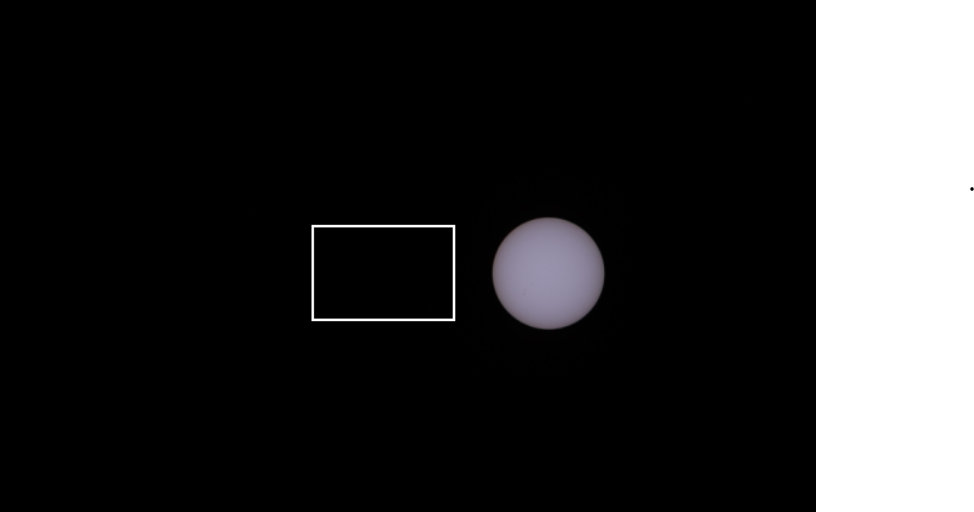
I was able to confirm accurate pointing and tracking. Slewing the camera to the Sun was close enough to where the projected image of the Sun on the filter was close to the target and in the camera, the Sun was at least in the field of view! This is huge because now we can focus efforts on exposure timing etc without having to worry about the Sun leaving the field.
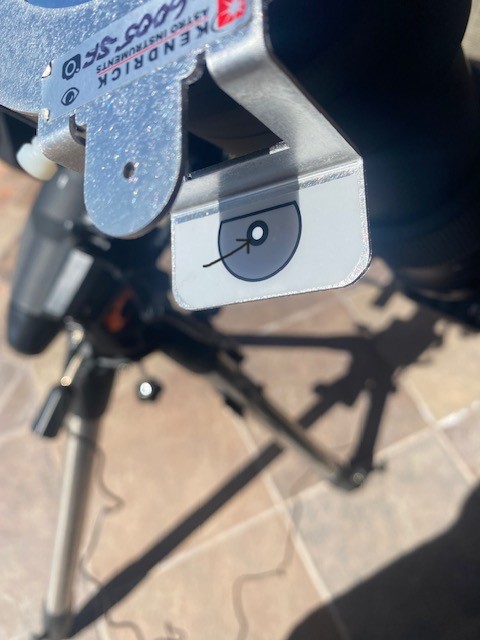
The projected white dot of the Sun easily falls somewhere on the metal plate, then it is a simple matter to center it inside the target with the handpad (black arrow).
I should point out that prior to turning on the mount I did a very rough daytime polar alignment just using a smartphone compass and making an altitude adjustment using the calibrated scale on the mount. Even with this crude, hardly accurate method the tracking was quite good! I plan to fine tune this at the observing site, hopefully aligning on Polaris the night or 2 before.
Centering the Sun projection on the filter yields this position of the Sun in the camera FOV. This will improve once we get better polar alignment.
Now honestly I cannot imagine possibly figuring anything out regarding focusing using the camera’s flip screen. Maybe it’s just my age but in the bright sunlight I cannot see a darn thing on that screen! So I have decided to use a laptop placed inside a cardboard box, somewhat shielded from the sunlight so I can focus the camera and center the image. In this test the box was tilted a little more toward the Sun than it will be on eclipse day.
This will be the only purpose of a laptop connection, namely focusing and centering. At the last eclipse I ran the whole thing automated with the laptop connected. This was fantastic for my first go, but as I have learned this approach cannot work for capturing the fleeting events of the beginning of second contact, (diamond ring, Baily’s beads). The program I used basically automated a bracketed exposure sequence which can work for the Corona during totality but you need too many exposures in too short a period to do what we want to do this time.
In addition to testing the mount, we needed to focus and then determine an optimal exposure for the Sun’s disc. I will explain why that is necessary later. I also wanted to see if focus was maintained over a period of time and also if the mount’s tracking would keep the Sun in the field for at least a half hour or so.
At the last eclipse I mentioned I did have trouble with the Canon Eos Utility program crashing after maybe 30 minutes or so of usage but it’s very simple to use and this time I am using it only for focus and centering so that will only take a few minutes. Once that is done I should not have to connect the camera again (hopefully!). Here you can see it’s easy to identify the shutter speed settings and then use the round black button at the top right to take the exposure.
The reason we need to determine the best exposure for the Sun’s disc is that 2-3 stops faster will be what you will need for Diamond rings etc.
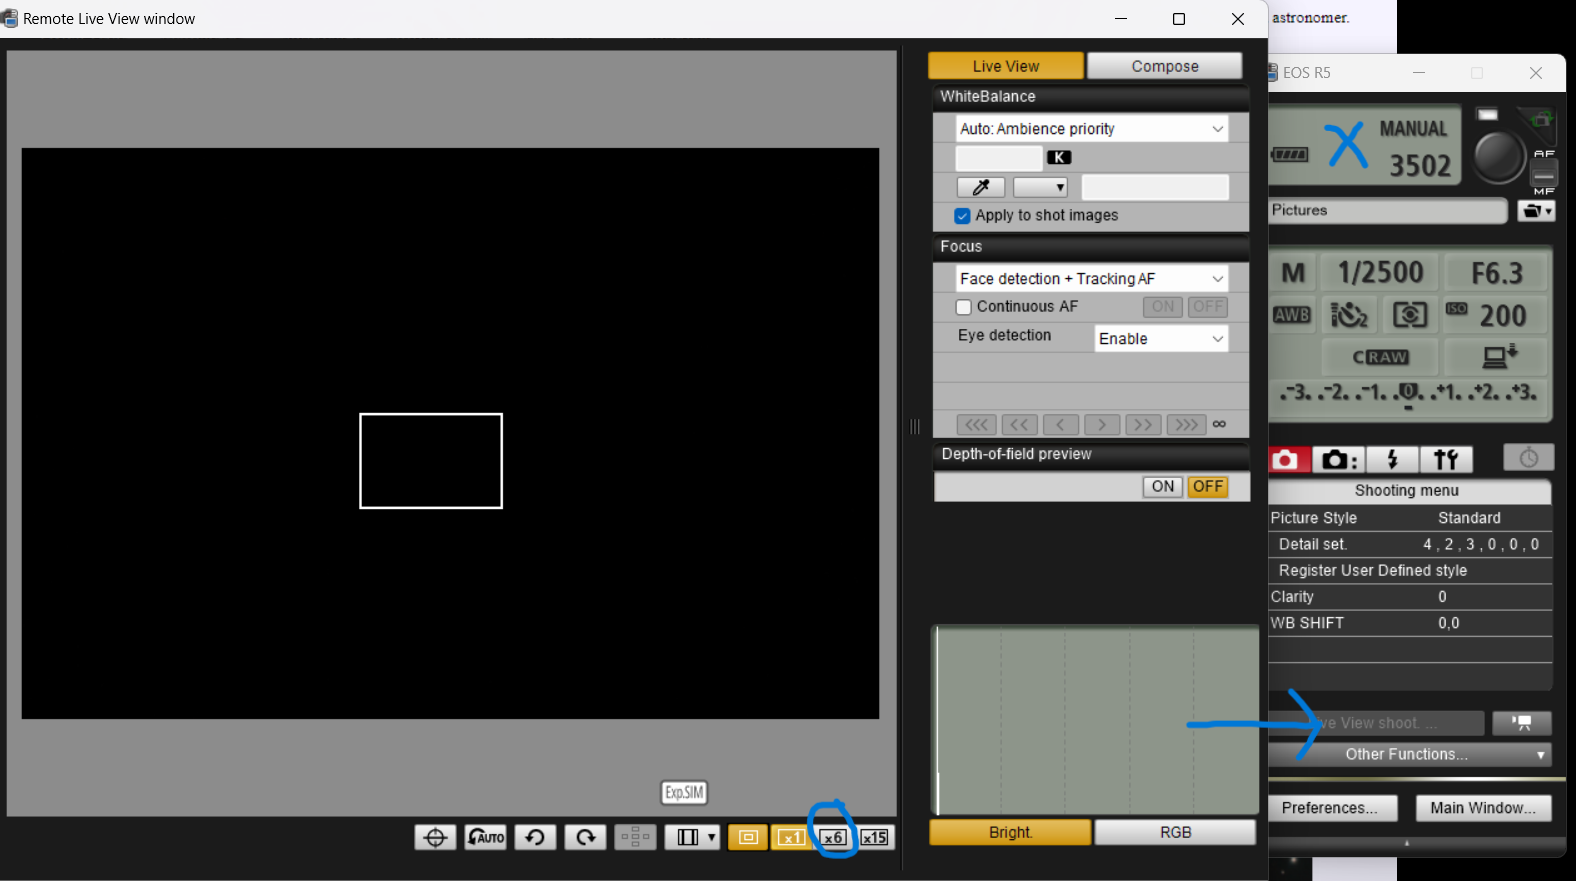
For focusing use the “Live View Shoot” mode (blue arrow). Click on the ‘x6’ magnification button. If you get a “Busy” error message in the top screen (blue ‘X’) just close out of live view and reopen, then click on the x6 button again. I thought 6 times mag was totally sufficient. Things are already bouncing around like crazy so any more I think would be a bit much. Focus on a sunspot group (we have an active solar period now!), but if you don’t have that to look at focus on the Sun’s edge.
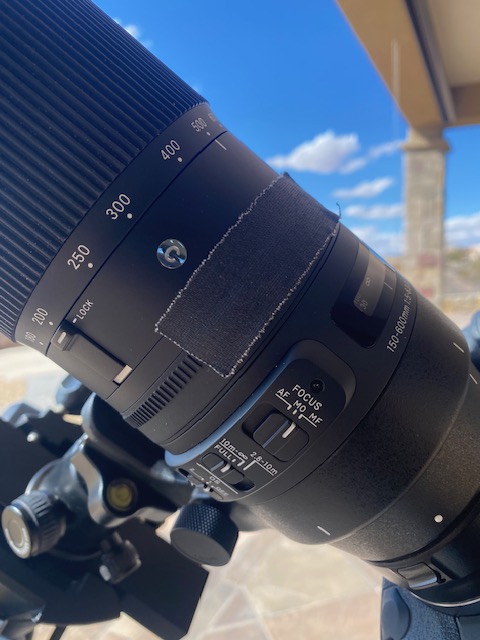
Once you have achieved focus, put a piece of tape on the focus ring. Use Gaffers tape if you can get it. It’s used in the construction field: a light weight cotton-like material that is perfect for optical gear. It will not leave any residue on your equipment and is very easy to remove and also re-usable many times.
This is 1/2000 sec ISO 200 F6.3, 500mm FL. I used 600mm at the last eclipse and figured I’d back off just a tad to enable capturing of the full corona. This image is cropped so you can see the sunspot groups better.
This is 1/2500 sec. I tested exposures from 1/200 all the way up to 1/5000. The color with this kind of filter is very white with kind of central blush in there almost greenish so it might be a little more challenging to assess the correct exposure, but 1/2000 to 2500 looks about right.
I then waited nearly a half hour and repeated a 1/2500 shot to see if focus was maintained. Looks like it is the same. It’s a challenge manually focusing a long telephoto but I think it’s just about there. We will have many chances to improve on it if that’s possible.
This is the actual full frame image scale uncropped so you can imagine that with the Sun centered there should be no problem capturing the full corona. This was the position after 30 minutes from when I had centered it so that’s still pretty good despite the very rough polar alignment!
So let’s assume 1/2000 is our disc exposure. We’re looking at probably around 1/4000 for Diamond ring etc.
Next up we need to test high speed continuous shooting with an intervalometer!
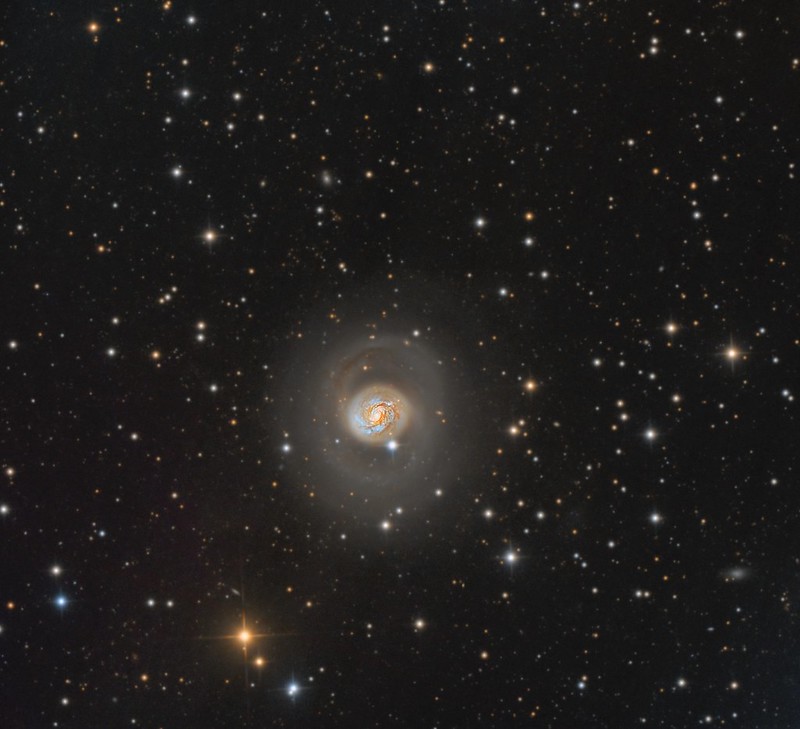
NGC 1055 is an edge-on spiral galaxy located in the constellation Cetus . “Edge on” meaning the plane of the galaxy lies along our line of sight as opposed to “face-on”. Imagine looking at the edge of a dinner plate. This would be the edge on view. When you can see the whole round plate in front of you, as well as what’s for dinner :), this is the face on view.
The galaxy has a prominent nuclear bulge crossed by a wide knotty dark lane of dust and gas. The spiral arm structure appears to be elevated above the galaxy’s plane and obscures the upper half of the bulge. Discovered on December 19, 1783 by William Herschel.
A rough distance estimate for NGC 1055 is 52 million light-years, with a diameter of about 115,800 light-years, slightly larger than our own Milky Way (about 106,000 light year diameter). NGC 1055 has extremely active star formation and is a bright infrared and radio source. It is in a binary galaxy system with neighboring M77 (previously imaged- see below) and there are a few million light years between them. Unfortunately I could not quite get both galaxies in the same image field!
M77 above , the binary sibling of NGC 1055, is a barred spiral galaxy 47 million light years away in the constellation Cetus (The Sea Monster in Greek mythology but typically whale in modern times). Fitting for this galaxy because it belongs to the Seyfert class of galaxies, one of the two largest groups of galaxies that contain active galactic nuclei which are characterized by the presence of a supermassive black hole at the center. These are the most luminous sources of electromagnetic radiation in the universe and while most of the radiation is in the form of high energy xrays and ultraviolet, 5% of Seyferts, including this one, are also strong in radio emissions. This has been studied extensively by the VLA (Very Large Array), an array of radio telescopes right here in New Mexico and only about 45 minutes from my rigs in Pie Town! The strong radio source is designated “Cetus A”.
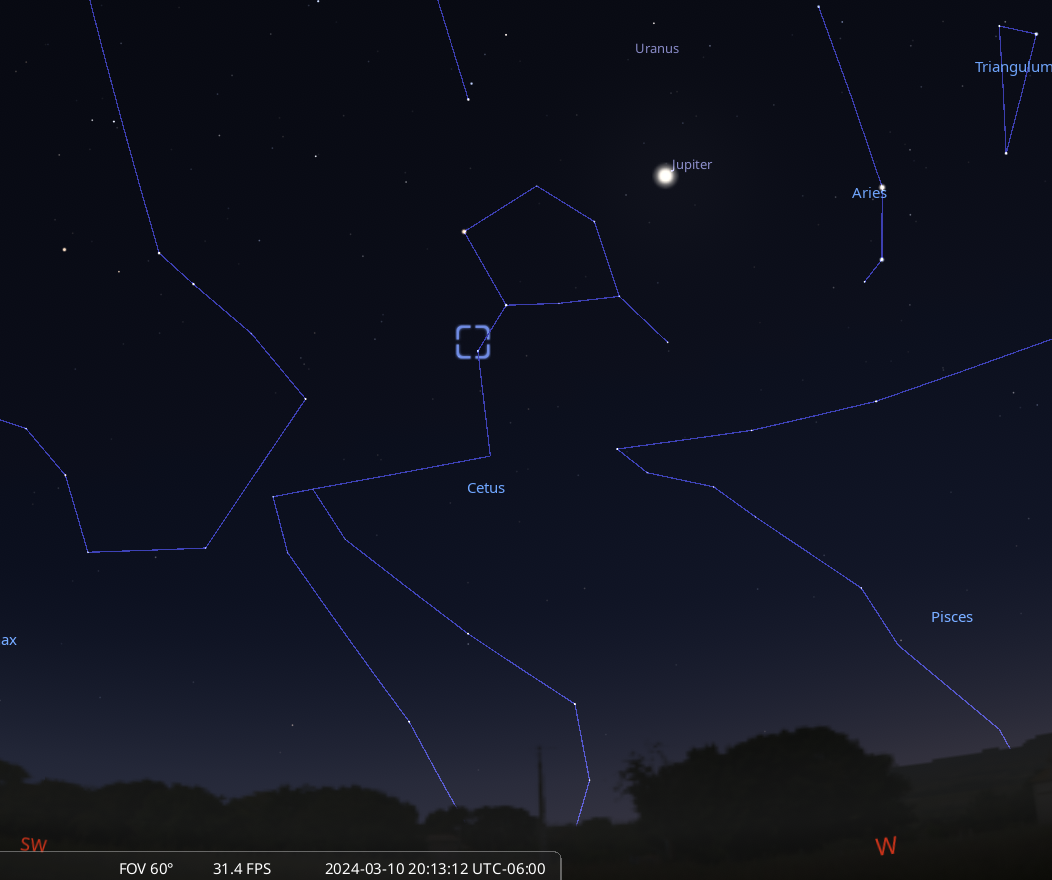
NGC 1055 is low in the Southwest at sunset here in the northern hemisphere (blue square). It is in the constellation Cetus, near the head of the whale. It is quite dim, near magnitude 11, so a large telescope is required to even recognize a faint smudge in the field of view!
And so we continue preparations for the April 8 solar eclipse in Ingram Texas! Before actually testing equipment we wanted to firm up a couple of important organizational items. First off is the actual official contact times for our intended location. We will update these when we get to actual site but there are potential timing “gotchas” that could happen in this case.
Number one is that here in the US we insist on changing clock times creating the annoying “Daylight Savings Time” vs “Standard Time”. This year daylight savings occurs on March 11, so clocks move ahead one hour. Number two is that we are going to be traveling to the observing site in the next time zone east of us so we will be technically in Central Daylight Time. Thankfully the calculated contact times are in Universal Time. However if you are using the “Eclipse Timer App” on your phone (to be discussed in a later post) and you load the contact times now, they will be off by one hour. You need to check another way.
“Universal Time” is mean time for the meridian at Greenwich, England (0° longitude), which runs through the former site of the Royal Observatory. It is based on the sidereal period of Earth’s rotation and is used as a basis for calculating standard clock time throughout most of the world. It is also called “Greenwich Mean Time”. All it means practically for us is we need to know how many hours west of the Greenwich Meridian we are going to be at to calculate the local times of the eclipse events.
On April 8 this year we will be in the Central Time Zone for the US which will be 5 hours west (EARLIER) than the Universal Time taking into account we will be in Central Daylight Time thanks to daylight savings!
So we need to know:
The real contact times we can expect
Where the Sun will be in the sky
Where the Moon will be coming from
Where on the Sun’s limb the photographic events are going to happen
When the Sun will cross the meridian
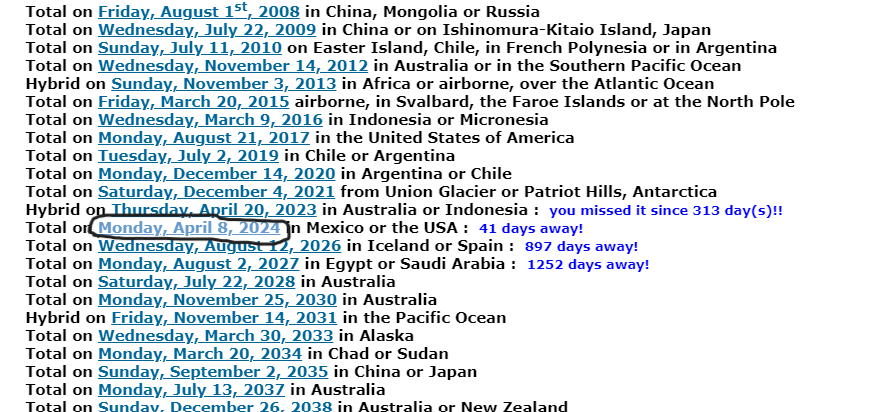
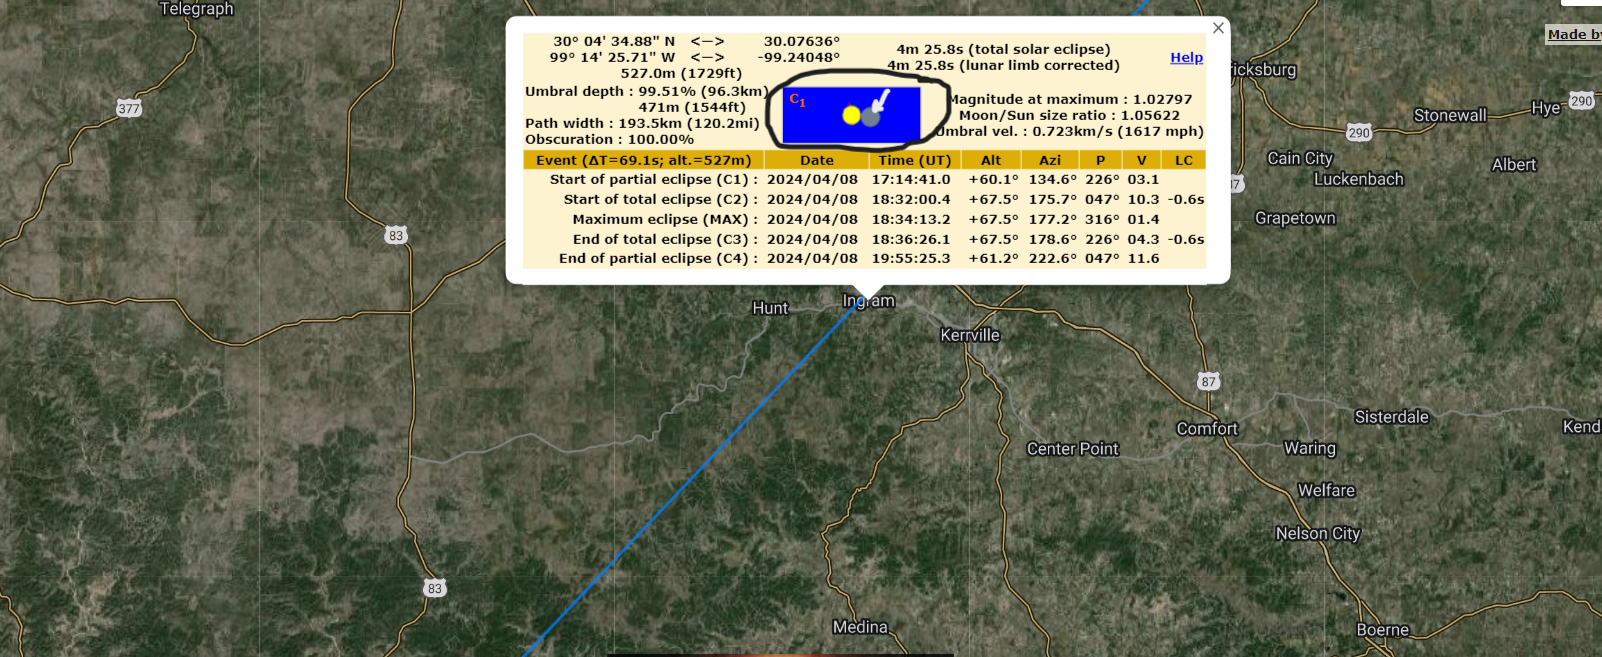
To do this we make use of this fantastic resource which is an Eclipse Interactive Google Map created by Javier M. Jubier.
First click on the eclipse to observe as shown above.
When you click on the eclipse date you are taken to the Google map. There you find your observing site and click on it. Like magic, the contact times are presented as shown! Just to review, ‘C1’ or First Contact is the beginning of the partial eclipse, when the Moon just starts to cross the Sun’s disc. You can see the Moon there in the graphic (white arrow) which is telling us the moon begins to cross the disc going from right to left.
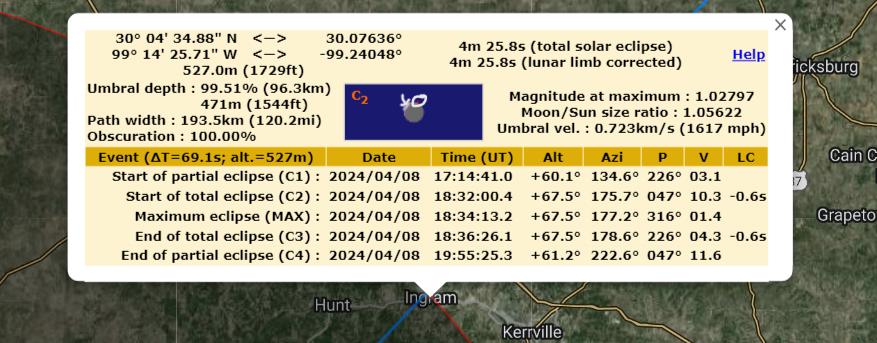
Now looking at the times we see that the start of total eclipse ‘C2’ occurs at 18:32 Universal Time which would be 1:32 PM (13:32) local time, arrived at by subtracting 5 hours for our time zone.. This seems correct since our initial estimate was around 1:30 local time. The eclipse duration is around 4+ minutes, also correct.
So we now have confirmed the correct contact times and we also know which direction the Moon is coming from.
The above graphic shows the appearance of the sun at C2 which is the very beginning of totality, however the few brief seconds before complete coverage is when all of the events we want to capture will occur before the corona! This includes Baily’s Beads and diamond ring effect which we covered in an earlier post. The white arrow shows the simulated diamond ring which is happening in the left upper quadrant. The white circle surrounds a red tick mark in the graphic showing us where the solar north is going to be.
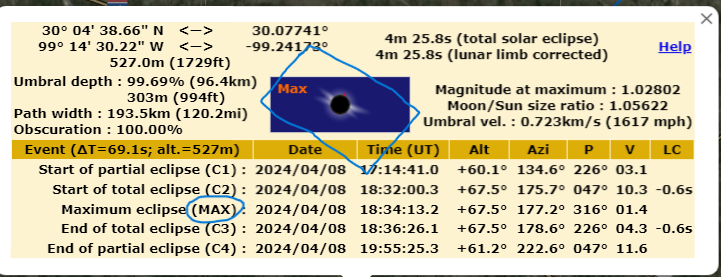
In this display above we can see that we will have to slightly rotate the camera (blue square) so the C2 events (and C3 at the end repeated) will be aligned centrally in the frame from left to right. Now you could also determine this when the partial phases begin and of course if it’s still rotated you can always correct this during processing 🙂 But it is helpful to know where you will be looking ahead of time.
If you click on any of the contact times in parentheses (circled above), this is actually a hyperlink that will take you the “Peak Finder” page displaying the location of the Sun with respect to the landscape. Now for us it’s not going to be that useful because we can already see the Sun will be very high in the sky (about 68 degress altitude). If you were planning a wider field view and totality was occurring more toward sunset let’s say, this could be very helpful.
Peak Finder page showing the Sun’s altitude at totality
Finally we are going to need at least a reasonable estimate of when the Sun will cross the meridian (basically highest point in the sky that separates east and west). We are going to be using a tracking (equatorial) mount and at some point after meridian crossing the mount will stop tracking until it gets “flipped” to the east side of the meridian so it can track west. If this happens mid eclipse that could be a major problem.
Above is a table of data from the US Naval Observatory that seems to indicate solar meridian crossing (also known as “transit”) will occur at 13.39 on April 8. This is 1:39PM. So it’s pretty close but probably not going to be a problem since totality is expected to end 3 minutes earlier. What we will have to include in our testing is how long the mount will track past the meridian. This will be very important!
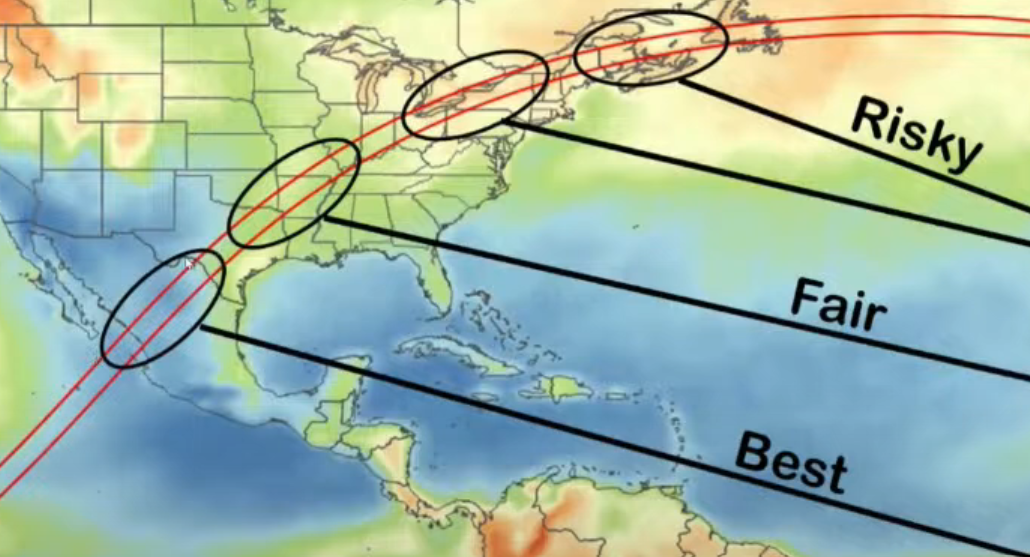
And finally just a rough weather projection which shows the eclipse path and chances of inclement weather on eclipse day. We will be on the lower end of “Fair” which means we have a slightly better that 50% chance of good weather. Because of the enormous crowds anticipated along the eclipse path, which contains several metropolitan areas, I will be somewhat skeptical of our chances to successfully relocate at the last minute but nothing will be entirely ruled out!
I believe all the preliminaries are in order so next is the actual equipment preparations!