For many years I had planned to “one day” be able to operate my own observatory and equipment from a dark sky site. After years of planning and anticipation, then 3 years of building, installing and troubleshooting, “one day” became now. In July of 2018 I was able to complete my first remote imaging session from beginning to end! Of course this is a work in progress and there are countless maintenance tasks, repairs, upgrades etc that this sort of thing will always require, but if you are a tinkerer that’s part of the fun!
The purpose of this article is to share some of the decision-making steps, operational points and other concerns related to this project that hopefully will be helpful to anyone thinking about going remote!
Choosing a site
You’re going to spend probably most of your time in this area. Many considerations exist all depending on your situation. Obviously you want a dark site, but there will be a compromise. This is different than portable imaging where you can take your stuff to the darkest spots on the planet. In the case of a permanent set up you will need power lines and internet. That might be challenging in a random isolated location.
“High or Low” which way to go? The troposphere is the lowest layer of the Earth’s atmosphere and is where basically all the weather is, so forget trying to set up above that because that’s around 11 miles up! However the lowest part of the troposphere is the planetary boundary layer where friction between the earth’s surface and the atmosphere can affect air flow. At around 7000 feet you are above this layer so at least theoretically it can be a plus. The downside to higher altitude is potentially more wind and weather exposure, specifically lightning. Several people I know in our area who are at the top of the hill have had lightning strikes knock out equipment repeatedly. Bottom line is probably the darker the better regardless of altitude with consideration given to local seeing if that is known (see below)
Seeing isn’t everything, it’s the only thing. If you have a portable seeing monitor, that’s great. You can check seeing in potential sites under consideration but remember seeing is not guaranteed over the lifetime of your observatory. The climate is changing always. Seeing is also a very local phenomenon and is unpredictable. If you are planning to use big, long focal length optics you need to make absolutely certain the seeing will support it. If your focal length is more than 2000mm or certainly more than 2500mm, average seeing will be disappointing for you. Ideally in that case it should not be more than 2 arc sec average, which brings us to the next tips:
Telescope hosting sites. These are a great option if you have longer focus equipment where seeing conditions have to be excellent most of the time. They have a proven track record usually with on site seeing monitors you can access on their website and you can often see examples of images taken by people who have their equipment set up there. You may be in a situation where you don’t want to necessarily build everything from the ground up. Telescope hosting sites where you are just renting their piers have the obvious advantage of a ready to go platform where all you have to do is add your equipment. There is on site staffing to monitor your equipment and depending on the facility you can have everything set up for you and maintained where you don’t have to do anything once your equipment is on site or you may be fully responsible for setting up your equipment and making sure it operates properly. Obviously full set up and maintenance by the facility staff will cost more. Many people “team up” and go into something like this where the monthly costs can be shared. At least in the US costs range from about $500 to $1500 per month (as of 2021) depending on the set up and the size of your equipment.
Astronomy communities. If you are someone who does want to have the satisfaction of building everything from the ground up astronomy communities or sometimes referred to as “enclaves” have several advantages. You have people already doing what you want to do in an area that has at least some proven observing merit with respect to conditions. Many of these areas also have lighting restrictions so you are less likely to run into a situation where right after you set up a bunch of developers come in and build next to your observatory or people move into the lot next to yours and put up nasty security lights! Access roads to these types of developments are typically well maintained so you don’t have to risk life and limb driving equipment to your observing site! You also do not have to reinvent the wheel as it were. You are likely to find people who went through many of the troubleshooting steps you are going through and can help you avoid mistakes and problems.
There are a couple of potential downsides to some communities. If there is a property owner’s association make sure there are no restrictions that would affect what you want to put up there. For example, some communities may not allow modular homes if you want to have a small house on your property in addition to the observatory. Some developments have managers that oversee all of the available lots and sell them directly to buyers in which case you are probably going to pay much much more than market value for the property .
How far away from my home residence should I be? This is another big question. For myself, I am very thankful that I live just under 2 hours away from my observatory. Despite flawless planning there are going to be unanticipated events where you (or your wife, etc) will really need to be able to get to your set up for whatever reason. If this is not the case you will probably have to have your observatory in a development where someone there can assist you in an emergency. Many astronomy communities have this service but at additional cost. If you have friendly astronomer neighbors then you may be able to have one of them assist you in an emergency if you are away. The other advantage to relative proximity is that you can check the condition of your observatory with some regularity and deal with any rodent issues, moth infestations and other nature related phenomena!
Dome or roll-off?
Most people who are planning this already know which side of this debate they’re on. For myself I chose roll-off for several reasons:
1) Despite “remote” imaging, I do have a passion for the night sky so there will be times when I might have an imaging session in progress but will set up a chair inside the observatory and just do some casual observing with a pair of binoculars. Can’t beat that!
2) Even modest sized roll-offs can accommodate 2 piers so you can have 2 separate imaging platforms, one for example with larger, longer focus optics and the other possibly for wider field imaging.
3) Roll-offs are MUCH easier to operate remotely. There is only one piece of equipment, the roof motor, which is highly unlikely to fail. Current software for roof operation and equipment such as back up sensors to detect roof position are relatively inexpensive. Domes are quirky and it introduces one more layer of stuff that can go wrong. The dome has to be synched with your mount and often will not close unless it is in one specific position. Several dome shutters have more than 1 motor , adding to the potential glitches. Software from what I have seen can be very expensive.
4) Warm rooms. This is a great feature of the roll-off! I can stay up there for over 2 hours if needed in an enclosed comfortable room at least 20 degrees warmer than the outside.
Now there are a couple of downsides to the roll-off. Unless you use a very short pier where the roof will not hit your scope regardless of the position it’s in, you have to make sure your scope is properly parked before the roof can close. You can use a scope sensor which can interface with your control software or you can employ cameras to enable you to confirm visually that the scope is in the right spot before closing your roof. Ok so I’m not that brave when it comes to trusting a “scope sensor” to know when your roof can close. I don’t have any problem checking visually and then closing everything the next morning or whenever. Extremely reliable contemporary security cameras can be easily obtained for less than $100. The other issue with roll-offs is more wind exposure. If the wind exceeds 10-15 mph it can be difficult to image depending on your equipment.
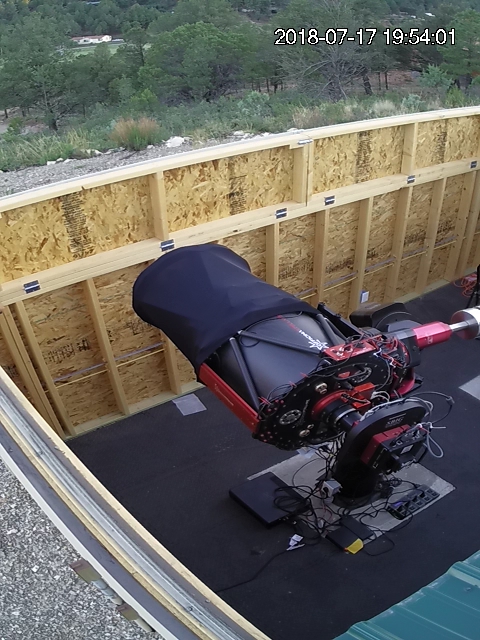
Outdoor camera view with roof open. The 16″ is ready for imaging!
Scope is parked flat as confirmed by outdoor monitoring camera
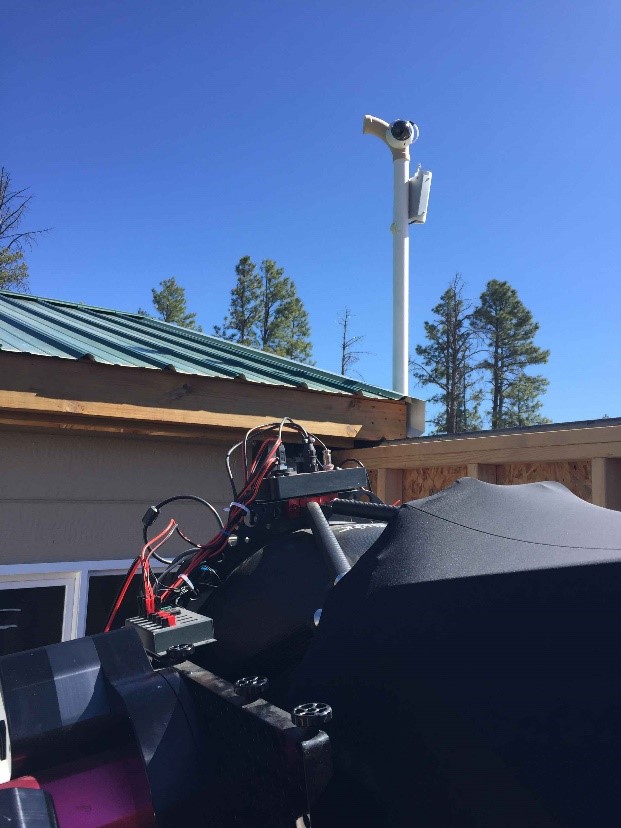
Simple to build tower consisting of PVC pipe onto which is mounted the outdoor video camera and Boltwood Cloud Sensor II.
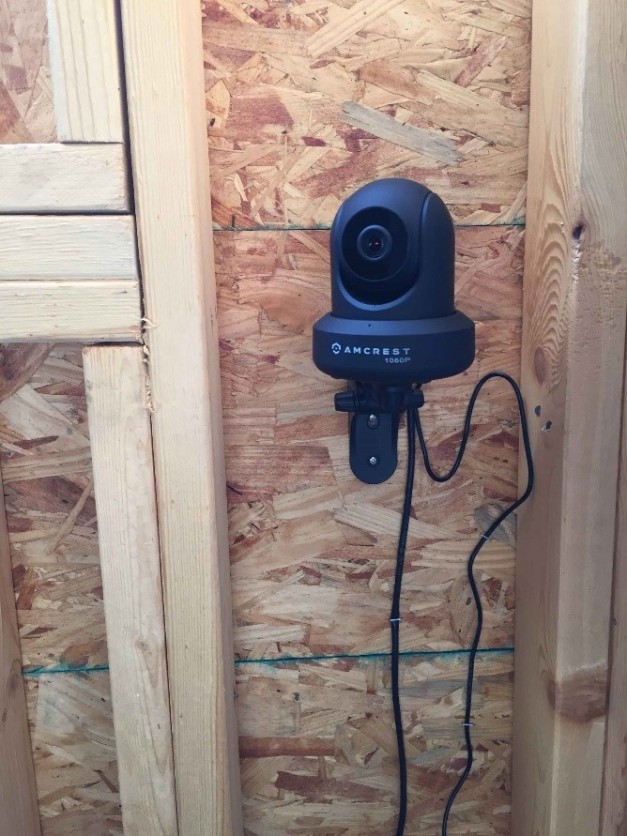 There are 2 cameras inside the observatory used for monitoring equipment. These are Amcrest cameras, under $100. Honestly these are the most reliable hardware items I have running!
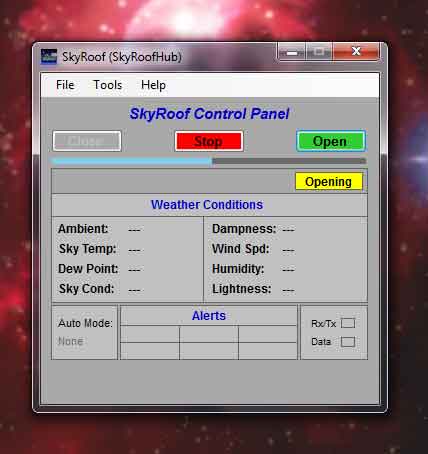
SkyRoof control panel showing roof opening
I have gone through 3 different roof control systems. The one I am currently using is “Sky Roof” from “Interactive Astronomy”. For more info you can check out this blog post
Am I ready? The stepwise progression toward completely remote operation.
If you are in the planning stages you want the transition to be as smooth as possible so you are not having to deal with multiple equipment issues all at once. This can be overwhelming. Ideally you should already have become fairly comfortable with “unattended” operation meaning you can turn your equipment on and it can run basically problem free throughout the night. There are many executive programs (e.g. ACP, CCD autopilot, SG pro etc) available now that can control all of the basic imaging functions such as focusing, guiding, rotating, etc. Once you have mastered the unattended operation of your equipment, you are ready for the next step which is simply turning on your equipment and starting your session completely off site. So instead of opening the roof with the hand switch in the observatory, physically turning on power to your mount, camera etc you will do all of these same tasks as though you were there in the observatory except you won’t be there…at all!
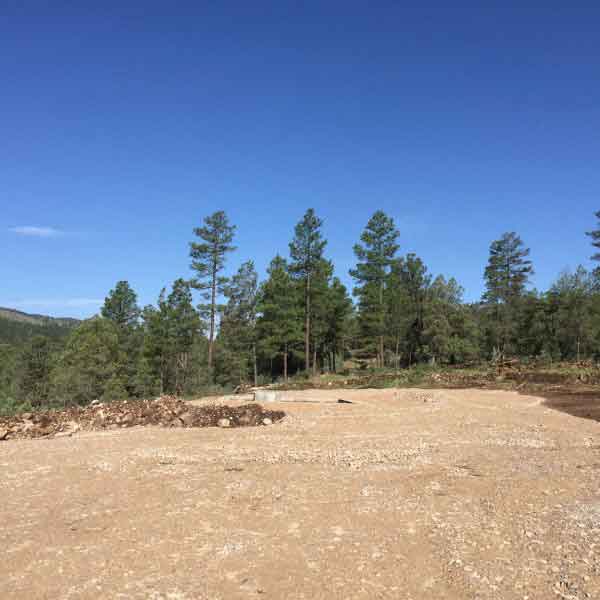
Site work and infrastructure considerations.
If you have trees on your lot you want to cut down, make sure there are no property restrictions regarding that. Even if there are no documented rules against it you might be surprised to find very passionate tree huggers in your neighborhood! Explain what you are doing and why. If there is a rainy season in your area, make sure there is proper drainage set up around your observing site. The other usual permanent observatory considerations are the same with respect to your concrete piers etc. Make sure the concrete is reinforced with rebar and goes down to the bedrock which can be a variable depth. If your pier requires alignment to the pole DO NOT use a compass. Best is a device called a Theodolite which enables you to site directly to the pole star. If you are installing multiple piers obviously make sure there is adequate separation for simultaneous scope operation. Make sure to install conduits to run data wiring from your piers to your warm room or control area and power from the mains to your pier. I don’t think it’s necessarily a problem to embed the conduits in your piers. It is highly unlikely you will have a problem with vibration in, for example, a 3 foot by 4 foot pier anchored to bedrock with 1 or 2 conduits. One conduit can be for AC power and the another for data. It’s very handy to have power right there on the pier so you don’t have to have cords running everywhere. Make sure though to have your piers isolated from the rest of the flooring.
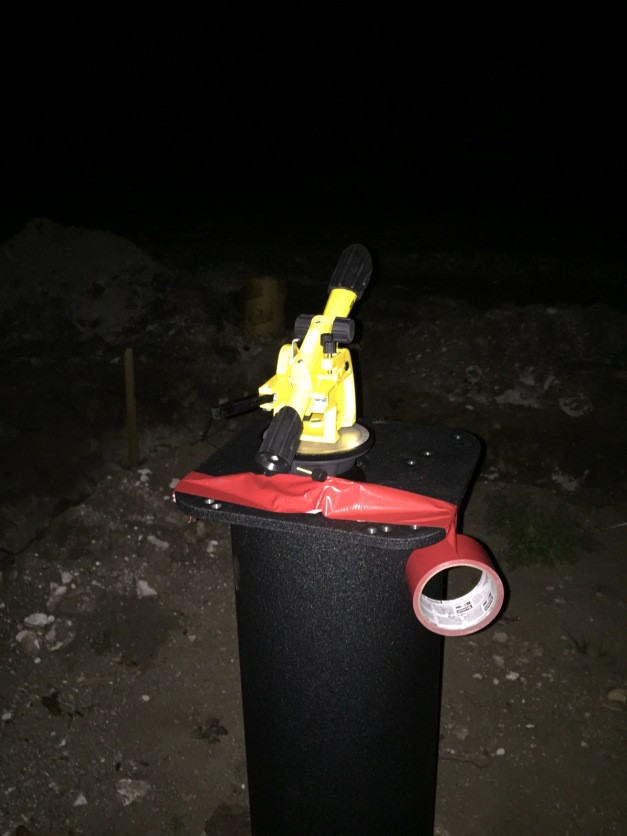
Yellow device used also by surveyors is called a Theodolite
This yellow device is called a theodolite, used by land surveyers. There is a low power spotting scope where you can sight Polaris and polar align your mount if necessary
Elevated observatories etc. A few folks I know have elevated their domes, placing the piers 30 feet or more above ground. Looks impressive but honestly, I have never been convinced that images are better by having your dome above ground convection. Yes, theoretically I understand the concept, but unless you are doing science, photometry, etc I think it’s unnecessary. It’s a huge expense which I am not sure is justified especially if you are budgeting for this project. However I have seen issues with cement observatory flooring that a few people out here have noticed. Cement is a significant heat sink and it can adversely affect seeing. If you do cement flooring you have to pay more attention to cooling down the observatory before starting your sessions. From what I have seen I think wood or similar material is a better choice.
You will need to run power and data to the observatory from wherever it comes in to the property. If you have a house you can run it from there. Use 2 separate conduits, one for data and one for power. Otherwise there can be degradation in data transmission due to interference if you run power and data together. Use fiber cable to the observatory, not ethernet cable. Fiber cable can be purchased in bulk very inexpensively. About 200 feet of fiber cable will cost $75. The advantages of fiber are that it is much faster than ethernet and also will isolate any surges, lightning strikes etc so for example if you do have a house that gets hit by lightning, the observatory will not be affected.
Weather monitoring
This may be the most important equipment you will need outside of your imaging equipment. A cloud monitor and an all sky camera are the 2 essentials. A cloud monitor, such as the Boltwood Cloud Sensor, can be integrated with your control software. It can shut everything down if desired in the event of clouds coming in or it can also provide an audible alarm which you can easily hear through a remote connection. In either case this is critical because you do NOT want to get rained on and you cannot have rain without clouds. These monitors will also record humidity, wind etc so you can in many cases direct your system to shut down under any one of a number of weather related scenarios , for example , if the humidity exceeds 75% or so. An all sky camera which functions also during the day (not all of them do) is also very useful. Local conditions vary and this can confirm conditions are good for imaging. If you are fortunate to be in a community with other astronomers who already own cameras that record images on a website, then you can save some expenses there!
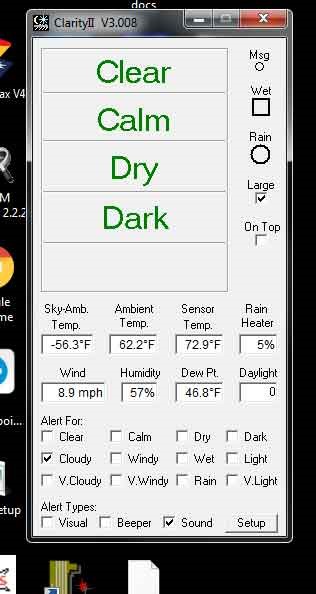
The Boltwood Cloud Sensor provides weather data that can be integrated with your automation software. This is the second most reliable piece of hardware I have installed. 1.5 years of continuous trouble free operations! Note the audible alarm is checked for “cloudy”. This can be heard through a remote connection. That’s what I use so admittedly I have to be extra conservative and not do any imaging if there is going to be even a chance of rain as you do get remote connection timeouts intermittently. I would have to employ scope sensor equipment to rely on automated emergency shutdown routines.
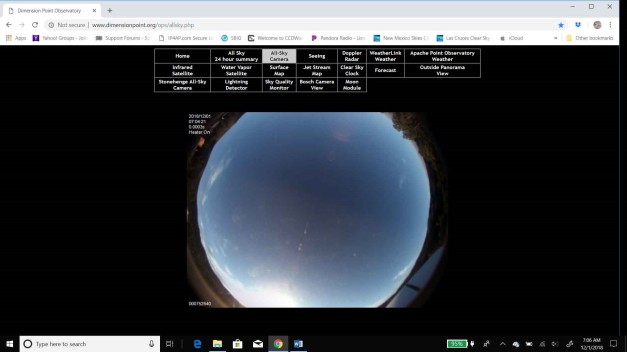
All sky camera courtesy of Dimension Point Observatory which is about 100 yards from me. Several other links exist on this site including weather forecasts, local seeing etc . This kind of information is indispensable when imaging remotely. I am extremely lucky to have neighbors who already have these resources available!
Communications. Turning on and off
Invest in a good reliable router at your observatory site. This is the brains of your set up. Understand how to access it and identify all of the components of your network.
Turning on and off equipment remotely is actually easier than I thought it would be. Many “web based controllers” exist that you can connect to your network and enable you to plug in your equipment, computers , router etc . You access the controller webpage remotely and all of your outlets are identified (mount, camera etc) where you simply click the “on” switch to turn on!
Some of these controllers can also be configured through a feature called “autoping” to reboot your router should your internet drop (see below)
Remote computing is pretty mainstream now. Several ways of doing this exist. Team Viewer for example is a reliable and free option.
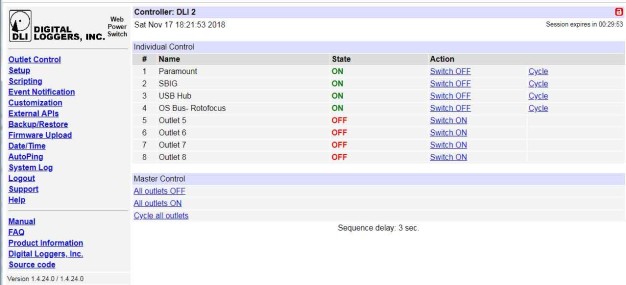
This is a simple to use web based outlet controller where you can turn on and off your equipment
Back ups and more backups. Emergency considerations
This is an ongoing learning process. Different methods will work for different setups. The bottom line is your job is to protect your equipment investment. Don’t get rained on and don’t suffer damage from electrical surges, wind etc. In other words you must always be able to shut down and close in a moment’s notice and have your equipment protected from unanticipated surges, lightning strikes etc. Use industrial grade surge protectors. (For example “brickwall.com” etc) Best practice is not to take any chances if the weather is iffy. Use multiple forecasts for your area. Check local doppler radar maps. I make sure I am not going to image if there is a definite system moving in over the next 24 hours. Check humidity. You can get fooled. Just because you are in a desert region does not mean you can’t have dew. At night the temperature can drop significantly to where you can definitely have dew formation, especially after a weather system has just passed. Here are some emergency scenarios and how to handle them.
Internet dropping– this is perhaps the most common issue. Digital Logger makes a web based controller you can program to reboot your internet if this happens. It can also reboot it successfully after a power failure
Power outages– these also happen periodically. Rarely are they long term but you must have back up battery power. A UPS unit (uninterruptable power supply) is a must for all of your equipment. Typically they can provide 2+ hours of additional power however the real purpose is to keep things going briefly until you can close your roof or dome and turn the equipment off. Some UPS units have a feature where you can connect a computer to them and program an instant notification via email or text to your home site when the main power supply goes down.
Equipment and software lockup. You should be able to cycle power off and on all of your devices if there is an operational hang. This should enable control to be restored. Computers can be set up to reboot if power is shut off and then turned back on again. This is usually accomplished in the Bios of your specific PC.
There are many other details to consider on the rode to successful remoting but these are what I believe to be some of the key points. I hope this information is helpful to those who might be considering “going remote! “
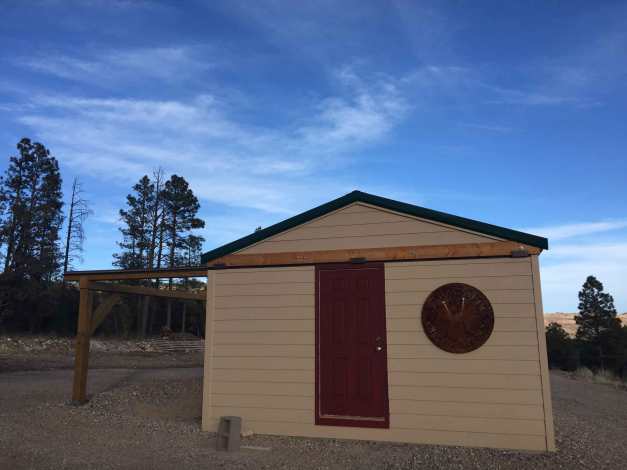 Orion’s Belt Remote Observatory, Mayhill NM


Pingback: The “Black screen of Death” and other trials of the remote imager | daveandtelescope