Can’t remember the last time I was actually “at the telescope”. Not with automation, executive programs, remote operations etc. However as luck or bad luck would have it I encountered another hardware failure on the now 9 month old Paramount. This time it was the PCB on the MKS 5000 control unit. So with my main imaging platform down I went back to basics. Back to the reason I came here in the first place. The dark sky! It’s still there. I happen to have a Tak FS102 refractor. This is a wonderful instrument. Let’s look at this for a minute. The FS-102 is one of the long discontinued Takahashi refractors. The FS series are some of the finest small refractors ever made yet supposedly for visual use only. Why is that? Did some “Dark Lord of Imaging” declare you can’t use it for that? Without going into a long treatise on refractive optics, let’s just say that the FS scope being a doublet lens design was replaced by the triplet lens designs (Tak TOA and TSA) which “supposedly” give better chromatic aberration correction which “supposedly” is better for imaging. Each wavelength of light coming through a lens “bends” or refracts at a different angle so without correction the red light comes to focus at a different point than blue, etc. Contemporary refractive optics (known as apochromatic using ‘ED’ or ‘extra low dispersion’ glass) were designed to correct for this and prevent what is known as chromatic aberration which appears visually as weird color fringes around objects. Apochromatic optics can consist of doublet lens or triplet lens designs.
But wait a minute. The FS is a fluorite doublet. Fluorite is not a glass. It’s a crystalline mineral and it has superior optical properties to glass , including very high transmission of light and low scatter. ‘FS’ stands for “Front Surface” meaning the fluorite element is on the front. It is true I obtained this scope mainly for visual use and the views are amazing here; strikingly better in my opinion than in my triplet William Optics refractor of similar size hands down. Outstanding crispness and color! I think it’s the best I’ve seen in a scope of this size. In my opinion if the scope gives you excellent optical performance visually, then why would that not translate to imaging performance? I decided to give it a try.
So under the incredible dark moonless night sky here at Orion’s Belt Remote Observatory in the Sacramento Mountains, with the Summer Milky Way coming in to full bloom over the horizon at about 10 pm, I set up the FS for an imaging session targeting an age old favorite: M20, the Trifid Nebula, in the constellation Sagittarius. The Trifid has everything in one package. It has an open star cluster, an emission nebula (the red portion), a reflection nebula (blue portion) and a dark nebula in the middle creating the trifurcated appearance. I have a small Tak guidescope mounted on the FS, just for occasions like this. I hooked up my Canon 60Da and connected the Lodestar X2 guide camera to the guidescope. I plugged the Lodestar into the guide port on my Celestron AVX mount and took about 3 hours of images! The steps were as follows:
1) Polar align the mount. I used Polaris and sighted it with a laser pointer. Pretty rough but adequate
2) Calibrate the mount. Most of the go to Celestrons do it the same way. Use the hand pad and punch in 4 stars, 2 on either side of the meridian. I put the Canon in “live view shoot” mode which is very handy because you don’t have to keep taking exposures to find the star you’re calibrating on. It is basically a video mode but very high sensitivity. It just works! I use the brightest stars out there.
3) Refocus. Once the calibration is complete I will focus on the last star. I use the live view mode and use the magnification function to blow up the star, then carefully focus until the star image is as small as possible. The FS focuser is very solid but it is not a dual Crayford style so you have to go slow.
4) Slew to M20. Take a 15 sec image and make sure the framing is what you want. In this case I had to use the hand pad to make small adjustments.
5) Finally you start the guiding process. I used PHD2 guiding software which is freeware and works with a number of guide cameras. Outstanding program! Very simple to use. I really was not sure what kind of guide performance this simple AVX mount would have but I was pleasantly surprised that it responds quite well to guide commands . It just works! All I did was plug the Lodestar into the port called “autoguide” and configure the PHD2 software. You pick a guide star on the screen and click on the guide button! Folks, it does NOT get any easier.
So that was it. Now you can be the judge! (see below) Honestly I think it did pretty well for a single 5 minute raw image! I will update you on the final result after processing etc. Couple of points. One is that you do need a flattener for this as you do for most refractors. I borrowed the one I was using for the William Optics which is identical diameter and close to the same focal length. The FS is an F8 where the WO is about F7. It seems to do the job as the stars are perfectly round to the corners of the image. Second point is you need to spend time focusing. There is no automation of this. This is just old fashioned adjust until it’s right.
Didn’t think this post was going to be this long but the night “back at the telescope’ was the most fun I’ve had in quite some time. So far I have not been the victim of any spells cast by the “Dark Lord of Imaging” !
Thanks for reading!
Dr Dave
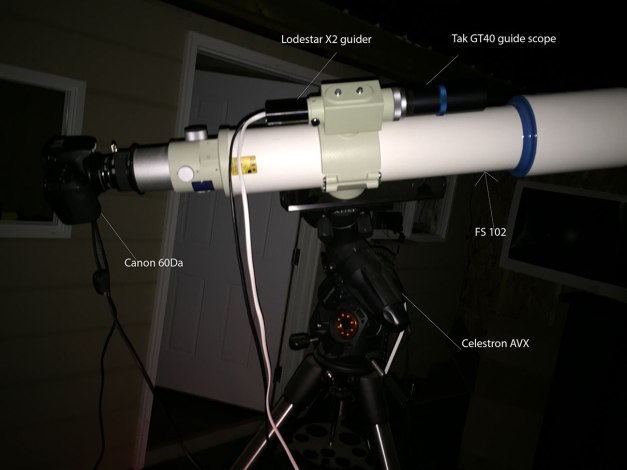
Back to basics imaging set up! Tak FS 102, Canon 60Da with flattener, Lodestar guider, Tak GT40 guidescope, Celestron AVX mount
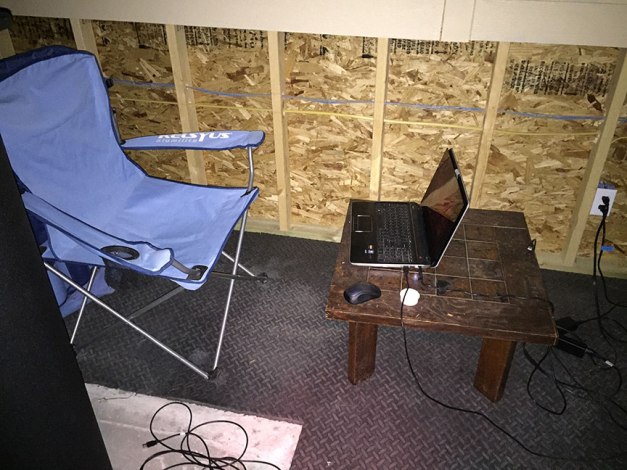
Ok so I’m not in the warm room! or in the astronomers quarters at the base of the hill watching it happen remotely. I am “at the telescope” under the glorious Milky Way while the images are being captured. I dropped the south wall down and did some binocular viewing during the session. This is astronomy folks!
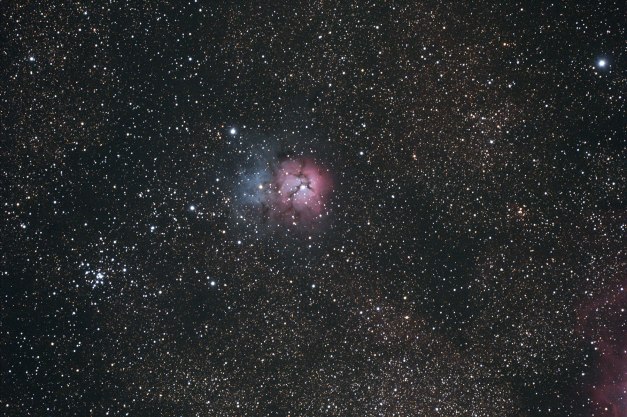
M20, the Trifid. 5 minute raw image with the set up shown above. A jewel in the stellar sea of the galactic center! You can see the edge of the Lagoon nebula in the lower right peeking through. Ok so I know it’s not a full res image. BUT at full resolution the stars are still round and not bloated. Can’t wait for the final result! Fluorite optics folks! That’s where it’s at …for refractors anyway 🙂


