Accurate alignment of the optical elements, typically 2 mirrors, of your telescope is known as “collimation”. Proper collimation is the key to success in astroimaging. It was time, probably overdue, for re-collimation of the 16” (400mm) RiDK telescope. I had not collimated the scope since around first light which was now about 1 ½ years prior. My bad on that , but I had not noticed any issues with star quality until very recently. Since I had to do maintenance on the mount, I thought it was a good time.
The RiDK is a corrected Dall-Kirkham Cassegrain telescope or ‘CDK’. ‘Ri’ are the first 2 letters of Riccardi who is the optical engineer for the Italian version of the CDK and manufactured by Officina Stellare. I believe it is basically similar to a Planewave CDK except the corrector lens is closer to the focal plane theoretically reducing chromatic aberration to zero. I chose this design for the main telescope because it’s much easier to collimate than just about any other reflecting telescope! The corrected Dall Kirkham Cassegrain, CDK, or in this particular case RiDK is a 2 mirror telescope with a corrector lens. The primary main mirror is a “prolate ellipsoid” or something in between a spherical mirror and a paraboloid, found in the classical Newtonian telescopes. The secondary mirror is a convex spherical mirror. A doublet lens is placed at the level of the primary, in the center of the optical train, to eliminate distortions in stellar images created by the raw spherical configuration of the secondary and to create a “flat” image through the entire field, in other words perfectly round stars from “corner to corner”. This arrangement is much easier to align than for example the Ritchey Cretien “RC” design which employs a hyperbolic primary and hyperbolic secondary. It’s also easier than Newtonian telescopes in my opinion as usually you have to collimate the secondary mirror as well as the primary. Often the secondary is offset from the center of the primary which hugely complicates things! In the RiDK scope, ease of collimation was confirmed when I first did it a while back. It wasn’t too bad at all right out of the crate. Initially around 6 arc sec off, I was able to reduce that to less than 1 fairly easily with small 1/10-1/8 turns of the primary mirror collimation screws.
The method I have used time and time again is a software based algorithm. CCDWare’s CCD Inspector or ‘CCDI’ is the application. In order for this to work well I think a few things have to be true:
1) Collimation is “in the ball park” which is difficult to quantify but I would say if you have confirmed with a Cheshire eyepiece or similar it looks right and you are ready for star testing then you’re good. I’m going to guess that means it’s not more than 15 arc seconds off at most but that number is a guess
2) Only one mirror needs adjusting, either the primary or secondary but not both
3) Your telescope is not fast, i.e F/5 or lower
As an example a while back I tried unsuccessfully to collimate my Tak 180 using this method alone. This is a unique optical system with an offset secondary and a super fast F/2.8 focal ratio! So 2 of the 3 criteria were not met.
So how does this work? Before that I just want to point out the great thing about this method is that you are testing on an imaged star which is what the goal is anyway. I think it’s harder to do this visually with an eyepiece because the small changes are difficult to be certain of. CCDI gives you an actual number in arc seconds so you know exactly what your corrections are accomplishing quantitatively. Plus you can use the camera set up you are actually imaging with.
For best results you will need the following:
1) Ability to place a star in the true center of the image field. Most camera acquisition programs will have the option of adding a cross hair to the screen. This is necessary.
2) Knowledge of the focus position of your set up such that you can reach a defocused position yielding a star image which is a minimum of 200 pixels in diameter
3) At least average seeing. This is going to limit how much of a correction can be made.
First you will need to install CCD inspector here. There is a free trial period of I believe about 30 days
Open the program. Go to the settings tab and click on “default image properties”
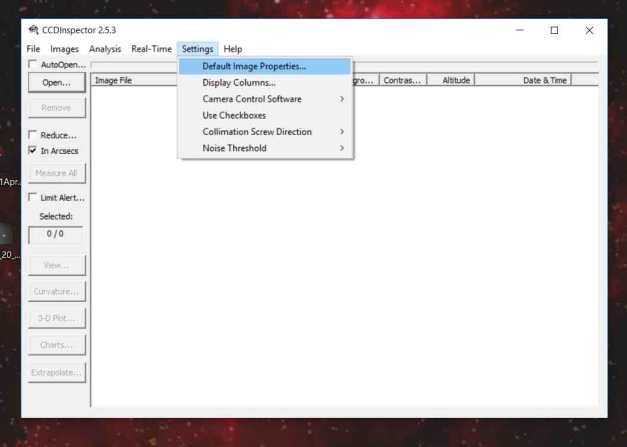
Settings > Default image properties
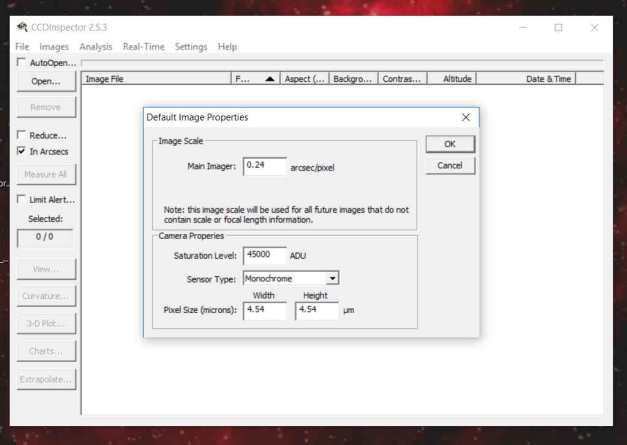
Enter image scale and pixel size of your imager. Saturation level for most applications is not critical.
Here you will enter your main imager’s specs as above: image scale etc.
Next you will need to tell the program what camera control software you are going to use. If you are not using either CCDSoft or Maxim then click on ‘Generic’. It does not matter what program you use as long as you indicate to CCDI where the files are going to be saved. This is the key.
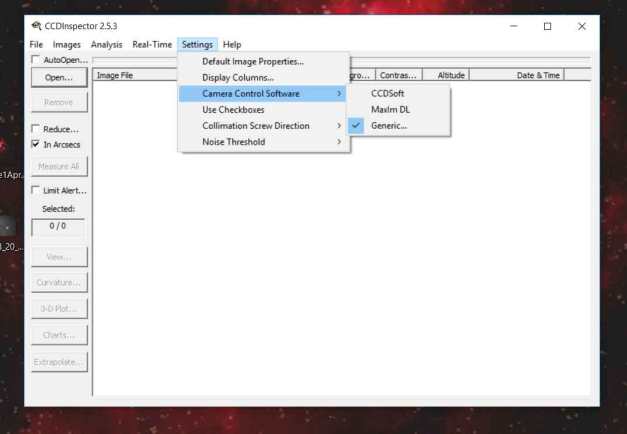
Use the “Generic” setting if not using either CCDSoft or Maxim
When you click on Generic, Windows explorer will open and you will be able to choose where CCDI needs to look for the saved image files. I would recommend doing this first in your camera program where you will need to tell it to autosave the files and select the folder where you want to save them. If you are using The Sky X autosave, my suggestion is to turn off the option to create a new folder for each date. This will be confusing to CCDI.
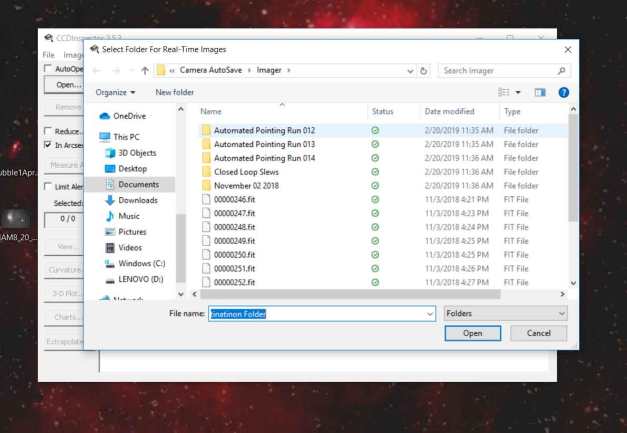
Clicking on “generic” pulls up the Windows explorer to select folder for “real time” images
We are now ready to begin the process! First slew to a medium bright to very bright star. This will take some trial and error to find the right combination of exposure time and magnitude for your optics. CCDI will tell you if you are on the right track. You will get an error message “star distorted or too bright” or “star too dim”. Remember to select “autodark” in your capture program and typically bin 1×1. For my 16″ F/7 scope I used a 4+ magnitude star for this with an exposure of 2.5 seconds to get consistent readings. You will need to get consistent readings without error messages to do this accurately. Also you might need to subframe your image depending on the size of your sensor. For example I am using a full frame 16803 sensor with 4096 x 4096 pixels. In The Sky X, I used the subframe option with 1/4 frame selected. This resulted in 1000 or so pixel square which worked well. If you have a medium sensor you might not need to use this feature. Just see what happens when you take several exposures. If , for example, you get 2 or 3 readings, then a bunch of error messages with “too bright”, then “too dim”, then “too bright” etc., you should definitely try subframing.
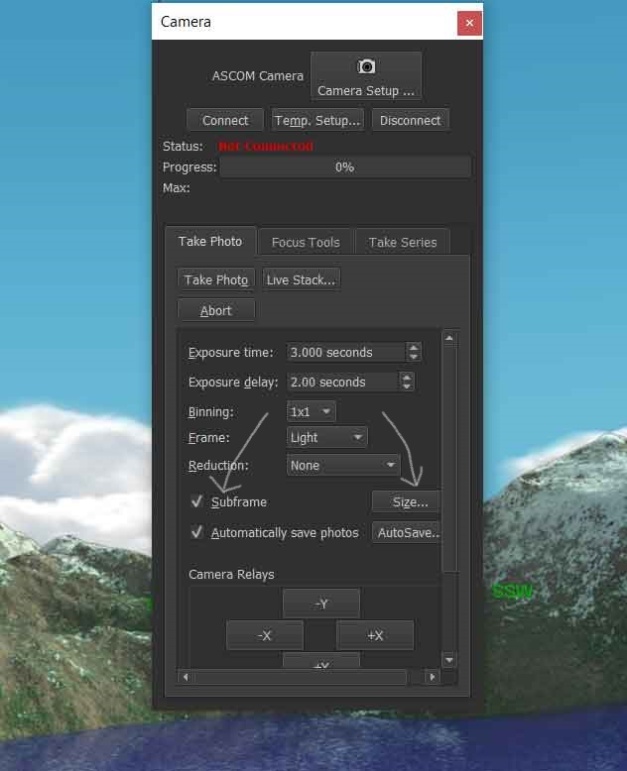
In The Sky X program you can select “subframe” and “size” . Note also “autosave” is checked. Once you select “size” you are brought to a screen where you can specify how small you want the frame down to 1/4 of the full size
Next confirm you are at or near focus and the star is dead center in the frame. I use the “closed loop slew” feature in The Sky X which will plate solve the image and move the star to the center automatically. Use a hand paddle if that’s what you have. You just need to make sure it’s centered.
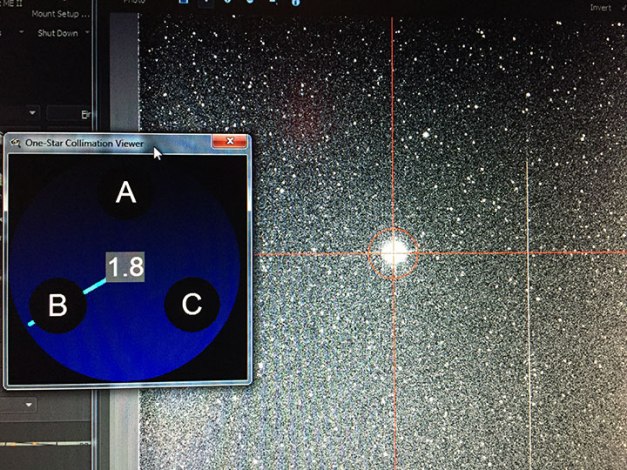
Star is centered to begin the process. The live collimation viewer is seen on the left. The number is in arc sec.
Once it’s centered then you need to defocus the star image. Move to a focus position where the defocused image is no less than 200 pixel diameter. Now I would point out there is nothing wrong with defocusing the star first and centering that manually. You can continue to do that without having to refocus etc., but I decided to make use of the closed loop slew feature which requires focused stars in order to plate solve the image. Once the star is centered, go to CCDI program and open the collimation viewer.
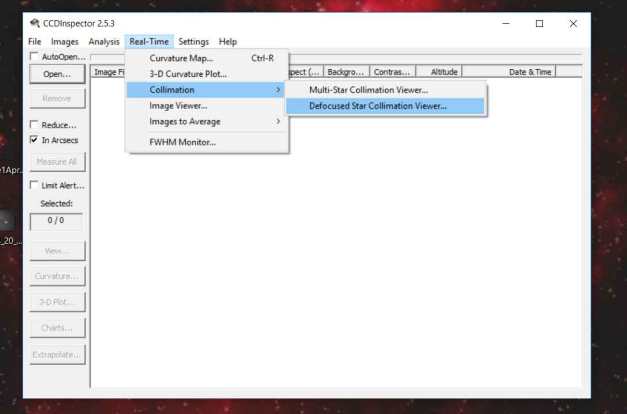
Go to “collimation” > “Defocused Star Collimation Viewer”
You can also select “images to average” also under the “Real-Time” tab. I usually do just one to make sure the readings are consistent. The exposures are typically short.
Next take an exposure. You should have the collimation viewer open on your screen (see above). If you don’t get a reading or an error message, i.e. nothing happens in the viewer, that probably means you don’t have the file saving set up right or perhaps you have inadvertently selected multiple images to average. Again, make sure the folder you select in CCDI (click on the “generic” tab under camera control in settings) is the same as the the folder your camera control software is autosaving to.
Take several exposures to make sure the readings you are getting are consistent, i.e. the arrow is pointing in roughly the same direction every time and the collimation number in arc seconds is also about the same. For my first run I was getting 7-10 arc seconds in the same direction.
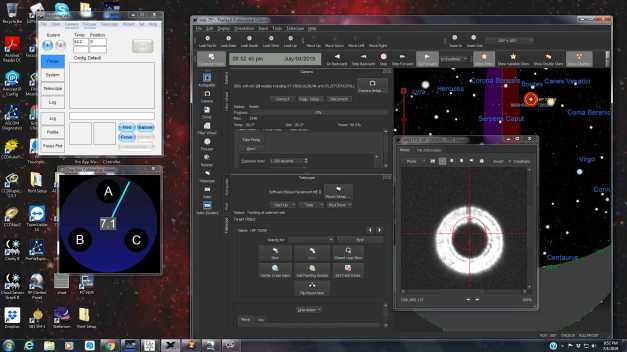
The collimation viewer is seen to the left reading 7.1. This was my initial starting point
Once you get several readings you are ready to make a correction. The goal is to tilt the primary mirror in the direction of the arrow. If you are working with a secondary mirror such as in an RC scope (e.g Astrotech model etc) you might have to move the secondary mirror OPPOSITE the arrow. You will have to trial and error it to see which collimation screws move the mirror in which direction. Label the screws as you are doing it. Start with very small movements of the screw, not more than maybe 1/16 of a turn.
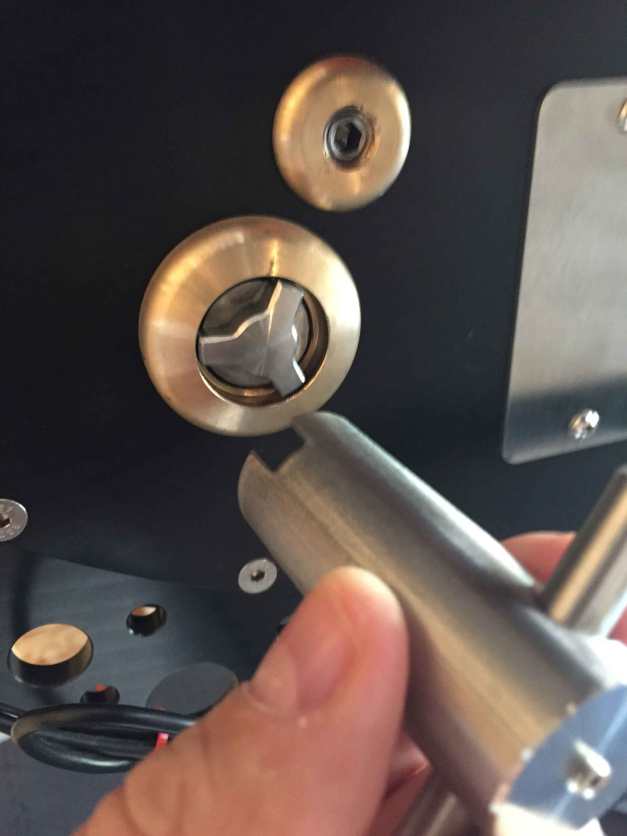
For my RiDK 16″, there is a collimation wrench for the primary screws. There are 3 set screws, one with each collimation screw (above the collimation screw and to the right slightly) which are loosened prior to collimation. One full turn of a collimation screw moves the mirror 1mm!)
After you make the small screw turn(s), take another image and you should see the defocused star move in the direction of the arrow if you have figured out your screws’ directions properly. Next what I did was refocused the star, recentered it, then defocused again. Take your image. You should see an improvement in the arc sec number. Perhaps a more efficient way of doing this if you are using The Sky X is to calibrate your main imager as an autoguider. Then you can right click on the center of the defocused star and it will recenter the star without you having to refocus, closed loop slew etc. I did not do that, but it really did not take more than 30 seconds to go through the routine I did.
After several iterations of this you should ideally be getting consistent readings at least below 5 arc sec, depending on seeing. In average seeing you should be able to get perhaps 3 or less. At a certain point you will start to see the arrow acting “weird” meaning it will point up after one exposure, then point down after a second exposure and then point to the side, etc. This means you are done!

After several iterations we got consistent readings less than around 2 arc sec but the arrow was flipping around so we are done for this session. Seeing was around 2-2.5 arc sec
And that is how I recollimated my RiDK , and also how you can collimate your reflector!
Thanks for reading!
Dr Dave


